
Acottontail's probally a journal
Forum Index > PokéFarm > Journals >


I'm going to list some of my most favorite pokemon here, going in dex order. Trying to keep this list to my top favorites, this list was a bit hard to make as I kept being like "I like that pokemon, but is it my favorite?" (Sorry Unova and Alola, not many pokemon really jump out at me)


 And now for the pokemon that I like (I like most pokemon, these are more like secondary favorites)


 Not to sure about my secondary favorites for gens 3 and 4. I like a lot of pokemon, but how much is the question.
And now for the pokemon that I like (I like most pokemon, these are more like secondary favorites)
Not to sure about my secondary favorites for gens 3 and 4. I like a lot of pokemon, but how much is the question.


retelling of Nakoma's Arena Gym, not exact words.
A trainer walks into the gym over-confidently. She saw a group of strong yet untrained looking pokemon at the back of the gym, but she was fully confident her pokemon were stronger. She was ready to have some fun, but had her secret weapons(well pokemon) up her sleeve in case things got to out of hand, before realizing that most of the gym leader's pokemon were resistant to their typings. "Hello I would like to challenge the Nakoma's Arena gym." The gym leader pointed to his Tyrantrum. ACottontail threw a pokeball, "Go special!". Tyrantrum charged forward with all his might, but SPECIAL was able to take him down with a flash cannon. VSx
VSx x
ACottontail sent out Barritone next. ACottontail smiled at the successful battle. Then she remembered, Pokemon need to be at least level 45, Barritone was level 39. She had messed up.
VSx
x
ACottontail sent out Barritone next. ACottontail smiled at the successful battle. Then she remembered, Pokemon need to be at least level 45, Barritone was level 39. She had messed up.
VSx x
"Oh my Areceus I forgot about the level rule. I'm so sorry, I messed up. I assume this auto disqualifies me." ACottontail started to spiral.
"Don't worry about it. I made that rule a while ago, before I found out pokemon are auto set to level 50 in battle. I'm about to send in my level 95 Gogoat so we're good. No Man's Sky charged in from behind Nakoma. ACottontail sent out Diamond. No Man's Sky attempted a solar beam. Diamond ran up to him and sucker punched him. Lept back and stuck her hand into the ground. Ice pillars increasing in size rose out of the ground until hitting No Man's Sky, who fainted.
x
"Oh my Areceus I forgot about the level rule. I'm so sorry, I messed up. I assume this auto disqualifies me." ACottontail started to spiral.
"Don't worry about it. I made that rule a while ago, before I found out pokemon are auto set to level 50 in battle. I'm about to send in my level 95 Gogoat so we're good. No Man's Sky charged in from behind Nakoma. ACottontail sent out Diamond. No Man's Sky attempted a solar beam. Diamond ran up to him and sucker punched him. Lept back and stuck her hand into the ground. Ice pillars increasing in size rose out of the ground until hitting No Man's Sky, who fainted.
 VSx
VSx x
"Wow this battle looks like so much fun. Just take the badge, I got to get into this. Nakoma himself has challenged ACottontail... ACottontail was caught off guard and tossed a random pokeball from her pocket. She looked up to remeber Nakoma was a Nidorino, not some legendary. Dawn looked down from her book to the Nidorino who just poked her foot. With a wave of her hand she unleashed some psychic energy, then resumed reading.
x
"Wow this battle looks like so much fun. Just take the badge, I got to get into this. Nakoma himself has challenged ACottontail... ACottontail was caught off guard and tossed a random pokeball from her pocket. She looked up to remeber Nakoma was a Nidorino, not some legendary. Dawn looked down from her book to the Nidorino who just poked her foot. With a wave of her hand she unleashed some psychic energy, then resumed reading.
 VSx
VSx x
"Thanks for the battles," ACottontail said. Nakoma was resting on the floor. ACottontail took the badge, and went onto the next adventure.
x
"Thanks for the battles," ACottontail said. Nakoma was resting on the floor. ACottontail took the badge, and went onto the next adventure.
 So that was Nakoma's Arena Gym
A trainer walks into the gym over-confidently. She saw a group of strong yet untrained looking pokemon at the back of the gym, but she was fully confident her pokemon were stronger. She was ready to have some fun, but had her secret weapons(well pokemon) up her sleeve in case things got to out of hand, before realizing that most of the gym leader's pokemon were resistant to their typings. "Hello I would like to challenge the Nakoma's Arena gym." The gym leader pointed to his Tyrantrum. ACottontail threw a pokeball, "Go special!". Tyrantrum charged forward with all his might, but SPECIAL was able to take him down with a flash cannon.
VSxx
ACottontail sent out Barritone next. ACottontail smiled at the successful battle. Then she remembered, Pokemon need to be at least level 45, Barritone was level 39. She had messed up.
VSxx
"Oh my Areceus I forgot about the level rule. I'm so sorry, I messed up. I assume this auto disqualifies me." ACottontail started to spiral.
"Don't worry about it. I made that rule a while ago, before I found out pokemon are auto set to level 50 in battle. I'm about to send in my level 95 Gogoat so we're good. No Man's Sky charged in from behind Nakoma. ACottontail sent out Diamond. No Man's Sky attempted a solar beam. Diamond ran up to him and sucker punched him. Lept back and stuck her hand into the ground. Ice pillars increasing in size rose out of the ground until hitting No Man's Sky, who fainted.
VSxx
"Wow this battle looks like so much fun. Just take the badge, I got to get into this. Nakoma himself has challenged ACottontail... ACottontail was caught off guard and tossed a random pokeball from her pocket. She looked up to remeber Nakoma was a Nidorino, not some legendary. Dawn looked down from her book to the Nidorino who just poked her foot. With a wave of her hand she unleashed some psychic energy, then resumed reading.
VSxx
"Thanks for the battles," ACottontail said. Nakoma was resting on the floor. ACottontail took the badge, and went onto the next adventure.
So that was Nakoma's Arena GymAxew hunt
1,362/5/1


 I wish I could have hatched another Albino. Though Lizzu is amazing, so I'm pretty happy with her.
I'm ending my hunt due to the type race. I'm going to try for Pawniard next. (I'm so tired right now...)
I wish I could have hatched another Albino. Though Lizzu is amazing, so I'm pretty happy with her.
I'm ending my hunt due to the type race. I'm going to try for Pawniard next. (I'm so tired right now...)
I wish I could have hatched another Albino. Though Lizzu is amazing, so I'm pretty happy with her.
I'm ending my hunt due to the type race. I'm going to try for Pawniard next. (I'm so tired right now...)So I started my Pawniard hunt. I decided to try to go for one with (Near) perfect IVs and nature. I tried to hatch a water delta, but it didn't work out. Though instead I got a delta albino, which is pretty cool. I named her after the Tibia bone, as I felt the name was fitting for a pretty much literal skeleton. I also got a delta rock type, which is good for countering those fire types they are weak to.(And a normal type one).


 I was also going for perfect IVs + adamant nature because it would be good for battles. I got very close, and I'm taking it. I got an adamant 31-31-30-28-31-31 Pawniard. This guy feels like my first self-breed perfect IV pokemon. Well not quite but I'm satisfied with him. I can imagine my 3 delta Pawniards making a super special group and this guy wanting to join it. Tibia thinks she is super special, when this guy is near perfect IV.
 I guess I'll keep hunting. I'm half hoping for a shiny, though really I don't know what to hunt next. Though I feel a bit guilty about releasing all the parents used to breed these guys, but I need the field space.
And I just hatched another near perfect Pawniard.
I guess I'll keep hunting. I'm half hoping for a shiny, though really I don't know what to hunt next. Though I feel a bit guilty about releasing all the parents used to breed these guys, but I need the field space.
And I just hatched another near perfect Pawniard.
 She has 31 in defense and 27 in special attack, I just don't know who to train anymore. I hope they release a mega for Bisharp soon, then I could train both. But until that day...
Also finally got a shiny at a chain of 1/1469. Yeah.
She has 31 in defense and 27 in special attack, I just don't know who to train anymore. I hope they release a mega for Bisharp soon, then I could train both. But until that day...
Also finally got a shiny at a chain of 1/1469. Yeah.
 I got another one at a chain of 1785. Sally just knows how much I love special attack boosting nature Pawniard when I'm hunting for one to battle with.

Anyway Christmas was great. I got a Lanturn, Aron, Armaldo, Articuno and Spheal plushes, on top of the Spinarak plush I got for my birthday. I also got an Igglybuff plush, and I started laughing at the unintentional PMD reference. I also got Digimon cyber sleuth, and I only found out after I get my Digimon to level 50 that I need to digivolve more in order to get megas... That and PlatinumNumemon is taking forever to get, and they boost the amount of exp you get in battles. I wanted an Anorith plush but they have them literally nowhere. I recently got into papercraft pokemon. I currently made a chibi Spheal and chibi Hophip. Right now I am working on an Anorith! I'm happy that I can make my own Anorith, but papercraft is a lot of work, and my jaw dropped when I saw the template for Anorith. But I tried it, and I'm doing a pretty good job so far. (Note when I mean papercraft I don't mean those super blocky ones. I mean outright making the thing out of paper. Spheal and Hophip are in the pokemon rumble style because it's easier to do and I like that style. The Anorith is literally an Anorith out of paper, and some of the pieces are so tiny!)
Also I made literally zero progress on my new years resolution this year. Maybe this year I'll learn how to use a real game engine, so I can finally get to work on the game I've been wanting to make.(And this will be painful to look at next year as I am sure I will still make zero progress.)
I was also going for perfect IVs + adamant nature because it would be good for battles. I got very close, and I'm taking it. I got an adamant 31-31-30-28-31-31 Pawniard. This guy feels like my first self-breed perfect IV pokemon. Well not quite but I'm satisfied with him. I can imagine my 3 delta Pawniards making a super special group and this guy wanting to join it. Tibia thinks she is super special, when this guy is near perfect IV.
I guess I'll keep hunting. I'm half hoping for a shiny, though really I don't know what to hunt next. Though I feel a bit guilty about releasing all the parents used to breed these guys, but I need the field space.
And I just hatched another near perfect Pawniard.
She has 31 in defense and 27 in special attack, I just don't know who to train anymore. I hope they release a mega for Bisharp soon, then I could train both. But until that day...
Also finally got a shiny at a chain of 1/1469. Yeah.
I got another one at a chain of 1785. Sally just knows how much I love special attack boosting nature Pawniard when I'm hunting for one to battle with.
Anyway Christmas was great. I got a Lanturn, Aron, Armaldo, Articuno and Spheal plushes, on top of the Spinarak plush I got for my birthday. I also got an Igglybuff plush, and I started laughing at the unintentional PMD reference. I also got Digimon cyber sleuth, and I only found out after I get my Digimon to level 50 that I need to digivolve more in order to get megas... That and PlatinumNumemon is taking forever to get, and they boost the amount of exp you get in battles. I wanted an Anorith plush but they have them literally nowhere. I recently got into papercraft pokemon. I currently made a chibi Spheal and chibi Hophip. Right now I am working on an Anorith! I'm happy that I can make my own Anorith, but papercraft is a lot of work, and my jaw dropped when I saw the template for Anorith. But I tried it, and I'm doing a pretty good job so far. (Note when I mean papercraft I don't mean those super blocky ones. I mean outright making the thing out of paper. Spheal and Hophip are in the pokemon rumble style because it's easier to do and I like that style. The Anorith is literally an Anorith out of paper, and some of the pieces are so tiny!)
Also I made literally zero progress on my new years resolution this year. Maybe this year I'll learn how to use a real game engine, so I can finally get to work on the game I've been wanting to make.(And this will be painful to look at next year as I am sure I will still make zero progress.)
I was thinking of maybe starting up a sprite school again. Though I would need to type up all of the lessons first to avoid the burnout I got last time. So I feel like putting everything I know about spriting in one place. But first some rambling.
I feel like all sprites are just the same skills over and over again. Mastery over recoloring, fusion and scratch can make about 95% of sprite types out there. Still I feel like once you get the hang of making a sprite you get it. You don't need to complete 15+ more sprites of the same type to be certified/graduate a class if you prove you got the hang of it after 3. In fact I actually start offering types of sprites in my sprite shop after only making two of that type most of the time, because I already got the hang of it.
I feel like every sprite school so far gives all the assignments in a course, regardless of skill, and pass you if you do all of them okayish. I want to start up a school that keeps required lessons down to a minimum, and moves on if the person gets the point. I also want to give feedback. I feel like that is very important for a growing spriter. I browse though sprite schools, and I really wish more of them gave feedback other than cool, or good, or just the next assignment.
My collection of spriting knowledge (I intend to make it into a school once I typed everything out, but right now this is a messy wip): A simplified sprite is a sprite where you remove all of the shading and lines from a sprite. Make sure you use the base color and not any shading or highlight colors for the sprite. If there are small details, such as a face, replace it with the color that is behind it.


 The first step to devamping a pokemon is to get a gen 1 sprite with a similar color scheme to the pokemon your devamping. A devamp only has 4 colors, white, lighter color, darker color and black. This turns into the pokemon having two colors, white with lighter color shading, and lighter color with darker color shading. You want to decide which colors of the sprite you'll make lighter and which parts you'll make darker. Then recolor them. Make all of the outlines black. I find this method makes devamps look better than if you made all the colors of a devamp correspond to different shades of colors in a sprite.
 But what if a sprite has many colors you may ask. In these cases use a gen 1 sprite with the color most similar to the main color and you have to try your best to place the rest of the colors. Generally make all of the places of one color the same color, and make color right next to each other different colors.
None of this applies to devamps in the gen 2 style, where you use two different colors instead of the lighter color and a darker color. However I am clueless when it comes to doing these so I can't be of much help...
But what if a sprite has many colors you may ask. In these cases use a gen 1 sprite with the color most similar to the main color and you have to try your best to place the rest of the colors. Generally make all of the places of one color the same color, and make color right next to each other different colors.
None of this applies to devamps in the gen 2 style, where you use two different colors instead of the lighter color and a darker color. However I am clueless when it comes to doing these so I can't be of much help...
 It's not an animated recolor. It's not putting sprites from multiple generations together. This is making your very own animations for sprites. This is done by converting the sprite into a vector sprite, moving it around, cleaning up the images then converting it to a gif.
For these lessons you will need a program called Scratch 2.0. You can get the program here. The program was designed to be an educational coding program, but we are interested in it's art editor.
These lessons were made with a computer in mind. Scratch 2.0 won't work on most tablets and phones.
If your reading this could you PM me some things you think I should teach in the sprite school I opened up.
Guides to make - gijinka, revamp, eggs, pokeballs, chibi runners
It's not an animated recolor. It's not putting sprites from multiple generations together. This is making your very own animations for sprites. This is done by converting the sprite into a vector sprite, moving it around, cleaning up the images then converting it to a gif.
For these lessons you will need a program called Scratch 2.0. You can get the program here. The program was designed to be an educational coding program, but we are interested in it's art editor.
These lessons were made with a computer in mind. Scratch 2.0 won't work on most tablets and phones.
If your reading this could you PM me some things you think I should teach in the sprite school I opened up.
Guides to make - gijinka, revamp, eggs, pokeballs, chibi runners
My collection of spriting knowledge (I intend to make it into a school once I typed everything out, but right now this is a messy wip):
Simplified
A simplified sprite is a sprite where you remove all of the shading and lines from a sprite. Make sure you use the base color and not any shading or highlight colors for the sprite. If there are small details, such as a face, replace it with the color that is behind it.gijinka design advice
This guide will be assuming you are trying to make the gijinka 100% human. I've seen many gijinkas that just put on ears and a tail, recolor and call it done. This guide will focus on more creative ways to make gijinkas. If you really want to make your gijinka part pokemon go for it.
My biggest piece of advice for making a fully human gijinka is to make it make sense. Way to often I've seen ears and tails put on gijinkas that make very little sense if the gijinka was suppost to be human. Unless you are making a literal hybrid, make sure everything you put onto the gijinka makes sense if they were a human.
My second biggest piece of advice is to design the gijinka based on the pokemon your using, not the trainer. Very often I see a recolored trainer with a few pokemon parts put on. This makes the gijinka based on the trainer you are using. Instead you should design each part of the gijinka based on the pokemon, grabbing and editing parts from other trainers as you see fit.
Section I - Hair
 Two of the biggest pitfalls I see when making a gijinka's hair is just recoloring it, and just adding the ears as they are to it.The problem with just recoloring it is that very often there is more you can do.
The problem with just adding ears to it is that it makes zero sense. The inside parts of ears imply that the gijinka actually has the ears, which makes little sense if they are suppost to be humans.
Two of the biggest pitfalls I see when making a gijinka's hair is just recoloring it, and just adding the ears as they are to it.The problem with just recoloring it is that very often there is more you can do.
The problem with just adding ears to it is that it makes zero sense. The inside parts of ears imply that the gijinka actually has the ears, which makes little sense if they are suppost to be humans.
 In order to fix this recolor the insides of the ears to the color of the surrounding ear. Realistically someone could make their hair like that(or at least realistic by anime logic), and thus it makes sense.
 However there is more you can do than just ears. When making a gijinka you should aim to make the hair try to replicate the pokemon's head. In this case, adding the small spikes Jolteon has. You don't even have to include ears in a gijinka if you don't want to. Just making the hair spikey in this case would also work.
 You don't even have to stick with the very top of the head. For example this gijinka has a long straight orange strand of hair, which is suppost to represent Zapados's beak.
 Sometimes when making a gijinka things will be a bit big, such as the ears. In these cases you can either grab parts off of the minisprites like the former gijinka, or you could shorten the part yourself like the latter gijinka.
 Though one place where leaving the ears unaltered would work is with hats. Logically someone could make a hat that has markings on it that look like the inside of the ear. There are other assories you can use to, such as hair arches and barrets can you could incorporate into a gijinka's design too.
Part 2 - Face and pose
You should try to give the gijinka you are making a face and pose to try to match the mood of the pokemon you are making it of. This usally leads to fusing multiple trainer sprites together in order to get what you are looking for. Be careful about altering the face around the nose. Very often the nose is baked into the shading, and altering that part of the face can remove it completely.
Though one place where leaving the ears unaltered would work is with hats. Logically someone could make a hat that has markings on it that look like the inside of the ear. There are other assories you can use to, such as hair arches and barrets can you could incorporate into a gijinka's design too.
Part 2 - Face and pose
You should try to give the gijinka you are making a face and pose to try to match the mood of the pokemon you are making it of. This usally leads to fusing multiple trainer sprites together in order to get what you are looking for. Be careful about altering the face around the nose. Very often the nose is baked into the shading, and altering that part of the face can remove it completely.
Two of the biggest pitfalls I see when making a gijinka's hair is just recoloring it, and just adding the ears as they are to it.The problem with just recoloring it is that very often there is more you can do.
The problem with just adding ears to it is that it makes zero sense. The inside parts of ears imply that the gijinka actually has the ears, which makes little sense if they are suppost to be humans.
In order to fix this recolor the insides of the ears to the color of the surrounding ear. Realistically someone could make their hair like that(or at least realistic by anime logic), and thus it makes sense.
However there is more you can do than just ears. When making a gijinka you should aim to make the hair try to replicate the pokemon's head. In this case, adding the small spikes Jolteon has. You don't even have to include ears in a gijinka if you don't want to. Just making the hair spikey in this case would also work.
You don't even have to stick with the very top of the head. For example this gijinka has a long straight orange strand of hair, which is suppost to represent Zapados's beak.
Sometimes when making a gijinka things will be a bit big, such as the ears. In these cases you can either grab parts off of the minisprites like the former gijinka, or you could shorten the part yourself like the latter gijinka.
Though one place where leaving the ears unaltered would work is with hats. Logically someone could make a hat that has markings on it that look like the inside of the ear. There are other assories you can use to, such as hair arches and barrets can you could incorporate into a gijinka's design too.
Part 2 - Face and pose
You should try to give the gijinka you are making a face and pose to try to match the mood of the pokemon you are making it of. This usally leads to fusing multiple trainer sprites together in order to get what you are looking for. Be careful about altering the face around the nose. Very often the nose is baked into the shading, and altering that part of the face can remove it completely.Fusion/retype design
To get the best results for the designs of fusions and retypes I suggest sketching them out first. A pitfall I see in sprites where the spriting starts immediately is that it often looks like parts are just pasted onto the pokemon because it's easy to make. To make better designs for my sprites I plan out the sprite first by sketching it. You don't even have to draw the entire pokemon. Just draw the designs of body parts until you can get an image of how the sprite looks like in your head. You don't even have to draw that well, as long as you can get a picture of the design in your head, your good.
Often when I start making a sprite I get overwhelmed. I know I have to do all these thing for the design, and it just feels like to much. What I do is take a breath and focus on one small part at a time. Once I finish one step I move onto another. I keep going until I'm happy with the sprite, or I added everything I want to add onto it.
Fusion design advice:
When making fusions don't just put parts of one pokemon onto another. Try to fuse the very essence of the pokemon themselves. Look at body parts of both pokemon and think 'how can I fuse these elements together' or 'how can I create something new from these parts'. You are free to put body parts onto the fusion where neither had those parts to begin with. You can also use parts for stuff they were never meant to be in the first place.
 Take this Manelectric Abomasnow fusion. See how Abomasnow's arms are used for floof? By using parts in unusual ways I created one of my favorite fusions. You may be wondering what colors to make a fusion. My answer is whatever looks nice. Don't be afraid to make the fusion the colors of the "base" if it looks good. Don't forget shiny pallets are also available. If you really want to you can even use colors neither of the pokemon have if they look nice and add to the design your looking for.
Retype design advice:
When making a retype I suggest adding in a theme on top of the retype. It's easy to just add fins to Megaium to make it a water type. However think of this. There are multiple plants that are related to water, such as sea weed, and lillypads. Imagine a Megaium with a lilly pad around it's neck and a lilly pad flower on it's head. I feel like adding a theme to retypes make it much more interesting than just adding parts of said type onto a pokemon.
Take this Manelectric Abomasnow fusion. See how Abomasnow's arms are used for floof? By using parts in unusual ways I created one of my favorite fusions. You may be wondering what colors to make a fusion. My answer is whatever looks nice. Don't be afraid to make the fusion the colors of the "base" if it looks good. Don't forget shiny pallets are also available. If you really want to you can even use colors neither of the pokemon have if they look nice and add to the design your looking for.
Retype design advice:
When making a retype I suggest adding in a theme on top of the retype. It's easy to just add fins to Megaium to make it a water type. However think of this. There are multiple plants that are related to water, such as sea weed, and lillypads. Imagine a Megaium with a lilly pad around it's neck and a lilly pad flower on it's head. I feel like adding a theme to retypes make it much more interesting than just adding parts of said type onto a pokemon.
evolution design
When making an evolution for a pokemon try to avoid bigger mon syndrome. I notice in a lot of fan evolutions they take the pokemon, make it bigger, and add stuff onto it. Almost no evolution line does this in pokemon. Take the Squirtle line. All members of the line have different tails and ears. Instead of being an in-between for Squirtle and Blastoise, Wartortle has it's own identity by having white wavy ears and a tail no other member has, and also has blush. While at the same time Wartortle looks like a middle evolution, and keeps the theme of being blue turtles in it's design, which prevents it from looking like it's from a completely different evolution line. Almost every pokemon is like this. So when designing an evolution for a pokemon or fakemon instead of making it a bigger or smaller version of the pokemon, try to give it it's own identity while still fitting in with the line.
devamping pokemon, gen 1
The first step to devamping a pokemon is to get a gen 1 sprite with a similar color scheme to the pokemon your devamping. A devamp only has 4 colors, white, lighter color, darker color and black. This turns into the pokemon having two colors, white with lighter color shading, and lighter color with darker color shading. You want to decide which colors of the sprite you'll make lighter and which parts you'll make darker. Then recolor them. Make all of the outlines black. I find this method makes devamps look better than if you made all the colors of a devamp correspond to different shades of colors in a sprite.
But what if a sprite has many colors you may ask. In these cases use a gen 1 sprite with the color most similar to the main color and you have to try your best to place the rest of the colors. Generally make all of the places of one color the same color, and make color right next to each other different colors.
None of this applies to devamps in the gen 2 style, where you use two different colors instead of the lighter color and a darker color. However I am clueless when it comes to doing these so I can't be of much help...Silhouettes/Galaxy
These two are so closely related I merged them into one class Grab the fill bucket or color replace tool and make everything the same color. Make sure to make everything the same color. Sometimes pokemon have colors that are near black on them, that are easy to miss if you are making the silhouette black. A good trick to make sure you don't miss anything is to fill bucket the sprite a neon color once your done then change it back. For this lesson I want you to make Leafeon completely pure black. Don't forget the almost completely black lines on the sprite.

 You can also make Silhouettes using pictures. After completing the first step put a giant square around the silhouette, and make the silhouette transparent. Then drag it over the picture. Then remove everything outside the square, and then the square it's self. You can even do this in paint by making color 2 the color of the silhouette and turn transparent selection on.
For this lesson I want you to change the Leafeon Silhouette you did into a full galaxy. Just follow the steps above but with a galaxy picture. If you are having trouble finding a galaxy background you can use this one by JL Field on needpix.com. It is free to use commercially with modification, so it is okay if you sell sprites in a shop made with it.
If you get your own galaxy background make sure it is free to use with modification, as otherwise it is art theft. If you plan to sell galaxy sprites in a shop make sure the image is free to use commercially with modification.
You can also make Silhouettes using pictures. After completing the first step put a giant square around the silhouette, and make the silhouette transparent. Then drag it over the picture. Then remove everything outside the square, and then the square it's self. You can even do this in paint by making color 2 the color of the silhouette and turn transparent selection on.
For this lesson I want you to change the Leafeon Silhouette you did into a full galaxy. Just follow the steps above but with a galaxy picture. If you are having trouble finding a galaxy background you can use this one by JL Field on needpix.com. It is free to use commercially with modification, so it is okay if you sell sprites in a shop made with it.
If you get your own galaxy background make sure it is free to use with modification, as otherwise it is art theft. If you plan to sell galaxy sprites in a shop make sure the image is free to use commercially with modification. Partial Galaxy is a lot like full Galaxy except you are only filling in parts of the sprite with a solid color. If there is white in the sprite your using you will want to make the transparent color different from white in the sprite. There are multiple styles you can do for partial galaxy. Below is a picture that tries to show them all.
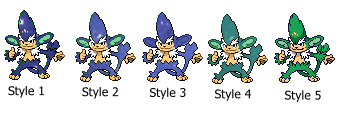 Style 1: Just erase all of the color you want to make Galaxy inside the sprite.
Style 2: Erase all of the details inside the outline of the sprite. I recommend finding a balance between this and style 1 as in my opinion lighter pixels of color don't look to well in the middle of a galaxy sprite. The same goes for adding to much detail in pure black.
Style 3: Style 2 but the outline colors are recolored to match the Galaxy within.
Style 4: The galaxy is recolored to match the color of the pokemon. Find a program to do this as doing it on your own will make you go crazy. Try to find a program that can actually change the color of things. As you can see from the example putting a semi-transparent layer of color over the sprite doesn't look to good.
Style 5: Replacing all of the lines with a galaxy. This is pretty much a lines sprite but you aren't removing the color inside and galaxifing the lines of the sprite. This looks better if you make the background a darker part of the galaxy photo.
Your assignment is to make a partial galaxy in the way you think looks best.
Style 1: Just erase all of the color you want to make Galaxy inside the sprite.
Style 2: Erase all of the details inside the outline of the sprite. I recommend finding a balance between this and style 1 as in my opinion lighter pixels of color don't look to well in the middle of a galaxy sprite. The same goes for adding to much detail in pure black.
Style 3: Style 2 but the outline colors are recolored to match the Galaxy within.
Style 4: The galaxy is recolored to match the color of the pokemon. Find a program to do this as doing it on your own will make you go crazy. Try to find a program that can actually change the color of things. As you can see from the example putting a semi-transparent layer of color over the sprite doesn't look to good.
Style 5: Replacing all of the lines with a galaxy. This is pretty much a lines sprite but you aren't removing the color inside and galaxifing the lines of the sprite. This looks better if you make the background a darker part of the galaxy photo.
Your assignment is to make a partial galaxy in the way you think looks best.
Lesson 1 - Silhouette
Grab the fill bucket or color replace tool and make everything the same color. Make sure to make everything the same color. Sometimes pokemon have colors that are near black on them, that are easy to miss if you are making the silhouette black. A good trick to make sure you don't miss anything is to fill bucket the sprite a neon color once your done then change it back. For this lesson I want you to make Leafeon completely pure black. Don't forget the almost completely black lines on the sprite.
Lesson 2 - Full Galaxy
You can also make Silhouettes using pictures. After completing the first step put a giant square around the silhouette, and make the silhouette transparent. Then drag it over the picture. Then remove everything outside the square, and then the square it's self. You can even do this in paint by making color 2 the color of the silhouette and turn transparent selection on.
For this lesson I want you to change the Leafeon Silhouette you did into a full galaxy. Just follow the steps above but with a galaxy picture. If you are having trouble finding a galaxy background you can use this one by JL Field on needpix.com. It is free to use commercially with modification, so it is okay if you sell sprites in a shop made with it.
If you get your own galaxy background make sure it is free to use with modification, as otherwise it is art theft. If you plan to sell galaxy sprites in a shop make sure the image is free to use commercially with modification.Partial Galaxy
Partial Galaxy is a lot like full Galaxy except you are only filling in parts of the sprite with a solid color. If there is white in the sprite your using you will want to make the transparent color different from white in the sprite. There are multiple styles you can do for partial galaxy. Below is a picture that tries to show them all.
Style 1: Just erase all of the color you want to make Galaxy inside the sprite.
Style 2: Erase all of the details inside the outline of the sprite. I recommend finding a balance between this and style 1 as in my opinion lighter pixels of color don't look to well in the middle of a galaxy sprite. The same goes for adding to much detail in pure black.
Style 3: Style 2 but the outline colors are recolored to match the Galaxy within.
Style 4: The galaxy is recolored to match the color of the pokemon. Find a program to do this as doing it on your own will make you go crazy. Try to find a program that can actually change the color of things. As you can see from the example putting a semi-transparent layer of color over the sprite doesn't look to good.
Style 5: Replacing all of the lines with a galaxy. This is pretty much a lines sprite but you aren't removing the color inside and galaxifing the lines of the sprite. This looks better if you make the background a darker part of the galaxy photo.
Your assignment is to make a partial galaxy in the way you think looks best.
Undertale styled sprites
Undertale styled sprites are sprites that make the pokemon white on a black background. The first thing to do is get the sprite you want to make on a black background. Then decide what parts you want to make black and what parts you want to make white. If there are not quite pure black outlines on the sprite recolor them to a visible grey to make it easier to see where the outline is on the sprite your working on.
The key thing in Undertale styled sprites is to convey the details of the pokemon in only two colors. For parts you want to make white fill it in white. For parts you want to make black give it a white outline. Be careful around small parts like the eyes and mouth as those are the easiest to mess up.
One thing I noticed in these sprites is that not everything has to be connected. You do not have to make the outline to connect everything like in pokemon sprites. If when zoomed out it looks okay then you are good. This most often comes up when two body parts outline's are very close to each other.
 For Example take this Cubone. Notice how there is no lines under the skull. This is what I am talking about. Despite the fact there isn't an outline connecting the arms to the skull it still looks nice. Another thing I noticed is that there is very little shading. Most of the shading appears to be shine for armor, and even then details come first.
For Example take this Cubone. Notice how there is no lines under the skull. This is what I am talking about. Despite the fact there isn't an outline connecting the arms to the skull it still looks nice. Another thing I noticed is that there is very little shading. Most of the shading appears to be shine for armor, and even then details come first.Getting sprites
There a few websites you can use to get sprites

 See how much better the sprite on the right looks from the sprite on the left? That is why you shouldn't use sprites in their black outline removed state.
- I usually get my sprites by copying and pasting them from Serebii.net, however it's banner sometimes has spoilers for the gen after 7 so be careful about that.
- The cave of dragonflies has a useful random sprite generator. You can generate up to three gens 1-5 sprites at a time, so it's useful when you don't know what to sprite.
- The spriter's resource is a useful place to get sprites from the spinoff and main series games. They are useful for getting minisprites and PMD sprites, along with sprites from other obscure spinoffs. However I won't link it because I'm unsure of the moderation of the comments section.
See how much better the sprite on the right looks from the sprite on the left? That is why you shouldn't use sprites in their black outline removed state.tools
There are many art programs out there. Here is a list of tools I recommend having in an art program.
- A single pixel tool. Being able to change individual pixels is important to have in an art program. This allows you to add patterns, scratch, mend parts, don't use an art program without one. Make sure it is in solid color and doesn't leave semi-transparent pixels everywhere.
- A selecting + moving tool. You will need this for fusions and slightly adjusting the size of things. While you could get away with only having a rectangular one by spacing separate parts away enough from each other I recommend using an art program that also has one where you draw out the shape.
- The ability to zoom in. Sprites are tiny and it will make your life much harder if you try to make them at 100% zoom. 300% zoom is the minimum you could get away with, though I recommend 500% or 600% zoom. While using an art program that shows a version of the sprite at 100% zoom while your working would be nice to have, it is not necessary and you can easily get away with not having that.
- The ability to copy and paste. Being able to copy and paste is key for getting sprites into the program to edit, and for fusions. I recommend using a program that can copy and paste images you copied outside the program as it makes getting the sprites into the program a lot easier, but in that case your program at least needs an import function.
- A color replacement tool. I highly recommend having a tool where you can select parts of the sprite to change one color into another. It also allows you to recolor parts of the sprite of the same color different colors. Having a tool that changes all of the colors into another color at the same time would be nice to have, but isn't necessary as you can just go over the whole sprite with the recolor parts tool. While you could get away without a color replacement tool, that makes it much easier to make mistakes while coloring.
- Color select + editor tool. Being able to select colors is key to recoloring. Being able to edit colors is also important as it allows you to add in shades when your pallet doesn't have enough, and to make your own pallets.
- Transparency. Having a transparent background looks a lot nicer than having a white background around your sprites. While this is useful to have in your main art program, you can also export your sprite to an art program that does have transparency. I personally use Krita to give a transparent background to my MS paint sprites.
- Layers. They are useful for working on parts surrounded by a bunch of other parts you don't want to mess up. Though this isn't required, and even I(most of the time) use an art program that doesn't have them.
- A large square eraser tool. This makes it much easier to get parts for fusion, and remove parts you don't need. While you could do this via the single pixel tool or selection tool, I find using the eraser first time saving. Make sure the eraser doesn't leave transparent pixels around. Also make sure the eraser doesn't erase sub-pixels as a program that works with sub-pixels is harder to make sprites in.
- Fill bucket tool. I find this useful when I'm quickly recoloring small parts of a pokemon. Though this isn't required.
Q&A
Q: How long have you been spriting?
A: I know at least since sometime in 2015, as I still have old stuff I made uploaded to Roblox around that time. Though I have made bad sprites even before then. I remember gen 4 being the newest generation, and getting sprites from pokemon elite 2000.com. Not sure when that was though. However I stopped for a while after making 61 sprites, and started making sprites again sometime after gen 5 was out.
Q: What art program do you use?
A: I mainly use the glorious top tier program of MS Paint. I do 95% of my sprite work in Paint. It's a good program if you want to make sprites in it. For transparency I put my sprites into Krita. For custom animations I use Scratch 2.0.
Q: What if I'm not very proud of my sprite work. Will I ever get better?
A: Please never give up because you think your sprite work isn't good enough. You will get better if you try. When I started spriting, I made almost every mistake in the book. I used the fill bucket tool to recolor with default MS paint colors, I didn't know the difference between a JPG and a PNG and had to redo several sprites, I used sprites where the black lines were destroyed, I've used resized parts without editing them, I've made my scratched sprites way to big, I've scratched on parts without shading them or editing out the excess pixels, and the worst probably has to be in a sprite where I made the inside of Bellossom's skirt completely white and just put it on top of Togekiss's wing. But today I'm very proud of my sprite work, and consider myself a rather skilled spriter. So surely if I can can improve after making all those mistakes, so can you.
Q: What's the best way to get better?
A: I feel like the best way to get better is to strive to get better. If you push yourself to make sprites the way you want them to, eventually you will acquire the skills needed to make said sprites. Don't just keep making sprites so everything falls into your comfort zone for your skills. I feel like mastery over the skills of recoloring, fusion and scratch can make the majority of sprites out there. I also recommend getting critique on your sprites. At this school I offer to critique anyone's sprites to help them grow as a spriter. I can point out problems in your sprites, and teach you how to fix them, giving you knowledge you can use to improve your future sprites. But most importantly never give up. I believe anyone, regardless of skill level, can become an amazing spriter if they try hard enough.
Q: How did you learn how to sprite?
A: I think I taught myself with some help from my parents. To be honest I started spiriting so long ago I don't really remember. I remember starting with fusions, and it took me 61 sprites before I started to actually recolor instead of just use the fill bucket. Though for the most part I taught myself, and read the occasional tutorial.
Q: Why did you start this sprite school?
A: I started this school because I don't agree with the teaching style of other sprite schools. I believe in moving on when a student proves they are ready and giving feedback on the sprites they make. I feel like for the most part other sprite schools pass you if you do all of their assignments okay regardless of proven skill level and don't give much feedback on assignments. While they do give practice, this can also lead to people making the same mistakes over and over again as they are never pointed out. I also feel like you don't need to do 20 of the same type of sprite if you get the hang of it after 3. So basically I am running this sprite school the way I believe a sprite school should be run.
rules
- Art theft will not be tolerated. Using a fanmade gen 6+ sprite without proper credit is considered art theft. Everywhere you post a sprite that uses a sprite someone else made give credit to them for the sprite, even if you've already told me where you get your sprites from in a previous post. Only use a sprite if it clearly states that it is free to use. The only exception is if you made the gen 6+ sprite yourself or only used official pokemon sprites to make it.
- Please yell at ACottontail if she hasn't responded to you in a week. She is a procrastinator, and needs a push sometimes to make her stop putting things off.
Recolor lessons
An intro to recoloring
Recolors are pretty much using the color replace tool to replace one set of colors with another set. Using something like a fill bucket tool is harder, and makes it more likely for you to forget a part. However I do sometimes use it and the single pixel tool when recoloring small parts in a fusion. When recoloring make sure all of the colors line up, don't forget the shading or the outlines.
 Very rarely can you remove a shade without causing damage to the sprite. For example take Flareon's gen 5 sprite. There is a shade between Flareon's normal tail color and shadow tail color. It is safe to take that out without causing to much harm to the sprite. However I don't recommend taking out shades unless you have to due to your pallet, or you know what you're doing. The Flareon to the right is a devamp. Devamps have strict color pallets so this could be necessary to do for them.
There will be times where your pallet doesn't have enough colors or you are making a pallet. In those cases select the color of the closest shade, edit the color and make it darker/lighter. When making your own pallet try to avoid neon colors by decreasing the saturation, as neon colors rarely look good. If colors in the original sprite contrast each other, make sure the recolor's colors also contrast. After your done recoloring zoom out. If you can't tell colors apart or can't tell there is shading where there should be adjust the colors.
A useful trick for recoloring is to put all of the shades of a color into a line of pixels going from lightest to darkest. Then next to it put the colors your going to change the pixels to. This helps you keep tract of all of the shades in a recolor.
Very rarely can you remove a shade without causing damage to the sprite. For example take Flareon's gen 5 sprite. There is a shade between Flareon's normal tail color and shadow tail color. It is safe to take that out without causing to much harm to the sprite. However I don't recommend taking out shades unless you have to due to your pallet, or you know what you're doing. The Flareon to the right is a devamp. Devamps have strict color pallets so this could be necessary to do for them.
There will be times where your pallet doesn't have enough colors or you are making a pallet. In those cases select the color of the closest shade, edit the color and make it darker/lighter. When making your own pallet try to avoid neon colors by decreasing the saturation, as neon colors rarely look good. If colors in the original sprite contrast each other, make sure the recolor's colors also contrast. After your done recoloring zoom out. If you can't tell colors apart or can't tell there is shading where there should be adjust the colors.
A useful trick for recoloring is to put all of the shades of a color into a line of pixels going from lightest to darkest. Then next to it put the colors your going to change the pixels to. This helps you keep tract of all of the shades in a recolor.Lesson 1 - Color replacement tool
In this first assignment you will get used to the recoloring tool in your art program. Before starting any sprite I recommend copy and pasting an extra version of the unedited original sprite into your art program. This way you can refer to it if you mess something up. Also feel free to make the canvas size huge while working on the sprite, just remember to shrink it down in the end.
I want you to take Frostlass and the color scheme to the right of it. Recolor the colors on the left side of the color pallet to the colors on the right.

 You will notice that when you get to white the color replace tool will also change the background. You have to be careful of this in recolors. If you go about this like how you did for the rest of the colors orange will be everywhere. Very carefully with the color replacement tool, replace the white in Frostlass. The are two areas you have to be careful in. On the arm to the right, right above the bow, there is an opening in the outline. Carefully recolor the inside while avoiding to recolor the outside. If you used the fill bucket here the color will spill out all over your canvas. Though you could use the single pixel tool to plug it up then use the fill bucket. Another area you have to be careful of is the area under Frostlass's head where it's arm is. There are a few pixels that aren't Frostlass between it's arm and it's body. Do not recolor those 6 pixels. They are a bit easier to see on the original sprite, which is why I said you should keep the unedited sprite next to what your working on for reference. Also when making the sprite transparent don't forget to make those pixels transparent too.
You may be wondering what is the point of making this hideous abomination. It is to get you to see all of the different shades that go into the sprite, and the outlines. I want to ensure you don't gloss over them in future recolors, where colors look more similar to each other. I also wanted to teach you how to deal with pure white in pokemon sprites, and to avoid filling in the inner pixels that aren't the pokemon.
You will notice that when you get to white the color replace tool will also change the background. You have to be careful of this in recolors. If you go about this like how you did for the rest of the colors orange will be everywhere. Very carefully with the color replacement tool, replace the white in Frostlass. The are two areas you have to be careful in. On the arm to the right, right above the bow, there is an opening in the outline. Carefully recolor the inside while avoiding to recolor the outside. If you used the fill bucket here the color will spill out all over your canvas. Though you could use the single pixel tool to plug it up then use the fill bucket. Another area you have to be careful of is the area under Frostlass's head where it's arm is. There are a few pixels that aren't Frostlass between it's arm and it's body. Do not recolor those 6 pixels. They are a bit easier to see on the original sprite, which is why I said you should keep the unedited sprite next to what your working on for reference. Also when making the sprite transparent don't forget to make those pixels transparent too.
You may be wondering what is the point of making this hideous abomination. It is to get you to see all of the different shades that go into the sprite, and the outlines. I want to ensure you don't gloss over them in future recolors, where colors look more similar to each other. I also wanted to teach you how to deal with pure white in pokemon sprites, and to avoid filling in the inner pixels that aren't the pokemon.Lesson 2 Pallet swap
In this assignment you will recolor Sandshrew with Flygon's colors. I want you to make the white parts light green, the yellow parts dark green, and the blue red.

 I slightly modified the Sandshrew sprite for the difficulty of this lesson. For the light green don't forget to also color in the claws and insides of Sandshrew's ears. Also don't recolor the pupils in Sandshrew's eyes.
I slightly modified the Sandshrew sprite for the difficulty of this lesson. For the light green don't forget to also color in the claws and insides of Sandshrew's ears. Also don't recolor the pupils in Sandshrew's eyes.
Lesson 3 Adding onto pallets
Sometimes when recoloring a pokemon you will notice that the pokemon you are recoloring has more shades than your pallet. In these cases you will have to edit the colors and make your own. For this lesson I want you to recolor Flygon with Infernape's colors. I want Flygon's light green to be orange, dark green to yellow and red to blue.
 Color pallets don't always line up with each other. The will be times where you are recoloring a pokemon with highlights with a pallet from a pokemon that doesn't have highlights. Don't recolor the pokemon's highlights color with the main body color. Everything will become much darker than it should be. Keep in mind the opposite for this is also true for recoloring a main body with a highlight color. Infernape's orange has a main body color, however doesn't have highlights. Flygon has highlights. In cases like these you will need to create a highlight color for Infernape's pallet.
To get more colors into the pallet first get the color that is the closest to the color you want. Then change it's lum value to make it higher for lighter colors or lower for darker colors. Sometimes when making a color darker it will look neon or brighter than it should be. In these cases lower the saturation until the color looks right.
While recoloring the dark green to the yellow outline color you will notice there is still one non-outline shade left on Flygon. Recoloring the shades with colors that were meant for outlines usually makes it too dark, and the opposite is true for recoloring the outline with colors that were meant for shades. In this case take Infernape's yellow shade color and make it darker, but not darker than the outline color. Of course the exception is when the pokemon your recoloring uses it's own shades as outline colors and vise versa. In that case follow the shading pattern of the pokemon your recoloring.
In this recolor all of the colors you are changing require you to make at least one shade of it on your own.
Color pallets don't always line up with each other. The will be times where you are recoloring a pokemon with highlights with a pallet from a pokemon that doesn't have highlights. Don't recolor the pokemon's highlights color with the main body color. Everything will become much darker than it should be. Keep in mind the opposite for this is also true for recoloring a main body with a highlight color. Infernape's orange has a main body color, however doesn't have highlights. Flygon has highlights. In cases like these you will need to create a highlight color for Infernape's pallet.
To get more colors into the pallet first get the color that is the closest to the color you want. Then change it's lum value to make it higher for lighter colors or lower for darker colors. Sometimes when making a color darker it will look neon or brighter than it should be. In these cases lower the saturation until the color looks right.
While recoloring the dark green to the yellow outline color you will notice there is still one non-outline shade left on Flygon. Recoloring the shades with colors that were meant for outlines usually makes it too dark, and the opposite is true for recoloring the outline with colors that were meant for shades. In this case take Infernape's yellow shade color and make it darker, but not darker than the outline color. Of course the exception is when the pokemon your recoloring uses it's own shades as outline colors and vise versa. In that case follow the shading pattern of the pokemon your recoloring.
In this recolor all of the colors you are changing require you to make at least one shade of it on your own.Lesson 4 Creating your own pallets
The final lesson is to learn how to create your own pallet for a recolor. For this assignment I want you to pick any pokemon you want, and completely change it's color pallet aside from black outlines and the white in their eyes. Leave no extra color unedited. Also don't get any colors from other pokemon sprites.
Getting a pallet that looks good can be hard. Try to avoid neon colors, as they rarely look good. Once you got the base color use what you learned in lesson 3 to make shades for them. Also try to make all the different colors on the pokemon go together.
While recoloring pokemon to other colors, it is okay to get colors from other pokemon if you are having trouble getting the color look right. However for please don't do that the sake of this assignment. I want to see how you deal with picking colors on your own.
Fusion lessons
An intro to Fusion
Fusion, the art of combining two pokemon sprites together to create something new. Fusion mainly consists of being able to separate parts, and being able to put them onto a base smoothly.
The skills used to make a fusion are used in a surprisingly large amount of sprites. Anytime you take a part from another sprite, these skills apply. I paid close attention while doing some fusions, and these lessons are based on the skills I used often in them.
Fusion design advice
To get the best results for the designs of fusions I suggest sketching them out first. A pitfall I see in sprites where the spriting starts immediately is that it often looks like parts are just pasted onto the pokemon because it's easy to make. To make better designs for my sprites I plan out the sprite first by sketching it. You don't even have to draw the entire pokemon. Just draw the designs of body parts until you can get an image of how the sprite looks like in your head. You don't even have to draw that well, as long as you can get a picture of the design in your head, your good.
When making fusions don't just put parts of one pokemon onto another. Try to fuse the very essence of the pokemon themselves. Look at body parts of both pokemon and think 'how can I fuse these elements together' or 'how can I create something new from these parts'. You are free to put body parts onto the fusion where neither had those parts to begin with. You can also use parts for stuff they were never meant to be in the first place.
Take this Manelectric Abomasnow fusion. See how Abomasnow's arms are used for floof? By using parts in unusual ways I created one of my favorite fusions. You may be wondering what colors to make a fusion. My answer is whatever looks nice. Don't be afraid to make the fusion the colors of the "base" if it looks good. Don't forget shiny pallets are also available. If you really want to you can even use colors neither of the pokemon have if they look nice and add to the design your looking for.
Often when I start making a sprite I get overwhelmed. I know I have to do all these thing for the design, and it just feels like to much. What I do is take a breath and focus on one small part at a time. Once I finish one step I move onto another. I keep going until I'm happy with the sprite, or I added everything I want to add onto it.
Take this Manelectric Abomasnow fusion. See how Abomasnow's arms are used for floof? By using parts in unusual ways I created one of my favorite fusions. You may be wondering what colors to make a fusion. My answer is whatever looks nice. Don't be afraid to make the fusion the colors of the "base" if it looks good. Don't forget shiny pallets are also available. If you really want to you can even use colors neither of the pokemon have if they look nice and add to the design your looking for.
Often when I start making a sprite I get overwhelmed. I know I have to do all these thing for the design, and it just feels like to much. What I do is take a breath and focus on one small part at a time. Once I finish one step I move onto another. I keep going until I'm happy with the sprite, or I added everything I want to add onto it.Lesson 1 - Erasing
When making a fusion you will often have to erase parts of a pokemon. This can come in the form of erasing the area around a part you want to use, or erasing the part on the base so you can place another part there. For this lesson I want you separate Mime.Jr's hat from the rest of it's body by erasing it's body.
 First of all when making a fusion always have a copy of the pokemon your using available somewhere on your canvas. This way if you make a mistake to one of the pokemon, and need the original it'll save you from having to copy and paste the sprite into the program again. When trying to separate a part from the rest of it's body first you should take the area around it with the selection tool, then copy and paste away from the rest of the sprite. Then go around the part with your eraser tool to remove the pixels that aren't part of the hat. After that you may notice there are some pixels that are too small to erase with your eraser tool without damaging the hat. For pixels such as those two above the right curve use the single pixel tool to erase them.
In some situations you may find it suitable to use the fill bucket to erase pixels around the part your trying to get. All of this also applies to removing parts of a base pokemon such as a tail to make way for a different one.
First of all when making a fusion always have a copy of the pokemon your using available somewhere on your canvas. This way if you make a mistake to one of the pokemon, and need the original it'll save you from having to copy and paste the sprite into the program again. When trying to separate a part from the rest of it's body first you should take the area around it with the selection tool, then copy and paste away from the rest of the sprite. Then go around the part with your eraser tool to remove the pixels that aren't part of the hat. After that you may notice there are some pixels that are too small to erase with your eraser tool without damaging the hat. For pixels such as those two above the right curve use the single pixel tool to erase them.
In some situations you may find it suitable to use the fill bucket to erase pixels around the part your trying to get. All of this also applies to removing parts of a base pokemon such as a tail to make way for a different one.Lesson 2 - Mending parts
When making a fusion you will sometimes have parts you want to use that are behind different parts of the pokemon. In those cases you will want to fix up the part before putting it into the fusion. For this lesson I want you to to take Articuno's tail, erase the parts around it and fix the parts that were blocked by other parts of Articuno.
 The first step is to erase the parts around Articuno's tail. It's okay to leave pixels if you think they will become part of the tail's outline. The next step is to draw the outline with the single pixel tool. Use the two outlines next to the area blocked by other parts as a reference to how you should draw the outline. Try to make it smoothly transition from one part of the outline to the next. The next step is to replace all the pixels that aren't Articuno's tail inside the tail with the base color of the tail with the single pixel tool. After that fix up the shading and details in the areas that were obscured by other parts. While those areas of Articuno's tail didn't have any shading, they did have changes in the outline color. Use the outline colors of the lines that weren't blocked by other parts as a reference to what the colors should be. Articuno's tail also has two lines as details. Use where the lines already there as a reference for where the missing lines should go.
The first step is to erase the parts around Articuno's tail. It's okay to leave pixels if you think they will become part of the tail's outline. The next step is to draw the outline with the single pixel tool. Use the two outlines next to the area blocked by other parts as a reference to how you should draw the outline. Try to make it smoothly transition from one part of the outline to the next. The next step is to replace all the pixels that aren't Articuno's tail inside the tail with the base color of the tail with the single pixel tool. After that fix up the shading and details in the areas that were obscured by other parts. While those areas of Articuno's tail didn't have any shading, they did have changes in the outline color. Use the outline colors of the lines that weren't blocked by other parts as a reference to what the colors should be. Articuno's tail also has two lines as details. Use where the lines already there as a reference for where the missing lines should go.Lesson 3 - Adding & Blending together parts
When making a fusion you will add parts onto a pokemon. After getting the part you want via erasing the rest of the sprite around it drag it onto the place you want it to go on the pokemon. If there is something in the way you don't want, such as there being another tail, you should erase it first before dragging the new part onto it. For this lesson I want you to replace the end of Lucario's arm with Octillery's mouth to create a sort of arm cannon.

 You will quickly run into the problem of just placing the mouth doesn't look good. This is because Octillery's mouth is way to big for Lucario's arm. In order to fix this draw a line starting from the outline of the top of Lucario's arm to Octillery's mouth a few pixels at a time. Every few pixels move the line up by one. When going up stop drawing and move up and left one before drawing again. Avoid pixels in outlines that connect pixels in a sharp L like way unless you are trying to make something like a sharp point. You don't have to connect the very top of Octillery's outline with Lucario's arm, stop once the outline of Octillery's mouth connects with the line you are drawing naturally. After that do the same to connect the outline of the bottom part of Lucario's arm with Octillery's mouth. Then erase the pixels outside the outline you just created. Finally fix up the shading making the end of the shading on Octillery's mouth meet up with the shading on Lucario's arm.
While it didn't occur here sometimes when placing parts in programs like MS paint, the white parts will show the pixels behind them. In order to fix this change the color of the part to a random color nowhere else in the sprite, move the part over, then make the part white again. This can also be fixed by working on a background that isn't the color of any other part on the sprite, or by just fixing it up once you moved the part, though the latter is prone to more mistakes.
You will quickly run into the problem of just placing the mouth doesn't look good. This is because Octillery's mouth is way to big for Lucario's arm. In order to fix this draw a line starting from the outline of the top of Lucario's arm to Octillery's mouth a few pixels at a time. Every few pixels move the line up by one. When going up stop drawing and move up and left one before drawing again. Avoid pixels in outlines that connect pixels in a sharp L like way unless you are trying to make something like a sharp point. You don't have to connect the very top of Octillery's outline with Lucario's arm, stop once the outline of Octillery's mouth connects with the line you are drawing naturally. After that do the same to connect the outline of the bottom part of Lucario's arm with Octillery's mouth. Then erase the pixels outside the outline you just created. Finally fix up the shading making the end of the shading on Octillery's mouth meet up with the shading on Lucario's arm.
While it didn't occur here sometimes when placing parts in programs like MS paint, the white parts will show the pixels behind them. In order to fix this change the color of the part to a random color nowhere else in the sprite, move the part over, then make the part white again. This can also be fixed by working on a background that isn't the color of any other part on the sprite, or by just fixing it up once you moved the part, though the latter is prone to more mistakes.Lesson 4 - Sandwich placement
Sometimes when making a sprite you will want to place something in front of some parts, and behind other parts. In order to do this first copy the part on the sprite that you want to go in front of the other part. After that put the middle part onto the sprite. Finally drag the part you copied earlier back onto the sprite.
For this lesson I want you to take the Mime Jr. hat you separated earlier and put it on top of Thundurus, but have the front Thundurus's spiky part be in front of the hat. I want you to place the hat to show that you understand this skill as opposed to a logical placement.
 Don't forget to fix up the white part on Mime Jr.'s hat if the pixels show through it.
Don't forget to fix up the white part on Mime Jr.'s hat if the pixels show through it.
Lesson 5 - resizing parts
Sometimes you will want something to be bigger or smaller. Never use a part you only resized, it will never look good.
Sometimes you just need to change the size by a only few pixels. In cases where you need it smaller select part of the part with the rectangular selection tool and shift the part closer to the rest of it by one. Try going for areas where the outline has more than one pixel first, and most of the time you should try going for the longest outline segments first. Afterwards adjust the outline and shading around the area you compressed to make it look natural. Repeat this until satisfied. To make it slightly bigger move the part away from the rest of the part and then fix it up.
For smaller parts use the gen 7 minisprites. Those sprites were made with the intention of being tiny so if they aren't small enough for you, nothing will be. Be sure to recolor them to the part to the colors of the front sprite, as minisprites often have different pallets than front sprites.
For this lesson I want you to make Espeon's tail two pixel's taller and two pixels thinner. If you are having trouble resizing the tail on Espeon, take it away from Espeon then edit it. Move it back onto Espeon afterwards.

Lesson 6: Making a fusion
Now for the moment you have been waiting for. Making the fusion. For this lesson I want you to fuse any pokemon together that you would like.
When making a big change to a sprite you should make a backup by copy and pasting the sprite somewhere on your canvas. That way if you don't like the change you made you can go back to a previous version without much hassle. Erase the backups once you are finished with the sprite.
All of the lessons beforehand were teaching you skills for this moment. I want you to go all out on this fusion. Show me everything you learned(unless it harms the design of the fusion). Before starting please read fusion design advice. I want you to try to make a fusion with a design you think looks nice instead of one that is easy to make. It's okay if you something mess up, it will only show you what you need to work on to get better.
Scratch lessons
An intro to scratch
Scratch, creating things by yourself by hand. Scratch is basically pixel art. While it can look overwhelming at first it really isn't that bad most of the time. Scratching shows up everywhere. In retypes and even fusions sometimes you will have to scratch new parts or modify parts in order to get the result you want.
There are three key things to scratch, keeping good proportion sizes, having a solid outline and shading the sprite.
Lesson 1 - Scratching a sprite
While this is one lesson it's a long one, as I wasn't really sure show to break it up. For this lesson I want you to try to create a sprite of a gen 6+ pokemon. I suggest trying do make a simpler pokemon.
Part 1: Proportion
The first step when making a sprite is to get the portions down. If you don't the sprite could end up being too big compared to other pokemon sprites or have something much bigger or smaller compared to the rest of the sprite. First find a pokemon of a similar size to the pokemon you will sprite. Then draw a neon colored box around it, make sure the sides of the box are just outside the outer most pixels of the sprite, and is right next to it. The easiest way to do that is to start using the rectangle tool until your cursor is in the corner of the sprite. Then without moving your cursor stop the current rectangle and create a new one going all the way to the other corner of the sprite. After that remove the pokemon from the middle of the box. That box serves as a reference for the size should make your pokemon. If a pokemon has something large hanging off of it like a tail you might want to make two boxes, one for the main body, and one for the tail.
Then you want to draw a sketch. Using Neon colors draw the general size + place of what things would be. Make sure to use different colors for different parts or it becomes hard to tell what's what. Usually I do two sketches, one to get the location and size of things on the sprite, and another to form more details. Pokemon sprites tend to face left so keep that in mind while sketching the sprite. After that go into more detail with a second sketch. Once that is done it is time to move onto the outline.
Though there is one trick that you can use if you are having trouble. Take a 3D sprite or artwork of what you are trying to scratch and scale it down to the size of the rectangle. Quickly get the general shape and then erase what isn't part of your sketch.
Let me get one thing clear. DO NOT TRACE IT EXACTLY. The point of this is to get the portions for the sprite. If you carefully trace it, it is no longer a scratched sprite but instead a pixel over. It is painfully obvious when someone does a pixel over from the 3D sprite or artwork. Just draw circles and lines to get the general shape of the pokemon. After erasing what isn't the sketch, move the parts of the sketch to the pose you want the sprite to have. After that make the 2nd sketch where you go into more careful detail.
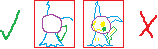 This image is an example of what I mean. The one on the left is lose and gets the general idea of the portions down without being exact enough to trace. It leaves enough room for your second sketch to make the sprite your own. On the right it is literally traced. It is very tempting to make that your outline with some adjustments. This is a pixel over, and it doesn't really teach you how to make a scratched sprite.
Part 2: Outline
The next step is to create an outline for your sprite. Carefully go around where the sketch is and make the outline, one line at a time. When making a circular shape, if there is a part that looks rather long and flat add a line segment on top of part of it. Then erase the inner part of it. When making the outline avoid making sharp L shaped groups of pixels unless you are making something like a spike. This will make your outline look a lot cleaner. A useful trick I remember hearing for curves is when a line segment of one pixel is next to one of 3 or more pixels, make a line segment of 2 pixels in between them to try to transition them. I find that this usually makes my line art look better, though there are exceptions. Be sure to zoom out and see how your outline looks from time to time as that is how people will view your sprite most of the time. Another trick I found if you are having trouble with making the shape of something is to draw the line quickly in about one mouse press. After that fix up the line by removing L shaped clutters of excess pixels and adjusting the line segments that look off.
Adjustments are key. If something looks off you might have to adjust the shape or size of something. When making narrowish parts with the top/bottom left/right halves next to each other try to make both of the line's line segments move in sync with each other. This will help you keep the width of the object consistent. Sometimes you will sprite something small, and the pixels won't seem to fit. In these cases you will have to play around with the pixels. You might have to redo it a few times. Keep altering them until you have something you are happy with. For things such as Mimikyu's cloth I keep trying to get one pointing out of it section right, and then I base the rest of it off of that.
It's okay to find yourself jumping back and forth between the outline and coloring. Sometimes when scratching sprites I complete one body part at a time instead of doing the outline all at once. Once you are finished with the outline erase your sketch. I do this by replacing the outline color with white/transparent.
Part three: Color
Finally it is time to color in the sprite. First get a pallet. Colors often have a base color, a shade color, an outline color and sometimes a highlight. Official gen 5 pokemon sprites have 15 colors on them, 13 counting black and white. If you are aiming for accuracy try to stay within this 13 color limit, which includes different shades of a color.
Place shading on the sprite like you would normally. If you don't really know how shading works that's okay, I don't either. Since the lighting of sprites come from the top left, place the shade by the bottom right parts of sprites. Also place shading where something on top of/in front of something would block the right. Despite my inexperience I can usually make the shading look descent through that. When adding the shade draw the outline of where the shade would start, then color in the inside. Also keep in mind other light sources such as flames, as that could affect how you shade the sprite.
There is a technique known as dithering that you might want to use if you want a shade in between two colors. To dither make everything of the same color connect diagonally. Dithering is usually used sparingly on sprites. If you are ever unsure on how to shade or make something try to find an official pokemon sprite to use as a reference on how to make/shade it.
Color the outline based on the color around it, based on what it would be if the sprite were to continue on. If the outline is by the base color, color it the outline color. If the outline is by a shade color, leave it black. You might also want to change the color of the outline so it doesn't blend in with objects surrounding the outline. Sometimes when a highlight color is by an outline the outline is colored with the shade color, however this is used sparingly.
This image is an example of what I mean. The one on the left is lose and gets the general idea of the portions down without being exact enough to trace. It leaves enough room for your second sketch to make the sprite your own. On the right it is literally traced. It is very tempting to make that your outline with some adjustments. This is a pixel over, and it doesn't really teach you how to make a scratched sprite.
Part 2: Outline
The next step is to create an outline for your sprite. Carefully go around where the sketch is and make the outline, one line at a time. When making a circular shape, if there is a part that looks rather long and flat add a line segment on top of part of it. Then erase the inner part of it. When making the outline avoid making sharp L shaped groups of pixels unless you are making something like a spike. This will make your outline look a lot cleaner. A useful trick I remember hearing for curves is when a line segment of one pixel is next to one of 3 or more pixels, make a line segment of 2 pixels in between them to try to transition them. I find that this usually makes my line art look better, though there are exceptions. Be sure to zoom out and see how your outline looks from time to time as that is how people will view your sprite most of the time. Another trick I found if you are having trouble with making the shape of something is to draw the line quickly in about one mouse press. After that fix up the line by removing L shaped clutters of excess pixels and adjusting the line segments that look off.
Adjustments are key. If something looks off you might have to adjust the shape or size of something. When making narrowish parts with the top/bottom left/right halves next to each other try to make both of the line's line segments move in sync with each other. This will help you keep the width of the object consistent. Sometimes you will sprite something small, and the pixels won't seem to fit. In these cases you will have to play around with the pixels. You might have to redo it a few times. Keep altering them until you have something you are happy with. For things such as Mimikyu's cloth I keep trying to get one pointing out of it section right, and then I base the rest of it off of that.
It's okay to find yourself jumping back and forth between the outline and coloring. Sometimes when scratching sprites I complete one body part at a time instead of doing the outline all at once. Once you are finished with the outline erase your sketch. I do this by replacing the outline color with white/transparent.
Part three: Color
Finally it is time to color in the sprite. First get a pallet. Colors often have a base color, a shade color, an outline color and sometimes a highlight. Official gen 5 pokemon sprites have 15 colors on them, 13 counting black and white. If you are aiming for accuracy try to stay within this 13 color limit, which includes different shades of a color.
Place shading on the sprite like you would normally. If you don't really know how shading works that's okay, I don't either. Since the lighting of sprites come from the top left, place the shade by the bottom right parts of sprites. Also place shading where something on top of/in front of something would block the right. Despite my inexperience I can usually make the shading look descent through that. When adding the shade draw the outline of where the shade would start, then color in the inside. Also keep in mind other light sources such as flames, as that could affect how you shade the sprite.
There is a technique known as dithering that you might want to use if you want a shade in between two colors. To dither make everything of the same color connect diagonally. Dithering is usually used sparingly on sprites. If you are ever unsure on how to shade or make something try to find an official pokemon sprite to use as a reference on how to make/shade it.
Color the outline based on the color around it, based on what it would be if the sprite were to continue on. If the outline is by the base color, color it the outline color. If the outline is by a shade color, leave it black. You might also want to change the color of the outline so it doesn't blend in with objects surrounding the outline. Sometimes when a highlight color is by an outline the outline is colored with the shade color, however this is used sparingly.
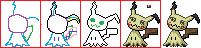 Here is an image showing the progression of me making a Mimikyu sprite, so you can get a rough idea of how the sprite looks like at each stage.
This image is an example of what I mean. The one on the left is lose and gets the general idea of the portions down without being exact enough to trace. It leaves enough room for your second sketch to make the sprite your own. On the right it is literally traced. It is very tempting to make that your outline with some adjustments. This is a pixel over, and it doesn't really teach you how to make a scratched sprite.
Part 2: Outline
The next step is to create an outline for your sprite. Carefully go around where the sketch is and make the outline, one line at a time. When making a circular shape, if there is a part that looks rather long and flat add a line segment on top of part of it. Then erase the inner part of it. When making the outline avoid making sharp L shaped groups of pixels unless you are making something like a spike. This will make your outline look a lot cleaner. A useful trick I remember hearing for curves is when a line segment of one pixel is next to one of 3 or more pixels, make a line segment of 2 pixels in between them to try to transition them. I find that this usually makes my line art look better, though there are exceptions. Be sure to zoom out and see how your outline looks from time to time as that is how people will view your sprite most of the time. Another trick I found if you are having trouble with making the shape of something is to draw the line quickly in about one mouse press. After that fix up the line by removing L shaped clutters of excess pixels and adjusting the line segments that look off.
Adjustments are key. If something looks off you might have to adjust the shape or size of something. When making narrowish parts with the top/bottom left/right halves next to each other try to make both of the line's line segments move in sync with each other. This will help you keep the width of the object consistent. Sometimes you will sprite something small, and the pixels won't seem to fit. In these cases you will have to play around with the pixels. You might have to redo it a few times. Keep altering them until you have something you are happy with. For things such as Mimikyu's cloth I keep trying to get one pointing out of it section right, and then I base the rest of it off of that.
It's okay to find yourself jumping back and forth between the outline and coloring. Sometimes when scratching sprites I complete one body part at a time instead of doing the outline all at once. Once you are finished with the outline erase your sketch. I do this by replacing the outline color with white/transparent.
Part three: Color
Finally it is time to color in the sprite. First get a pallet. Colors often have a base color, a shade color, an outline color and sometimes a highlight. Official gen 5 pokemon sprites have 15 colors on them, 13 counting black and white. If you are aiming for accuracy try to stay within this 13 color limit, which includes different shades of a color.
Place shading on the sprite like you would normally. If you don't really know how shading works that's okay, I don't either. Since the lighting of sprites come from the top left, place the shade by the bottom right parts of sprites. Also place shading where something on top of/in front of something would block the right. Despite my inexperience I can usually make the shading look descent through that. When adding the shade draw the outline of where the shade would start, then color in the inside. Also keep in mind other light sources such as flames, as that could affect how you shade the sprite.
There is a technique known as dithering that you might want to use if you want a shade in between two colors. To dither make everything of the same color connect diagonally. Dithering is usually used sparingly on sprites. If you are ever unsure on how to shade or make something try to find an official pokemon sprite to use as a reference on how to make/shade it.
Color the outline based on the color around it, based on what it would be if the sprite were to continue on. If the outline is by the base color, color it the outline color. If the outline is by a shade color, leave it black. You might also want to change the color of the outline so it doesn't blend in with objects surrounding the outline. Sometimes when a highlight color is by an outline the outline is colored with the shade color, however this is used sparingly.
Here is an image showing the progression of me making a Mimikyu sprite, so you can get a rough idea of how the sprite looks like at each stage.
Lesson 2 - Editing/Adding scratched parts
When making sprites there will be times where you will want parts you can't quite get from other sprites. In these instances you will have to make the part yourself. For this lesson I want you to give Shinx emo bangs that go over one of the eyes.
 A lot of what you learned in the previous lesson still applies. However this time you have to be aware of the pixels around the area you are creating the scratched sprite. Base the size of what you are making on the pixels around it.
Carefully make the new outline with the existing pixels. If you damage the surrounding pixels erase a bit of the area around the newly scratched part, not the entire sprite. Then copy&paste a backup. Move the sprite with the new scratched part over the backup. After that erase the parts that become irrelevant, in this case the remaining parts of the top head fluff. Finally shade it.
A lot of what you learned in the previous lesson still applies. However this time you have to be aware of the pixels around the area you are creating the scratched sprite. Base the size of what you are making on the pixels around it.
Carefully make the new outline with the existing pixels. If you damage the surrounding pixels erase a bit of the area around the newly scratched part, not the entire sprite. Then copy&paste a backup. Move the sprite with the new scratched part over the backup. After that erase the parts that become irrelevant, in this case the remaining parts of the top head fluff. Finally shade it.Pose lessons
An intro to poses
Poses can bring life into any kind of sprite you make. There is a difference between a Growithe that is just standing there, and one that looks excited to see you. Finding the right pose can give your sprite more of an emotional impact, and help with the theme you are going for.
Lesson 1 - Facial expressions
Giving your sprite the right facial expression can help sell the emotion the sprite is going for.
Eyes: Try to keep the shape and color of the eyes in mind while making changes. Also don't forget to color in the outline for newly added parts. When making the eye close, make the line in the center of the eye as pokemon tend to have a top and bottom eyelid.
Example expressions: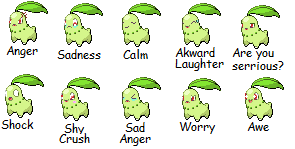 For this lesson I want you to take any pokemon or sprite you've made that doesn't have Chikorita's face that you want and give it the same expressions as the image above. Make sure the pokemon has a visible mouth and eyes to make expressions of. While these are a bit much, it should let you practice most of the expressions you would give a sprite.
Anger - Make the pokemon's eyes slant towards the center of their face. Give the pokemon a frown. Add an anger symbol by having three red curves face inward from a center. Use the example for reference if you are having trouble making it. While you wouldn't put it in all of the sprites you are trying to make look angry, it can really help sell the emotion.
Saddness - Give the pokemon a frown. Make them look down. Start by blanking out the eye. Then add the pupil. After that draw the rest of the inside of the eye around the pupil. Be careful to preserve the shape and color of the inside of the eye while making changes to it. After that add tears under the eye.
Calm - Make the pokemon's eyes close and curve down. Give the sprite a slight smile.
Awkward Laughter - Make the pokemon's eyes close and curve up. Give the pokemon an open mouth smile. Add a drop of sweat to the pokemon's face about where the upper part of the eyes are. To sprite the sweat drop make a vertical line of two pixels. Then give it an outline everywhere but the top and corners.
Are you serious - Make the top of the pokemon's eyelids a flat line. Give the pokemon a flat line for the face.
Shock - Make the pokemon's eyes completely white. You make have to make the eyes a bit more circular. Give the pokemon an o shaped open mouth.
Shy Crush - Make the pokemon look towards it's bottom right. Add in some blush. If you are having trouble adding blush that isn't to hard or soft looking have a hard pink color surrounded by some light pink color like the example image.
Sad Anger - Find the center point for the eye. Make a pixel to the side closest to the center of the face. Make a diagonal line that keeps going up until you reach the outline of the eye. Then below + diagonal to the center pixel add a line that goes to the outline of the eye. Make the pokemon frown. Add in some tears.
Worry - Make the pokemon frown, but not too harshly. Make the top part of the eye curve inwards.
Awe - Give the pokemon star shaped pupils. Give them a huge smile.
For this lesson I want you to take any pokemon or sprite you've made that doesn't have Chikorita's face that you want and give it the same expressions as the image above. Make sure the pokemon has a visible mouth and eyes to make expressions of. While these are a bit much, it should let you practice most of the expressions you would give a sprite.
Anger - Make the pokemon's eyes slant towards the center of their face. Give the pokemon a frown. Add an anger symbol by having three red curves face inward from a center. Use the example for reference if you are having trouble making it. While you wouldn't put it in all of the sprites you are trying to make look angry, it can really help sell the emotion.
Saddness - Give the pokemon a frown. Make them look down. Start by blanking out the eye. Then add the pupil. After that draw the rest of the inside of the eye around the pupil. Be careful to preserve the shape and color of the inside of the eye while making changes to it. After that add tears under the eye.
Calm - Make the pokemon's eyes close and curve down. Give the sprite a slight smile.
Awkward Laughter - Make the pokemon's eyes close and curve up. Give the pokemon an open mouth smile. Add a drop of sweat to the pokemon's face about where the upper part of the eyes are. To sprite the sweat drop make a vertical line of two pixels. Then give it an outline everywhere but the top and corners.
Are you serious - Make the top of the pokemon's eyelids a flat line. Give the pokemon a flat line for the face.
Shock - Make the pokemon's eyes completely white. You make have to make the eyes a bit more circular. Give the pokemon an o shaped open mouth.
Shy Crush - Make the pokemon look towards it's bottom right. Add in some blush. If you are having trouble adding blush that isn't to hard or soft looking have a hard pink color surrounded by some light pink color like the example image.
Sad Anger - Find the center point for the eye. Make a pixel to the side closest to the center of the face. Make a diagonal line that keeps going up until you reach the outline of the eye. Then below + diagonal to the center pixel add a line that goes to the outline of the eye. Make the pokemon frown. Add in some tears.
Worry - Make the pokemon frown, but not too harshly. Make the top part of the eye curve inwards.
Awe - Give the pokemon star shaped pupils. Give them a huge smile.
- Eyes closed with a curve going up - Happy
- Eyes closed with a curve going down - Calm/sleeping
- Top part of eye curves down - Worry/upset
- Bottom part of eye curves up - Annoyed/going crazy
- Eyes slant towards center of face - Anger/Hostility
- Pure white - Shocked
- Stars as pupils - Amazed
- Looking down - sadness
- Looking away - Timidity
- Eyes closed with a curve going up - Happy
- Curve going down - Happy
- Curve going up - Upset
- Straight - neutral, a slight smile or frown is also used sometimes
- O shaped - Shock
- Drooling - Hunger
For this lesson I want you to take any pokemon or sprite you've made that doesn't have Chikorita's face that you want and give it the same expressions as the image above. Make sure the pokemon has a visible mouth and eyes to make expressions of. While these are a bit much, it should let you practice most of the expressions you would give a sprite.
Anger - Make the pokemon's eyes slant towards the center of their face. Give the pokemon a frown. Add an anger symbol by having three red curves face inward from a center. Use the example for reference if you are having trouble making it. While you wouldn't put it in all of the sprites you are trying to make look angry, it can really help sell the emotion.
Saddness - Give the pokemon a frown. Make them look down. Start by blanking out the eye. Then add the pupil. After that draw the rest of the inside of the eye around the pupil. Be careful to preserve the shape and color of the inside of the eye while making changes to it. After that add tears under the eye.
Calm - Make the pokemon's eyes close and curve down. Give the sprite a slight smile.
Awkward Laughter - Make the pokemon's eyes close and curve up. Give the pokemon an open mouth smile. Add a drop of sweat to the pokemon's face about where the upper part of the eyes are. To sprite the sweat drop make a vertical line of two pixels. Then give it an outline everywhere but the top and corners.
Are you serious - Make the top of the pokemon's eyelids a flat line. Give the pokemon a flat line for the face.
Shock - Make the pokemon's eyes completely white. You make have to make the eyes a bit more circular. Give the pokemon an o shaped open mouth.
Shy Crush - Make the pokemon look towards it's bottom right. Add in some blush. If you are having trouble adding blush that isn't to hard or soft looking have a hard pink color surrounded by some light pink color like the example image.
Sad Anger - Find the center point for the eye. Make a pixel to the side closest to the center of the face. Make a diagonal line that keeps going up until you reach the outline of the eye. Then below + diagonal to the center pixel add a line that goes to the outline of the eye. Make the pokemon frown. Add in some tears.
Worry - Make the pokemon frown, but not too harshly. Make the top part of the eye curve inwards.
Awe - Give the pokemon star shaped pupils. Give them a huge smile.Lesson 2 - Posing the body
For this lesson I want you to put Kirlia's gen 5 sprite into a pose of having one hand on it's hip and the other out. I also want you to separate it's feet.
 In order to put a pokemon into a pose you should take the end of it's limb and place it where you want it to be. Then scratch the remaining portion in order to reconnect it with it's body. Also clean up the area where the limb was if it was blocking something. Keep in mind the size of the pokemon. Try to keep the width of body parts consistent and try not to stretch or shrink parts too much.
First apply this to making Kirlia's left hand stick out. Next move Kirlia's right hand to it's hips as while it is on the skirt it's not quite on the hips. It will be a bit harder to connect to the body. If you are having trouble making it look right take Kirlia's elbow and attach it to the end of Kirlia's hand.
For the legs start by separating the foot, then placing it where Kirlia's two feet will be. After that make the legs so they connect from the feet to Kirlia's bottom. Keep in mind Kirlia's legs are about 1 pixel thick.
In order to put a pokemon into a pose you should take the end of it's limb and place it where you want it to be. Then scratch the remaining portion in order to reconnect it with it's body. Also clean up the area where the limb was if it was blocking something. Keep in mind the size of the pokemon. Try to keep the width of body parts consistent and try not to stretch or shrink parts too much.
First apply this to making Kirlia's left hand stick out. Next move Kirlia's right hand to it's hips as while it is on the skirt it's not quite on the hips. It will be a bit harder to connect to the body. If you are having trouble making it look right take Kirlia's elbow and attach it to the end of Kirlia's hand.
For the legs start by separating the foot, then placing it where Kirlia's two feet will be. After that make the legs so they connect from the feet to Kirlia's bottom. Keep in mind Kirlia's legs are about 1 pixel thick.A note on using past generation sprites
Pokemon has been through 5 generations worth of sprites. Sometimes you may see a sprite from an older generation that has a pose that would be great to use for the sprite your making.
Generation 3 and 4 sprites are okay to use. However they may have a different color pallet so you have to make sure all of the colors are consistant in the sprite. Gen 3 tends to have a different color pallet from the gen 4 & 5 sprites so you may want to recolor them before using them.
Generation 1 and 2 sprites however are too different to be used with generation 3, 4 and 5 sprites. If you want to use them you have to revamp them first. I don't mean just a recolor, but a ton of edits to the shading as gen 1 and 2 had color pallets that servely limited their shading.
As for using the generation 6+ 3D sprites in sprites, don't. They are very hard to recolor as they have 30 million colors on them that prevent the color replacement tool from working. It is also very hard to make scratch edits to them without there being a jarring clash between the two styles. This is why people either use fan-made gen 6+ sprites or do a pixel over of the 3D model.
Advanced recolor lessons
An intro to advanced recolor
Sometimes you want to make parts of the sprite of the same color different colors. When this comes up spamming the color replacement tool doesn't work anymore. The key to complicated recolors is being careful. These lessons will also cover adding patterns to a sprite.
Lesson 1 - Recoloring only parts
When recoloring sprites sometimes you only want to recolor only parts of a certain color to another color. When this happens go in very carefully with a small color replacement tool and recolor the parts you can recolor without changing the other parts. After that go into the smaller areas with the single pixel tool.

 For this lesson I want you to recolor Burmy's leaves the alternating colors of the Watmel berry. Start by making the top most two leaves pink. For the pink color use the 2nd lightest shade for the base color to avoid using highlights as the base color. Use the darkest shade as the shade color so you can tell the base and shade color apart. Create your own outline color. Next change all of the leaves surrounding Burmy's face to Watmel green. Use the 2nd lightest color for the base, the 2nd darkest color for the shade, and darken the darkest color a bit for the outline. Here you will have to be a lot more careful. If you aren't you could change the color of the leaves beneath them by mistake. When your color replacement tool gets to small recolor the remaining pixels with the single pixel tool and the fill bucket. Be careful about the outlines. Some of the outlines blend into the leaves below them. Recolor the outline closest to the inner part of the leaves you are recoloring. Do not recolor if an outline pixel is diagonal to the inner pixel of what you are recoloring as most of the time and in this case it is the outline for something else. Once that is done recolor the next row of leaves pink, and the large part at the very bottom green.
For this lesson I want you to recolor Burmy's leaves the alternating colors of the Watmel berry. Start by making the top most two leaves pink. For the pink color use the 2nd lightest shade for the base color to avoid using highlights as the base color. Use the darkest shade as the shade color so you can tell the base and shade color apart. Create your own outline color. Next change all of the leaves surrounding Burmy's face to Watmel green. Use the 2nd lightest color for the base, the 2nd darkest color for the shade, and darken the darkest color a bit for the outline. Here you will have to be a lot more careful. If you aren't you could change the color of the leaves beneath them by mistake. When your color replacement tool gets to small recolor the remaining pixels with the single pixel tool and the fill bucket. Be careful about the outlines. Some of the outlines blend into the leaves below them. Recolor the outline closest to the inner part of the leaves you are recoloring. Do not recolor if an outline pixel is diagonal to the inner pixel of what you are recoloring as most of the time and in this case it is the outline for something else. Once that is done recolor the next row of leaves pink, and the large part at the very bottom green.Lesson 2 - Patterns
When adding patterns make sure the color of the pattern goes with the pokemon's color scheme. Another thing to look out for is just copy and pasting the pattern all over the pokemon. Make sure the pattern for the pokemon follow's it's outlines and doesn't go on top of them. However it is okay to recolor an outline color to an outline color for a pattern if the pattern was going to continue there. If there is an outline that indicates a change of shape in the pokemon such as an arm that covers part of the body, chose where the pattern will show and erase the other part. It looks rather unnatural when markings on two places of the body just happen to line up to look like one marking with a line through it. Try to avoid it unless it is intentional in your design. Also make sure to follow the shading on the pokemon. Another thing is variation. Varying the pattern you put on the pokemon can really make it look nicer. I recommend starting off with a normal sized marking and a smaller one, and making more as you see fit. Of course if you want to make every marking unique go for it.
 Now let me tell you about anti-aliasing. They are pixels put between two colors to make it look smoother. Look at the Clefairy above. The Clefairy on the left has anti-aliasing and the one on the right doesn't. See how much smoother the Clefairy on the left is? To make anti-analising chose a color between the base color of the pokemon, and the base color of the pattern. I find that the best way to get the color is to get a tool that makes semi-transparent strokes, get the color from one of the strokes and then undo the stroke. Then put a pixel in areas that look rough, and could be smoother. Do not go overboard with anti-analising. In the games it is only really used to make spots on pokemon look better. Don't surround the entire pattern with anti-analising. Anti-analising is only mainly used in areas of the base color. If there is a part in the shade a new color of anti-analising isn't made for it. Either remove it all together in shade areas or use a color that is already somewhere on the sprite. There is also usually only one anti-analising color.
 For this lesson I want you to give Clefairy a star pattern. Start by finding a color that looks good on Clefairy. Then either draw patterns using the base pattern color onto Clefairy which is better for unique patterns or make them off to the side which is better for repeating shape patterns. For smaller stars you can make them + shaped. For bigger stars you can make a line of 5 pixels, with one of 3 pixels under it. add a pixel to the top and onto the bottom outer corners. You can make your own star shapes too if you want, these are just for guidance if you get stuff. Now for the anti-analising. For the bigger star on the bottom most pixels add a pixel going towards the center. I find that is what looks the best. You don't want to over do anti-analising in sprites. For instance if you put anti-analising in the corners of the smaller star it will look like a spot.
Now if you didn't draw the shapes directly onto the sprite copy and paste the shapes onto the sprite. Be careful about the placement. You want to find a nice balance of not being to cluttered and varying the shapes you place down. Once that is done fix up any outlines you broke. Then recolor the parts that need to, including outlines.
For this lesson I want you to give Clefairy a star pattern. Start by finding a color that looks good on Clefairy. Then either draw patterns using the base pattern color onto Clefairy which is better for unique patterns or make them off to the side which is better for repeating shape patterns. For smaller stars you can make them + shaped. For bigger stars you can make a line of 5 pixels, with one of 3 pixels under it. add a pixel to the top and onto the bottom outer corners. You can make your own star shapes too if you want, these are just for guidance if you get stuff. Now for the anti-analising. For the bigger star on the bottom most pixels add a pixel going towards the center. I find that is what looks the best. You don't want to over do anti-analising in sprites. For instance if you put anti-analising in the corners of the smaller star it will look like a spot.
Now if you didn't draw the shapes directly onto the sprite copy and paste the shapes onto the sprite. Be careful about the placement. You want to find a nice balance of not being to cluttered and varying the shapes you place down. Once that is done fix up any outlines you broke. Then recolor the parts that need to, including outlines.
Now let me tell you about anti-aliasing. They are pixels put between two colors to make it look smoother. Look at the Clefairy above. The Clefairy on the left has anti-aliasing and the one on the right doesn't. See how much smoother the Clefairy on the left is? To make anti-analising chose a color between the base color of the pokemon, and the base color of the pattern. I find that the best way to get the color is to get a tool that makes semi-transparent strokes, get the color from one of the strokes and then undo the stroke. Then put a pixel in areas that look rough, and could be smoother. Do not go overboard with anti-analising. In the games it is only really used to make spots on pokemon look better. Don't surround the entire pattern with anti-analising. Anti-analising is only mainly used in areas of the base color. If there is a part in the shade a new color of anti-analising isn't made for it. Either remove it all together in shade areas or use a color that is already somewhere on the sprite. There is also usually only one anti-analising color.
For this lesson I want you to give Clefairy a star pattern. Start by finding a color that looks good on Clefairy. Then either draw patterns using the base pattern color onto Clefairy which is better for unique patterns or make them off to the side which is better for repeating shape patterns. For smaller stars you can make them + shaped. For bigger stars you can make a line of 5 pixels, with one of 3 pixels under it. add a pixel to the top and onto the bottom outer corners. You can make your own star shapes too if you want, these are just for guidance if you get stuff. Now for the anti-analising. For the bigger star on the bottom most pixels add a pixel going towards the center. I find that is what looks the best. You don't want to over do anti-analising in sprites. For instance if you put anti-analising in the corners of the smaller star it will look like a spot.
Now if you didn't draw the shapes directly onto the sprite copy and paste the shapes onto the sprite. Be careful about the placement. You want to find a nice balance of not being to cluttered and varying the shapes you place down. Once that is done fix up any outlines you broke. Then recolor the parts that need to, including outlines.
Lesson 3 - Adding advanced multi-color patterns
Sometimes when making a sprite you will want to create a complex pattern in multiple colors. You will then come to the horrible realization that you have to keep tract of shading while creating the pattern. However I've come up with a method to make it much easier. The first thing you want to do is make a copy of the sprite your making. Then draw the pattern directly onto the sprite using flat colors. You can completely ignore shading for now. Make sure not to use colors already on the sprite. You also have to color in areas you want to keep their original color in a different color. Make sure to also color in outlines you want to be that color.
After that make a copy of the unedited sprite and the sprite covered in patterns. Make one of the colors in the pattern transparent. Then drag it over the unedited sprite. After that recolor everything to the color you want, and this includes shading. For the rest of the colors make another copy of the unedited sprite. Then on the sprite you just recolored make another color transparent. Drag that over the unedited sprite and then recolor. If you are trying to keep some of the colors the same as the original sprite do it last, as otherwise you might recolor it to a different color.

 For this lesson I want you to recolor Walrein with the pattern provided on the right. The pattern was made to be really annoying to recolor onto the sprite without this method. I trust that you will be able to create patterns on your own, recoloring everything correctly is the part I want to focus on for this lesson. The pattern gives you the base color for the body, but you will have to create all of the shades on your own. Start by making the red transparent and then drag it over the Walrein sprite. Then recolor it. I want you to try to stick to the same red for the entirety of Walrein's sprite. Though you want to make the Red on the white parts of Walrein lighter than the rest of the body. Be careful about mixing up the pure white on Walrein's sprite with the pure white patterns on it. After that do the green. Then the white. For the yellow just leave Walrein's base color there.
For this lesson I want you to recolor Walrein with the pattern provided on the right. The pattern was made to be really annoying to recolor onto the sprite without this method. I trust that you will be able to create patterns on your own, recoloring everything correctly is the part I want to focus on for this lesson. The pattern gives you the base color for the body, but you will have to create all of the shades on your own. Start by making the red transparent and then drag it over the Walrein sprite. Then recolor it. I want you to try to stick to the same red for the entirety of Walrein's sprite. Though you want to make the Red on the white parts of Walrein lighter than the rest of the body. Be careful about mixing up the pure white on Walrein's sprite with the pure white patterns on it. After that do the green. Then the white. For the yellow just leave Walrein's base color there.Custom Animation
An intro to custom animation
It's not an animated recolor. It's not putting sprites from multiple generations together. This is making your very own animations for sprites. This is done by converting the sprite into a vector sprite, moving it around, cleaning up the images then converting it to a gif.
For these lessons you will need a program called Scratch 2.0. You can get the program here. The program was designed to be an educational coding program, but we are interested in it's art editor.
These lessons were made with a computer in mind. Scratch 2.0 won't work on most tablets and phones.Lesson 1 - Rigging a sprite
Before you can animate a sprite, you got to rig the sprite. For this lesson I want you to rig any official pokemon sprite or sprite you made/edited.
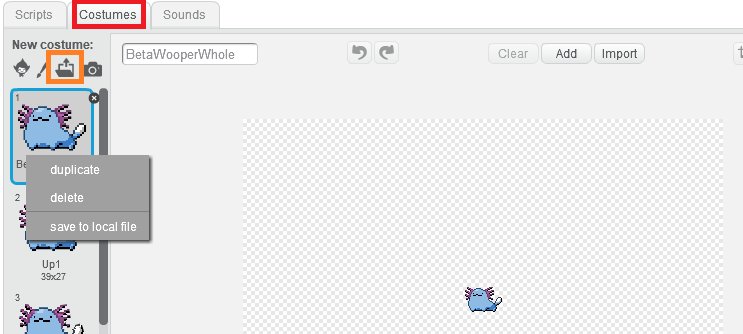 The first thing to do is to open up Scratch. Click costumes which is boxed in red. Then you want to import the sprite into the program which is boxed in orange. You want to right click and duplicate the first image.
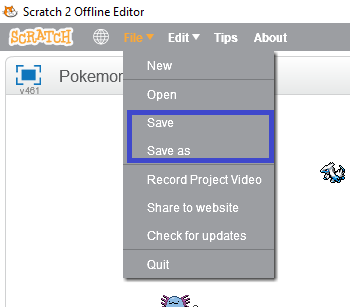 Remember to save what you do in Scratch. The save buttons are boxed in light blue. Scratch has crashed on me before when I was using the magic wand tool. Stay on the safe side and save.
 Then on duplicated image erase everything but a body part which is boxed in yellow. These parts will be the parts that you are able to move in the animation process.
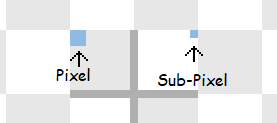 Instead of operating in pixels like any normal art program, Scratch operates in SUB-pixels. That means many features are able to be done in a 4th of a pixel. This is bad when doing pixel art. All but the smallest 2 eraser sizes automatically erase subpixels, and the smallest two will erase subpixels if you use it willy-nilly.
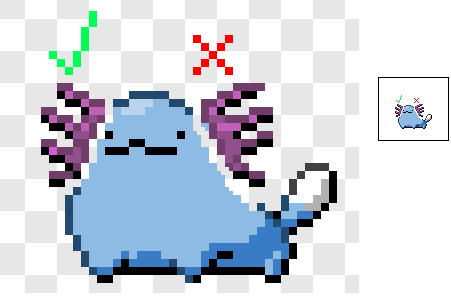 The thing to do is carefully with a small eraser erase the boundary between the body part and the rest of the sprite, never doing diagonal strokes. Then erase the rest of the sprite with a bigger eraser without damaging the part. Then erase what you couldn't erase with the bigger eraser without damaging the part with a smaller eraser.
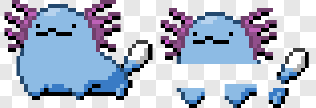 Depending on the part you may want to extend it a few pixels outwards so it looks better when other parts are moved away from it.
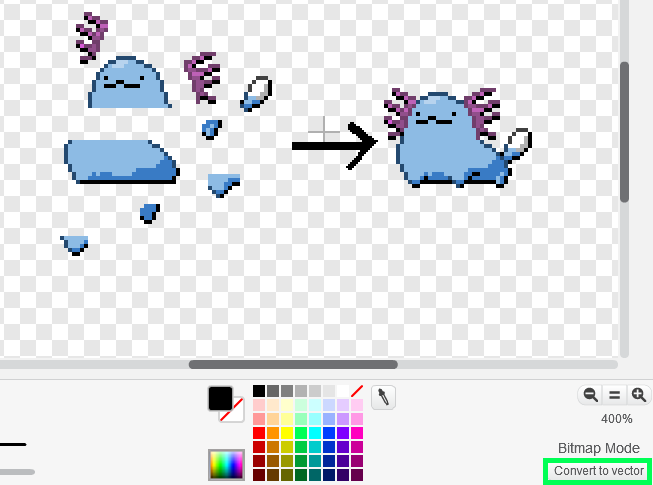 After that click convert to vector that is boxed in green in the lower right corner. Repeat the process above until you got all of the body parts.
You will want one vector image to put all of the body parts together on. Copy and paste all of the body parts onto one image. Copying and pasting in Scratch is finicky. You will lose what you just copied the second you are off of a vector image. It may also take a few tries.
Once all of the pieces are on one image it's time to reconstruct the sprite. Carefully put the parts back together to form the sprite, you can drag it and use arrow keys. However this also involves subpixels.
After that click convert to vector that is boxed in green in the lower right corner. Repeat the process above until you got all of the body parts.
You will want one vector image to put all of the body parts together on. Copy and paste all of the body parts onto one image. Copying and pasting in Scratch is finicky. You will lose what you just copied the second you are off of a vector image. It may also take a few tries.
Once all of the pieces are on one image it's time to reconstruct the sprite. Carefully put the parts back together to form the sprite, you can drag it and use arrow keys. However this also involves subpixels.
 Try to use segments of single pixels on the sprite to try to line things up. You can also do this as you separate the parts, which is what I do. When you are done go back and forth from the original image to the reconstructed one and check for differences. Ideally they should look the same.
For this lesson I want to to screenshot the end result once you reconstructed the sprite.
Try to use segments of single pixels on the sprite to try to line things up. You can also do this as you separate the parts, which is what I do. When you are done go back and forth from the original image to the reconstructed one and check for differences. Ideally they should look the same.
For this lesson I want to to screenshot the end result once you reconstructed the sprite.
The first thing to do is to open up Scratch. Click costumes which is boxed in red. Then you want to import the sprite into the program which is boxed in orange. You want to right click and duplicate the first image.
Remember to save what you do in Scratch. The save buttons are boxed in light blue. Scratch has crashed on me before when I was using the magic wand tool. Stay on the safe side and save.
Then on duplicated image erase everything but a body part which is boxed in yellow. These parts will be the parts that you are able to move in the animation process.
Instead of operating in pixels like any normal art program, Scratch operates in SUB-pixels. That means many features are able to be done in a 4th of a pixel. This is bad when doing pixel art. All but the smallest 2 eraser sizes automatically erase subpixels, and the smallest two will erase subpixels if you use it willy-nilly.
The thing to do is carefully with a small eraser erase the boundary between the body part and the rest of the sprite, never doing diagonal strokes. Then erase the rest of the sprite with a bigger eraser without damaging the part. Then erase what you couldn't erase with the bigger eraser without damaging the part with a smaller eraser.
Depending on the part you may want to extend it a few pixels outwards so it looks better when other parts are moved away from it.
After that click convert to vector that is boxed in green in the lower right corner. Repeat the process above until you got all of the body parts.
You will want one vector image to put all of the body parts together on. Copy and paste all of the body parts onto one image. Copying and pasting in Scratch is finicky. You will lose what you just copied the second you are off of a vector image. It may also take a few tries.
Once all of the pieces are on one image it's time to reconstruct the sprite. Carefully put the parts back together to form the sprite, you can drag it and use arrow keys. However this also involves subpixels.
Try to use segments of single pixels on the sprite to try to line things up. You can also do this as you separate the parts, which is what I do. When you are done go back and forth from the original image to the reconstructed one and check for differences. Ideally they should look the same.
For this lesson I want to to screenshot the end result once you reconstructed the sprite.Lesson 2 - Animating the sprite
For this lesson I want you to animate the sprite you rigged in lesson 1.
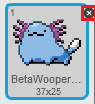 First you want to get the reconstructed vector image as the only costume in a sprite. I recommend duplicating the sprite you were working on by right clicking the image for it on the bottom left corner of the screen, then clicking duplicate. Then press X on all of the costumes in the sprite until only the vector image is left.
Now it is time to animate the sprite. First you should duplicate the first frame. Now you want to move it a bit. The vector editor also works in sub-pixels, so try to use the pixels around the part to judge how much you moved it.
If you move things by less than a full pixel it will not show up in the final animation. You can also rotate and resize parts. For frames that continue current motion duplicate the frame you just worked on once your finished working on it.
First you want to get the reconstructed vector image as the only costume in a sprite. I recommend duplicating the sprite you were working on by right clicking the image for it on the bottom left corner of the screen, then clicking duplicate. Then press X on all of the costumes in the sprite until only the vector image is left.
Now it is time to animate the sprite. First you should duplicate the first frame. Now you want to move it a bit. The vector editor also works in sub-pixels, so try to use the pixels around the part to judge how much you moved it.
If you move things by less than a full pixel it will not show up in the final animation. You can also rotate and resize parts. For frames that continue current motion duplicate the frame you just worked on once your finished working on it.
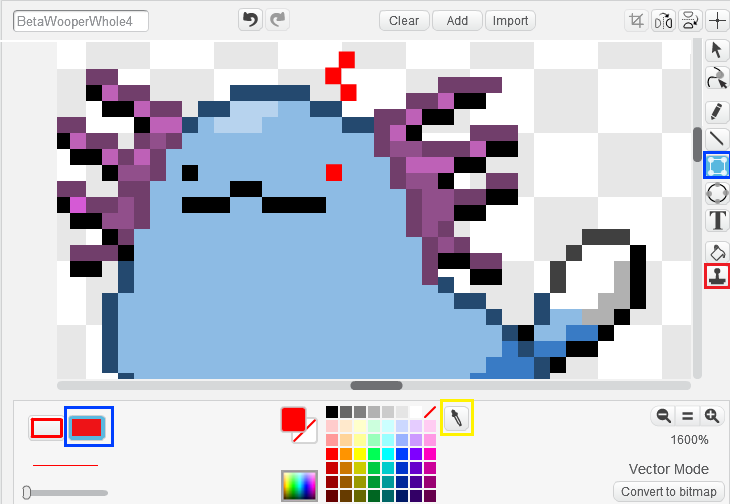 Adding pixels to the animation is a bit tricky. First you want to click the button that looks like a square with circles in the corners. Then on the bottom left corner of the art editor you want to click the solid rectangle.
Then use the eyedropper to get the color you want. Using an existing pixel as a guide, make a rectangle about the size of a pixel. Then place them where you want to put the pixels. You can use the tool that looks like a stamp to copy and paste those pixels(and parts).
The animation should eventually loop back to one of the frames. Focus on making the unique frames for the animation. Don't create extra frames looping back to the first sprite if you want them to look exactly the same as other frames you already have.
Adding pixels to the animation is a bit tricky. First you want to click the button that looks like a square with circles in the corners. Then on the bottom left corner of the art editor you want to click the solid rectangle.
Then use the eyedropper to get the color you want. Using an existing pixel as a guide, make a rectangle about the size of a pixel. Then place them where you want to put the pixels. You can use the tool that looks like a stamp to copy and paste those pixels(and parts).
The animation should eventually loop back to one of the frames. Focus on making the unique frames for the animation. Don't create extra frames looping back to the first sprite if you want them to look exactly the same as other frames you already have.
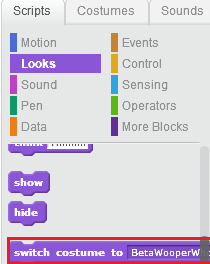 You can test out your animation in the editor. Click the scripts button that is next to the costumes button. There are bits of code that let you control the sprite. Under looks there is a block that says "Swtich costume to (NAME)". That will allow you to change what frame the sprite is currently on. Use the arrow drop down to select which frame it will become when used.
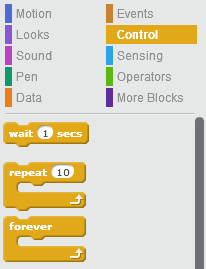 Under control there is a block that says "forever". Put one around the rest of your code so the animation keeps looping.
There is also a block called "wait (1) secs". This block will allow you to add pauses to your animation. Typically you want to put waits of 0.1 seconds in between blocks that change the sprite.
Finally there is the "repeat (10)" block. This allows you to loop parts of your animation. This is useful if you want a part of the animation to loop a number of times before doing something else.
Changes can be seen to the left of the screen. You can duplicate blocks by right clicking on them. You can start and stop code by quickly clicking on it. Keep adjusting your frames and animation until you get something you are happy with.
Under control there is a block that says "forever". Put one around the rest of your code so the animation keeps looping.
There is also a block called "wait (1) secs". This block will allow you to add pauses to your animation. Typically you want to put waits of 0.1 seconds in between blocks that change the sprite.
Finally there is the "repeat (10)" block. This allows you to loop parts of your animation. This is useful if you want a part of the animation to loop a number of times before doing something else.
Changes can be seen to the left of the screen. You can duplicate blocks by right clicking on them. You can start and stop code by quickly clicking on it. Keep adjusting your frames and animation until you get something you are happy with.
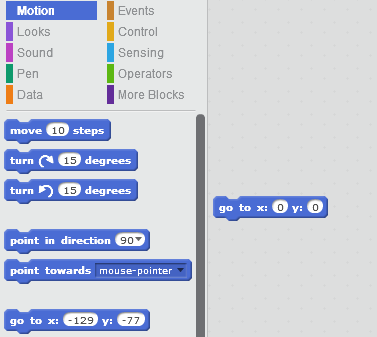 For the next step you want to clean up the images. This avoids the grainy and broken outlines problem many gen 5 sprite animations have. First of all go under motion and get the block "go to x:(number)y:(number)". Make both numbers zero, then click it. This will get your sprite to the center of the screen.
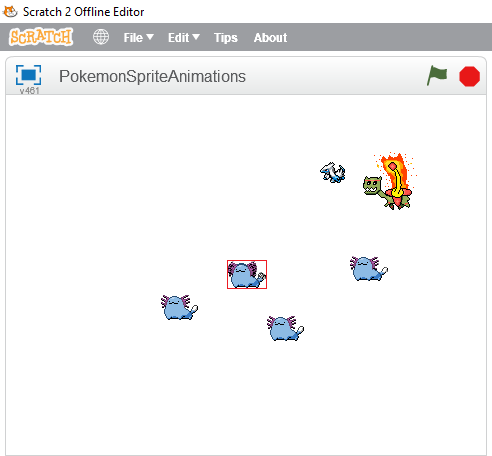 Now open up the program you use to make sprites. Take screen shots of the screen but make the white part transparent. Start by taking screen shots of the farthest reaching frames, and put them over each other. Make sure the screenshots line up. Then draw a 1 pixel wide box around the edges of the sprite. This box tells you how big all of the frames should be, so you wouldn't have trouble latter.
 If you are having trouble getting the images to line up create this image in a separate sprite in the scratch editor. Then move around the screen shots so that the pixel in the middle stays white.
Clear the inside of the box. Now take a screen shot of a frame. Save it. Create a new image that has what was in the last image. Repeat this for all of the frames.
If you are having trouble getting the images to line up create this image in a separate sprite in the scratch editor. Then move around the screen shots so that the pixel in the middle stays white.
Clear the inside of the box. Now take a screen shot of a frame. Save it. Create a new image that has what was in the last image. Repeat this for all of the frames.
 Once you do that crop the images so they look like above. Now it is time to clean up the image. Remove the semi-white pixels or make them a color in the sprite's pallet. Close up any broken outlines. Make sure all pixels are within the pallet's color.


 This is a comparison of the screen shoted image to the cleaned up image. The gen 5 animations can look messed up at times, and Eelektross is a great example of this. Very often during the animation the arms and the top of the head have their outlines broken. Cleaning up the frames can help you avoid this.
Once you've made all of the backgrounds transparent go to ezgif.com or another gif making website. Upload all of the frames that will be in your animation.
This is a comparison of the screen shoted image to the cleaned up image. The gen 5 animations can look messed up at times, and Eelektross is a great example of this. Very often during the animation the arms and the top of the head have their outlines broken. Cleaning up the frames can help you avoid this.
Once you've made all of the backgrounds transparent go to ezgif.com or another gif making website. Upload all of the frames that will be in your animation.
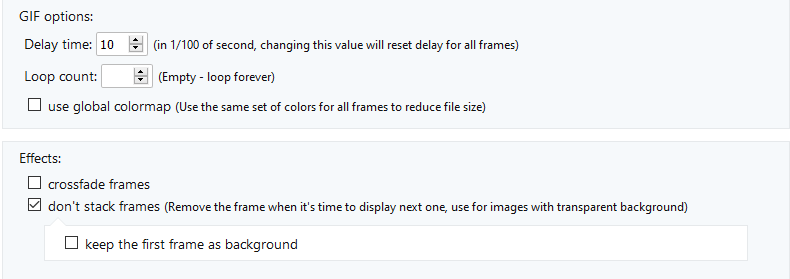 Scroll down a bit to the options. Click don't stack frames. For the delay time set it to what most of the frames were in the scratch editor. 0.1 in a wait block = 10 delay time.
Now it's time to put the animation together. Each frame is given a number based on their file name alphabetical order. Use that to keep track of what frame it is. Copy and drag frames into the order you want them in. There isn't a way to loop part of an animation, so if you want part of an animation to play after another part loops a number of times, you have to do that manually.
Scroll down a bit to the options. Click don't stack frames. For the delay time set it to what most of the frames were in the scratch editor. 0.1 in a wait block = 10 delay time.
Now it's time to put the animation together. Each frame is given a number based on their file name alphabetical order. Use that to keep track of what frame it is. Copy and drag frames into the order you want them in. There isn't a way to loop part of an animation, so if you want part of an animation to play after another part loops a number of times, you have to do that manually.
 Once you are done count how many frames there are total in your animation. Each row can fit 6 frames in them. Set the right number under toggle range of frames to how many frames there are in the animation.
Then press make a gif. EZgif deletes gifs on their servers after a while, so make sure to save the gif to your computer. Upload the image somewhere else where it won't get deleted.
Once you are done count how many frames there are total in your animation. Each row can fit 6 frames in them. Set the right number under toggle range of frames to how many frames there are in the animation.
Then press make a gif. EZgif deletes gifs on their servers after a while, so make sure to save the gif to your computer. Upload the image somewhere else where it won't get deleted.
First you want to get the reconstructed vector image as the only costume in a sprite. I recommend duplicating the sprite you were working on by right clicking the image for it on the bottom left corner of the screen, then clicking duplicate. Then press X on all of the costumes in the sprite until only the vector image is left.
Now it is time to animate the sprite. First you should duplicate the first frame. Now you want to move it a bit. The vector editor also works in sub-pixels, so try to use the pixels around the part to judge how much you moved it.
If you move things by less than a full pixel it will not show up in the final animation. You can also rotate and resize parts. For frames that continue current motion duplicate the frame you just worked on once your finished working on it.
Adding pixels to the animation is a bit tricky. First you want to click the button that looks like a square with circles in the corners. Then on the bottom left corner of the art editor you want to click the solid rectangle.
Then use the eyedropper to get the color you want. Using an existing pixel as a guide, make a rectangle about the size of a pixel. Then place them where you want to put the pixels. You can use the tool that looks like a stamp to copy and paste those pixels(and parts).
The animation should eventually loop back to one of the frames. Focus on making the unique frames for the animation. Don't create extra frames looping back to the first sprite if you want them to look exactly the same as other frames you already have.
You can test out your animation in the editor. Click the scripts button that is next to the costumes button. There are bits of code that let you control the sprite. Under looks there is a block that says "Swtich costume to (NAME)". That will allow you to change what frame the sprite is currently on. Use the arrow drop down to select which frame it will become when used.
Under control there is a block that says "forever". Put one around the rest of your code so the animation keeps looping.
There is also a block called "wait (1) secs". This block will allow you to add pauses to your animation. Typically you want to put waits of 0.1 seconds in between blocks that change the sprite.
Finally there is the "repeat (10)" block. This allows you to loop parts of your animation. This is useful if you want a part of the animation to loop a number of times before doing something else.
Changes can be seen to the left of the screen. You can duplicate blocks by right clicking on them. You can start and stop code by quickly clicking on it. Keep adjusting your frames and animation until you get something you are happy with.
For the next step you want to clean up the images. This avoids the grainy and broken outlines problem many gen 5 sprite animations have. First of all go under motion and get the block "go to x:(number)y:(number)". Make both numbers zero, then click it. This will get your sprite to the center of the screen.
Now open up the program you use to make sprites. Take screen shots of the screen but make the white part transparent. Start by taking screen shots of the farthest reaching frames, and put them over each other. Make sure the screenshots line up. Then draw a 1 pixel wide box around the edges of the sprite. This box tells you how big all of the frames should be, so you wouldn't have trouble latter.
If you are having trouble getting the images to line up create this image in a separate sprite in the scratch editor. Then move around the screen shots so that the pixel in the middle stays white.
Clear the inside of the box. Now take a screen shot of a frame. Save it. Create a new image that has what was in the last image. Repeat this for all of the frames.
Once you do that crop the images so they look like above. Now it is time to clean up the image. Remove the semi-white pixels or make them a color in the sprite's pallet. Close up any broken outlines. Make sure all pixels are within the pallet's color.
This is a comparison of the screen shoted image to the cleaned up image. The gen 5 animations can look messed up at times, and Eelektross is a great example of this. Very often during the animation the arms and the top of the head have their outlines broken. Cleaning up the frames can help you avoid this.
Once you've made all of the backgrounds transparent go to ezgif.com or another gif making website. Upload all of the frames that will be in your animation.
Scroll down a bit to the options. Click don't stack frames. For the delay time set it to what most of the frames were in the scratch editor. 0.1 in a wait block = 10 delay time.
Now it's time to put the animation together. Each frame is given a number based on their file name alphabetical order. Use that to keep track of what frame it is. Copy and drag frames into the order you want them in. There isn't a way to loop part of an animation, so if you want part of an animation to play after another part loops a number of times, you have to do that manually.
Once you are done count how many frames there are total in your animation. Each row can fit 6 frames in them. Set the right number under toggle range of frames to how many frames there are in the animation.
Then press make a gif. EZgif deletes gifs on their servers after a while, so make sure to save the gif to your computer. Upload the image somewhere else where it won't get deleted.
Fusion Creation process
Here I will walk you through the process I go through for fusions. For this fusion I will be fusing Vaporeon and Cofagrigus. Now when you first think of this fusion you might think of something like this.
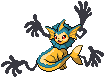 My problem with this sprite is that it is too simple. There is so much potential when fusing these two pokemon together, yet this fusion takes the easy way out. While the hands going out of the fins and tail is cool, this sprite fails to really go anywhere with the idea of the fusion, and is just Cofagrigus arms on a recolored Vaporeon.
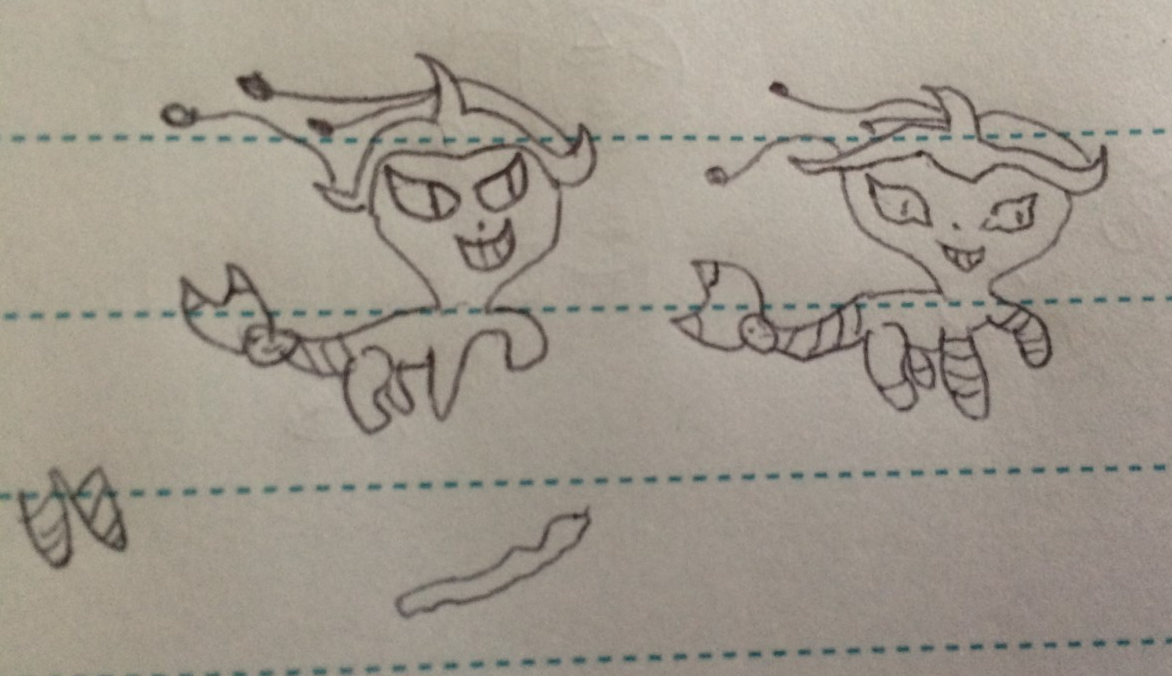 My first step when making a fusion is to plan it out with a sketch. When making a fusion I try to fuse the very essence of the pokemon together or make something new. For example take where Vaporeon's fins were. On Vaporeon's head fins come out. Ghostly arms come out of Cofagrigus's body. I decided to fuse these two concepts together by making ghostly arms come out where Vaporeon's fins should be. There are stripes along the tail with it ending with the face on Cofagrigus's head to try to create something new out of Vaporeon's tail using elements from Cofagrigus.
After the first sketch I sketch out and refine ideas for the sprite. In this case it is the stripes along the front paws and having the fin along Vaporeon's back be ghostly like Cofagrigus's arms. Then I draw a second sketch where I put all of the elements together, and try to make the pokemon look like the pokemon if I mess up the first sketch horribly.
Now you will notice in the second sketch I forgot the ghostly back fin. This is because I forgot to draw it. I tried to draw it in the pose I wanted it in, the fusion creeping about. Notice the simplicity of the sketch. These are meant to help you plan your ideas out. Details such as hands(Seriously who can draw them?) are simplified to get the general point across without making the sketch take 3000 years.
My first step when making a fusion is to plan it out with a sketch. When making a fusion I try to fuse the very essence of the pokemon together or make something new. For example take where Vaporeon's fins were. On Vaporeon's head fins come out. Ghostly arms come out of Cofagrigus's body. I decided to fuse these two concepts together by making ghostly arms come out where Vaporeon's fins should be. There are stripes along the tail with it ending with the face on Cofagrigus's head to try to create something new out of Vaporeon's tail using elements from Cofagrigus.
After the first sketch I sketch out and refine ideas for the sprite. In this case it is the stripes along the front paws and having the fin along Vaporeon's back be ghostly like Cofagrigus's arms. Then I draw a second sketch where I put all of the elements together, and try to make the pokemon look like the pokemon if I mess up the first sketch horribly.
Now you will notice in the second sketch I forgot the ghostly back fin. This is because I forgot to draw it. I tried to draw it in the pose I wanted it in, the fusion creeping about. Notice the simplicity of the sketch. These are meant to help you plan your ideas out. Details such as hands(Seriously who can draw them?) are simplified to get the general point across without making the sketch take 3000 years.
 I will be using Vaporeon's HeartGold sprite as it is closer to the pose I am aiming for.
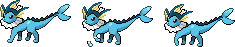 For this sprite the first thing I do is get the sprite ready for the pose. This gets the sprite ready to work on Cofagrius parts latter. I move and mend body parts into the pose I want. I also remove part of the fin as it was in the way and I won't need it for the final design. For the paw off the ground I made a copy of the sprite as it was a part of the sprite I was likely to mess up. I did a few versions that didn't look so good until I got a final version I was happy with.
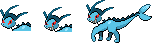 Next I decided to focus on the head. First I remove the fins as I won't need them. Then I move the head closer to the body as the frills took up a lot of space. Then I worked on the mouth and eyes. When making the mouth I had a feeling like I would have to reshape the eye, so I made a copy of it. After that I made another copy in case I messed up the head while adding the hands, and I should have started with a copy of the full body, as I realized only after I placed the hands. I also adjusted the smile a bit as in sprites adjustments are key. Just a few pixels can drastically change the feel of the sprite.
 I realized the hands are to big as they will cover up a significant portion of the sprite if I left them as they were. I shrank the size of the hands, and then placed them. I originally was going to have the leftmost hand behind the other hands, however it would get to covered up, so I considered moving it off to the side and just using the central hand again. I decided to have the hand hover over the other two as to not get in the way. I then drew in the ghostly arms to connect the hands to the head.
 Next I add on the face on Cofagrius's head onto the tail of the fusion. Then I recolor it. I fix up the back fins and recolor them into a ghost-like substance. I also fix up the neck. I tried to make the face yellow, but that wasn't really working out. I changed it to black, and also changed the direction of the face to match the direction of the mouth and eyes.
 I was having trouble with getting the smile to look right. While I don't usually do this in fusions, I decided to grab the mouth off of Gengar's minisprite to make the mouth look better. The mouth on Cofagrius's minisprite is to small to look good. I tried edit the mouth to make it more pointed like Cofafrius's teeth, but that made it look worse. So instead I fused it with the current mouth and lightened the color a bit, and that mouth looked good. To get the mouth on the fusion I filled it with a near white color, then changed it back.
 Next I add the stripes. I grab the color pallet and add them along the arms, legs and tail. I thought the fusion was looking a bit plain in the area, so I added a stripe to it's stomach. However it looked worse so I kept it the way it was.
 Finally I worked on the headdress. I was going to make it mimic Cofagrius's. However I realized that while I changed the direction the fusion's head was in, I didn't change the direction the headdress was facing. After fixing that I focused on the headdress.
 And now, the fusion is finished. While making this sprite I used techniques from all 5 core classes. I recolored Cofagrius to Vaporeon's colors. I obviously fused parts of Cofagrius onto Vaporeon. I scratched part of the smile, the ghostly arms and the sides of the headdress. I put the fusion in a pose, and for advanced recolor I put on a stripe pattern onto Vaporeon. As shown here these skills come up everywhere in spriting, which is why they are core classes.
 This sprite is actually a remake of an older fusion sprite. I wasn't as into giving my sprites poses then. Here you can clearly see the difference it makes. The old sprite uses Vaporeon's gen 5 sprite and pose. The result looks like it's making the surprised Pikachu face while sitting down. The next sprite has the fusion lurking around with a big slasher smile. This pose is much more fitting for the fusion, and tells you a bit about it's personality.
And here is what my workspace looked like once I was done with the fusion (Though shrunken a bit):
This sprite is actually a remake of an older fusion sprite. I wasn't as into giving my sprites poses then. Here you can clearly see the difference it makes. The old sprite uses Vaporeon's gen 5 sprite and pose. The result looks like it's making the surprised Pikachu face while sitting down. The next sprite has the fusion lurking around with a big slasher smile. This pose is much more fitting for the fusion, and tells you a bit about it's personality.
And here is what my workspace looked like once I was done with the fusion (Though shrunken a bit):
 That showed just one way to fuse the two pokemon together. There are still infinitely more ways the fusion can go. This time instead of completely fusing the pokemon together I am going to fuse the concepts of Cofagrius onto Vaporeon.
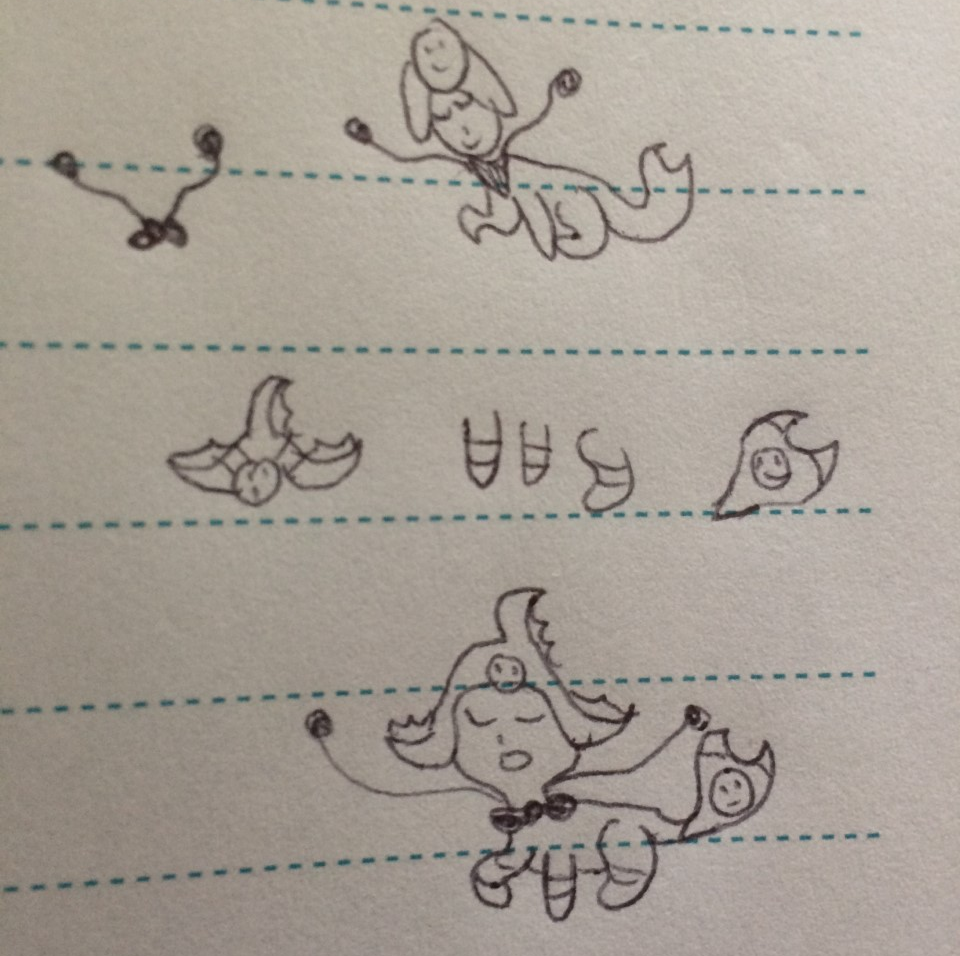 For this fusion I am aiming for a rich, and bit ghostly fusion. As you can see the first sketch doesn't remotely look like the pokemon. After thinking through some of the parts, the 2nd second sketch is a lot better, and actually looks like a pokemon.
For this fusion I will use Vaporeon's platinum sprite as it is the closest to the pose I am aiming for. The first thing I do is get the pose right. I move the tail behind Vaporeon, lift up Vaporeon's front arm and add in the back legs. This was tricky as the tail was covering most of it. My first attempt looked wrong as it made the belly looked large and fat. My second attempt's legs looked worse. I edited the pixels between the first and second pair of legs, and went with the first attempt's back legs as they looked better. I also adjusted the front arm going up a bit to make it look better.
Next I work on the bowtie. I tried placing the hands in front of Vaporeon, but that did not work out. For the bow tie I looked at the barrettes from the diamond and pearl games as inspriation. Finally I got something I was happy with, and put the hands behind the back.
Next I add in the head piece. As you can see, putting it on Vaporeon's head as it is, is way to big. I tried shrinking it, but those also floped. I ended up editing the one on the minisprite a bit.
Then I made the gold bands, I also edited the lines and shading of the head piece a bit.
After that I added the golden thing to the tail. I also closed up the lines on the back fin.
While I put in everything I wanted to, the fusion still looked a bit plain. I added a neck band that has the symbol of Cofagrius's head on it. I also tried giving it the eye of hourus as Cofagrius is based on an egyptian Coffin. I tried to tone it down a bit, but it looked like it was crying... Clearly not my intetion, so I removed it entirely. And with that the fusion is finished.
You can make many different versions of a fusion using the same two pokemon. Here are four fusions using the same two pokemon, and that's just as Vaporeon as the base. So the next time your making a fusion, instead of just dragging a part onto a pokemon and recoloring it, remeber there's a whole world of possiblities you can make. Let your creativity shine!
For this fusion I am aiming for a rich, and bit ghostly fusion. As you can see the first sketch doesn't remotely look like the pokemon. After thinking through some of the parts, the 2nd second sketch is a lot better, and actually looks like a pokemon.
For this fusion I will use Vaporeon's platinum sprite as it is the closest to the pose I am aiming for. The first thing I do is get the pose right. I move the tail behind Vaporeon, lift up Vaporeon's front arm and add in the back legs. This was tricky as the tail was covering most of it. My first attempt looked wrong as it made the belly looked large and fat. My second attempt's legs looked worse. I edited the pixels between the first and second pair of legs, and went with the first attempt's back legs as they looked better. I also adjusted the front arm going up a bit to make it look better.
Next I work on the bowtie. I tried placing the hands in front of Vaporeon, but that did not work out. For the bow tie I looked at the barrettes from the diamond and pearl games as inspriation. Finally I got something I was happy with, and put the hands behind the back.
Next I add in the head piece. As you can see, putting it on Vaporeon's head as it is, is way to big. I tried shrinking it, but those also floped. I ended up editing the one on the minisprite a bit.
Then I made the gold bands, I also edited the lines and shading of the head piece a bit.
After that I added the golden thing to the tail. I also closed up the lines on the back fin.
While I put in everything I wanted to, the fusion still looked a bit plain. I added a neck band that has the symbol of Cofagrius's head on it. I also tried giving it the eye of hourus as Cofagrius is based on an egyptian Coffin. I tried to tone it down a bit, but it looked like it was crying... Clearly not my intetion, so I removed it entirely. And with that the fusion is finished.
You can make many different versions of a fusion using the same two pokemon. Here are four fusions using the same two pokemon, and that's just as Vaporeon as the base. So the next time your making a fusion, instead of just dragging a part onto a pokemon and recoloring it, remeber there's a whole world of possiblities you can make. Let your creativity shine!
My first step when making a fusion is to plan it out with a sketch. When making a fusion I try to fuse the very essence of the pokemon together or make something new. For example take where Vaporeon's fins were. On Vaporeon's head fins come out. Ghostly arms come out of Cofagrigus's body. I decided to fuse these two concepts together by making ghostly arms come out where Vaporeon's fins should be. There are stripes along the tail with it ending with the face on Cofagrigus's head to try to create something new out of Vaporeon's tail using elements from Cofagrigus.
After the first sketch I sketch out and refine ideas for the sprite. In this case it is the stripes along the front paws and having the fin along Vaporeon's back be ghostly like Cofagrigus's arms. Then I draw a second sketch where I put all of the elements together, and try to make the pokemon look like the pokemon if I mess up the first sketch horribly.
Now you will notice in the second sketch I forgot the ghostly back fin. This is because I forgot to draw it. I tried to draw it in the pose I wanted it in, the fusion creeping about. Notice the simplicity of the sketch. These are meant to help you plan your ideas out. Details such as hands(Seriously who can draw them?) are simplified to get the general point across without making the sketch take 3000 years.
I will be using Vaporeon's HeartGold sprite as it is closer to the pose I am aiming for.
For this sprite the first thing I do is get the sprite ready for the pose. This gets the sprite ready to work on Cofagrius parts latter. I move and mend body parts into the pose I want. I also remove part of the fin as it was in the way and I won't need it for the final design. For the paw off the ground I made a copy of the sprite as it was a part of the sprite I was likely to mess up. I did a few versions that didn't look so good until I got a final version I was happy with.
Next I decided to focus on the head. First I remove the fins as I won't need them. Then I move the head closer to the body as the frills took up a lot of space. Then I worked on the mouth and eyes. When making the mouth I had a feeling like I would have to reshape the eye, so I made a copy of it. After that I made another copy in case I messed up the head while adding the hands, and I should have started with a copy of the full body, as I realized only after I placed the hands. I also adjusted the smile a bit as in sprites adjustments are key. Just a few pixels can drastically change the feel of the sprite.
I realized the hands are to big as they will cover up a significant portion of the sprite if I left them as they were. I shrank the size of the hands, and then placed them. I originally was going to have the leftmost hand behind the other hands, however it would get to covered up, so I considered moving it off to the side and just using the central hand again. I decided to have the hand hover over the other two as to not get in the way. I then drew in the ghostly arms to connect the hands to the head.
Next I add on the face on Cofagrius's head onto the tail of the fusion. Then I recolor it. I fix up the back fins and recolor them into a ghost-like substance. I also fix up the neck. I tried to make the face yellow, but that wasn't really working out. I changed it to black, and also changed the direction of the face to match the direction of the mouth and eyes.
I was having trouble with getting the smile to look right. While I don't usually do this in fusions, I decided to grab the mouth off of Gengar's minisprite to make the mouth look better. The mouth on Cofagrius's minisprite is to small to look good. I tried edit the mouth to make it more pointed like Cofafrius's teeth, but that made it look worse. So instead I fused it with the current mouth and lightened the color a bit, and that mouth looked good. To get the mouth on the fusion I filled it with a near white color, then changed it back.
Next I add the stripes. I grab the color pallet and add them along the arms, legs and tail. I thought the fusion was looking a bit plain in the area, so I added a stripe to it's stomach. However it looked worse so I kept it the way it was.
Finally I worked on the headdress. I was going to make it mimic Cofagrius's. However I realized that while I changed the direction the fusion's head was in, I didn't change the direction the headdress was facing. After fixing that I focused on the headdress.
And now, the fusion is finished. While making this sprite I used techniques from all 5 core classes. I recolored Cofagrius to Vaporeon's colors. I obviously fused parts of Cofagrius onto Vaporeon. I scratched part of the smile, the ghostly arms and the sides of the headdress. I put the fusion in a pose, and for advanced recolor I put on a stripe pattern onto Vaporeon. As shown here these skills come up everywhere in spriting, which is why they are core classes.
This sprite is actually a remake of an older fusion sprite. I wasn't as into giving my sprites poses then. Here you can clearly see the difference it makes. The old sprite uses Vaporeon's gen 5 sprite and pose. The result looks like it's making the surprised Pikachu face while sitting down. The next sprite has the fusion lurking around with a big slasher smile. This pose is much more fitting for the fusion, and tells you a bit about it's personality.
And here is what my workspace looked like once I was done with the fusion (Though shrunken a bit):
That showed just one way to fuse the two pokemon together. There are still infinitely more ways the fusion can go. This time instead of completely fusing the pokemon together I am going to fuse the concepts of Cofagrius onto Vaporeon.
For this fusion I am aiming for a rich, and bit ghostly fusion. As you can see the first sketch doesn't remotely look like the pokemon. After thinking through some of the parts, the 2nd second sketch is a lot better, and actually looks like a pokemon.
For this fusion I will use Vaporeon's platinum sprite as it is the closest to the pose I am aiming for. The first thing I do is get the pose right. I move the tail behind Vaporeon, lift up Vaporeon's front arm and add in the back legs. This was tricky as the tail was covering most of it. My first attempt looked wrong as it made the belly looked large and fat. My second attempt's legs looked worse. I edited the pixels between the first and second pair of legs, and went with the first attempt's back legs as they looked better. I also adjusted the front arm going up a bit to make it look better.
Next I work on the bowtie. I tried placing the hands in front of Vaporeon, but that did not work out. For the bow tie I looked at the barrettes from the diamond and pearl games as inspriation. Finally I got something I was happy with, and put the hands behind the back.
Next I add in the head piece. As you can see, putting it on Vaporeon's head as it is, is way to big. I tried shrinking it, but those also floped. I ended up editing the one on the minisprite a bit.
Then I made the gold bands, I also edited the lines and shading of the head piece a bit.
After that I added the golden thing to the tail. I also closed up the lines on the back fin.
While I put in everything I wanted to, the fusion still looked a bit plain. I added a neck band that has the symbol of Cofagrius's head on it. I also tried giving it the eye of hourus as Cofagrius is based on an egyptian Coffin. I tried to tone it down a bit, but it looked like it was crying... Clearly not my intetion, so I removed it entirely. And with that the fusion is finished.
You can make many different versions of a fusion using the same two pokemon. Here are four fusions using the same two pokemon, and that's just as Vaporeon as the base. So the next time your making a fusion, instead of just dragging a part onto a pokemon and recoloring it, remeber there's a whole world of possiblities you can make. Let your creativity shine!
Time for another chapter of my Shiny Scramble! Man it's been awhile. I've actually had most of the chapter typed up for a while now, I just never got around to posting it. Anyway I hope to get back to doing this scramble, in less detail on what I did and more story because writing everything I do in detail is a bit of a pain. I don't think I could keep it up.
Shiny Scramble, Chapter 10, A long road ahead.
The quartet awoke and headed towards route 205.
 "It's another great day! And with our new friend mistress Air it'll be even better!" Buguitar pretended to smile around Hot Air. Hot Air on the other hand didn't even try to hide her death glare. "Mistress Air, why are you looking at Buguitar like that?"
 "No reason, everything is all sunshine and rainbows here." Wish was unconvinced. He took out a clipboard and wrote something down.
Jacob:"How about a quick battle before I leave for Eterna forest?" He sent out a Ponyta. Wish was out but was sent to 12 health before he could do anything. Hot Air switched in and alternated Gust and Stockpile. In the end the burn she got ended up doing the most damage to her.
Jacob:"That really dampened my spirits."
In the grass they beat a level 8 Shellos Wish failed to OHKO with magical leaf and a Pachirisu that allowed Wish to level up.
Daniel:"There's no mountain here, but I'm dressed to hike! Gahaha! Here goes!" On a elevated rocky platform he sent out a Geodude. "Our dreams are meant to be shared. Let it grow. Let it live." Buguitar defeated it with some struggle and missed sings. Wish, Hot Air and Buguitar were able to OHKO Daniel's Geodue, Machop and Bidoof respectively.
Daniel:"Oh yeah. What a refreshing battle that was." The quartet continued onwards. Shiny picked up a X-Attack.
Elizabeth:"I love Pokemon that smell sweet. Like this one--get whiff of this!"
"Let us see what it will bring." Buguitar finished off Budew with more health than she started with.
Elizabeth:"Don't you understand what I meant. Don't my pokemon smell nice?" Shiny found a hidden antidote.
Zackary:"It's a long way between Floroma and Eterna City. So, Let's battle!"
"When we share in our love," Geodude was down to yellow and Buguitar was down to red. Wish switched in and finished Geodude with magical leaf on the first turn out. Buguitar leveled up.
Zackary:"Wawwah! I'm out of pokemon that can go!"
Shiny rushed to the pokemon center and came back. Wish OHKOed a wild Shellos, 3HKOed a Bidoof without any disobedience. Shiny picked up a pokeball, Oran berry and Pecha berry.
They healed then headed back out. "Of all places possible, I've lost my way here..." Nicholas said as he sent out an Onix.
"Search it out, and find the way:" Buguitar 2HKOed Onix thanks to a crit.
Nicholas:"Having lost his way, the trainer lost his battle too..."
Shiny caught a shiny Shellos after Buguitar went to 21 health mostly due to confusion. The Shellos was named Augie, after the person who gave Dirachi's challenge. They healed then fought a Pachirisu that allowed Wish to level up, he started to glow faintly but quickly stopped. He was happy, but he wasn't happy enough to evolve yet. Buguitar was the only evolved pokemon right now and Wish wanted Hot Air and Buguitar to succeed before he did.
Shinys encountered:28
Shinys caught:14
Kelsey:"Osu! I'm not trained to hold back! She sent out a Machop. Even with Wish leading no damage was done after Hot Air switched in and OHKOed with a crit gust. Shiny picked up a
"No reason, everything is all sunshine and rainbows here." Wish was unconvinced. He took out a clipboard and wrote something down.
Jacob:"How about a quick battle before I leave for Eterna forest?" He sent out a Ponyta. Wish was out but was sent to 12 health before he could do anything. Hot Air switched in and alternated Gust and Stockpile. In the end the burn she got ended up doing the most damage to her.
Jacob:"That really dampened my spirits."
In the grass they beat a level 8 Shellos Wish failed to OHKO with magical leaf and a Pachirisu that allowed Wish to level up.
Daniel:"There's no mountain here, but I'm dressed to hike! Gahaha! Here goes!" On a elevated rocky platform he sent out a Geodude. "Our dreams are meant to be shared. Let it grow. Let it live." Buguitar defeated it with some struggle and missed sings. Wish, Hot Air and Buguitar were able to OHKO Daniel's Geodue, Machop and Bidoof respectively.
Daniel:"Oh yeah. What a refreshing battle that was." The quartet continued onwards. Shiny picked up a X-Attack.
Elizabeth:"I love Pokemon that smell sweet. Like this one--get whiff of this!"
"Let us see what it will bring." Buguitar finished off Budew with more health than she started with.
Elizabeth:"Don't you understand what I meant. Don't my pokemon smell nice?" Shiny found a hidden antidote.
Zackary:"It's a long way between Floroma and Eterna City. So, Let's battle!"
"When we share in our love," Geodude was down to yellow and Buguitar was down to red. Wish switched in and finished Geodude with magical leaf on the first turn out. Buguitar leveled up.
Zackary:"Wawwah! I'm out of pokemon that can go!"
Shiny rushed to the pokemon center and came back. Wish OHKOed a wild Shellos, 3HKOed a Bidoof without any disobedience. Shiny picked up a pokeball, Oran berry and Pecha berry.
They healed then headed back out. "Of all places possible, I've lost my way here..." Nicholas said as he sent out an Onix.
"Search it out, and find the way:" Buguitar 2HKOed Onix thanks to a crit.
Nicholas:"Having lost his way, the trainer lost his battle too..."
Shiny caught a shiny Shellos after Buguitar went to 21 health mostly due to confusion. The Shellos was named Augie, after the person who gave Dirachi's challenge. They healed then fought a Pachirisu that allowed Wish to level up, he started to glow faintly but quickly stopped. He was happy, but he wasn't happy enough to evolve yet. Buguitar was the only evolved pokemon right now and Wish wanted Hot Air and Buguitar to succeed before he did.
Shinys encountered:28
Shinys caught:14
Kelsey:"Osu! I'm not trained to hold back! She sent out a Machop. Even with Wish leading no damage was done after Hot Air switched in and OHKOed with a crit gust. Shiny picked up a 175 pokedollars repel.
Karina:"Oh, I don't know. Should I play a little?" Wish was up against a Piplup. With turns wasted Wish beat Piplup. "Oh boo, how insulting."
Shiny picked up a super potion off the ground. It was around noon.
"How long have we been traveling. I'm famished."
"It's only noon," Said Shiny, "Though maybe we should take a pit-stop at that house in the middle of nowhere over there." Shiny pointed to a house up ahead.
 "Are you sure. Who knows who could live there?"
"Probly someone kind!" They all walked inside, "Hello Madam!"
Woman:"Hello! You seem to be tired, want to rest awhile?"
Shiny:"Sure, thanks." The team was healed and Shiny watched some TV while eating lunch. There was a help wanted ad for Sinnoh news net for a show. Shiny quickly grew annoyed at how many ads TV allows to air as shows.
Woman:"So are you going through Eterna forest?"
Shiny:"Yeah."
Woman:"Be careful. It's deep and there are many ways to get poisoned."
"Oh no poisonous bugs? I'm so afraid. I'm sure I can handle a few bugs with gust."
"Thank you kind madam! We are going to the forest now. Goodbye!"
Woman:"Goodbye young trainer, Cleffa and other pokemon. Stay safe."
The quartet entered Eterna forest. A young woman approached them. "Hello, my name's Cheryl. And you are...?"
Shiny:"I'm Shiny. This is Wish, Buguitar and Ho-, her majesty mistress Air."
"I'm capable of introducing myself. But I won't now, now that it'll be redundant."
"Then what was the point of that sentence?"
"Then what was the point of your face?"
"Be nice guys! Hello Cheryl. It's very nice to meet you."
Cheryl:"So those are your names. I'm sincerely glad to meet you. Shiny may I ask a big favor of you?"
Shiny:"What is it?"
"What ever it is we'll be glad to help!"
Cheryl:"I want to get through this forest, but I'm afraid of doing it alone. I've heard there is a sinister group of people called team galactic about."
Shiny:"Yeah, they're a bunch of idiots who have chronic problem of threatening to hurt kids that can handle themselves. They're not much of a threat if you can beat them in battles."
Cheryl:"I think there'd be safety in numbers. Please, may I go through with you?"
Shiny:"If you heal my pokemon after every battle then you have yourself a deal!"
Cheryl:"That sounds like a good deal. I'll take it."
"Yay! It'll be nice to travel with you Cheryl!"
The forest was overwhelming for Shiny. There were two paths that just seemed to go very far. She took the left path. She saw a pokeball behind a Casoon. When Shiny was in front of the ball a Misdreavus jumped out from behind. "Don't worry, I've got your back," Cheryl said as she sent out a Chansey. Buguitar sang "the point where we can all meet. The point where we're all the same." they were easily able to take care of the wild pokemon despite none of Buguitar's moves being not very effective. In the end Shiny was rewarded with an antidote.
A kid ran by and punched Shiny in the face yelling, "Pikachu all the way!"
Shiny fell backwards. She opened her eyes and saw two Misdreavus looking down at her. The blue one licked her and muttered something along the lines "Tastes like chicken," while the other one nuzzled her.
"Are you sure. Who knows who could live there?"
"Probly someone kind!" They all walked inside, "Hello Madam!"
Woman:"Hello! You seem to be tired, want to rest awhile?"
Shiny:"Sure, thanks." The team was healed and Shiny watched some TV while eating lunch. There was a help wanted ad for Sinnoh news net for a show. Shiny quickly grew annoyed at how many ads TV allows to air as shows.
Woman:"So are you going through Eterna forest?"
Shiny:"Yeah."
Woman:"Be careful. It's deep and there are many ways to get poisoned."
"Oh no poisonous bugs? I'm so afraid. I'm sure I can handle a few bugs with gust."
"Thank you kind madam! We are going to the forest now. Goodbye!"
Woman:"Goodbye young trainer, Cleffa and other pokemon. Stay safe."
The quartet entered Eterna forest. A young woman approached them. "Hello, my name's Cheryl. And you are...?"
Shiny:"I'm Shiny. This is Wish, Buguitar and Ho-, her majesty mistress Air."
"I'm capable of introducing myself. But I won't now, now that it'll be redundant."
"Then what was the point of that sentence?"
"Then what was the point of your face?"
"Be nice guys! Hello Cheryl. It's very nice to meet you."
Cheryl:"So those are your names. I'm sincerely glad to meet you. Shiny may I ask a big favor of you?"
Shiny:"What is it?"
"What ever it is we'll be glad to help!"
Cheryl:"I want to get through this forest, but I'm afraid of doing it alone. I've heard there is a sinister group of people called team galactic about."
Shiny:"Yeah, they're a bunch of idiots who have chronic problem of threatening to hurt kids that can handle themselves. They're not much of a threat if you can beat them in battles."
Cheryl:"I think there'd be safety in numbers. Please, may I go through with you?"
Shiny:"If you heal my pokemon after every battle then you have yourself a deal!"
Cheryl:"That sounds like a good deal. I'll take it."
"Yay! It'll be nice to travel with you Cheryl!"
The forest was overwhelming for Shiny. There were two paths that just seemed to go very far. She took the left path. She saw a pokeball behind a Casoon. When Shiny was in front of the ball a Misdreavus jumped out from behind. "Don't worry, I've got your back," Cheryl said as she sent out a Chansey. Buguitar sang "the point where we can all meet. The point where we're all the same." they were easily able to take care of the wild pokemon despite none of Buguitar's moves being not very effective. In the end Shiny was rewarded with an antidote.
A kid ran by and punched Shiny in the face yelling, "Pikachu all the way!"
Shiny fell backwards. She opened her eyes and saw two Misdreavus looking down at her. The blue one licked her and muttered something along the lines "Tastes like chicken," while the other one nuzzled her.
 "It's okay I baked you some cookies as confert food."
Shiny:"Thanks. Ooo it's chocolate." Shiny took a bite then spat it out, "Pleth! What is in this cookie?"
"Mud of course."
Shiny:"Why."
"You never said you weren't okay with mud being in cookies."
"Hey that wasn't very nice. It's not nice to trick people like that."
"Oh contrary. I offered her cookies which was very kind of me. I never said what kind it was and it's not my fault that she doesn't like the flavor." The Misdreavus ate one of the cookies.
"You are disgusting."
"Um, um." On one hand they were right they did never specify the favor and shiny didn't ask. On the other hand most don't like mud flavored cookies, or did they seeing as they ate one.
Misdreavus turned to shiny, "Alright new trainer just knock out that Misdreavus there, weaken me and let's go together."
Shiny:"Wait, what?"
"Havn't you ever wished that you could start a pokemon journey? Well I'm here to grant it by joining your team as your 4th pokemon."
"No, we are not letting another ghost type on the team. There is only room for one ghost type, and that is me."
"I'm not a ghost type. I'm a psychic and dark type obviously. In fact I'm a little offended that you thought I was a ghost type."
"Why you, Misdreavus are for sure a-"
"Come on guys get along. We'll be gland to let you join our team! What is your name."
"I just go by my species name, Dirachi, the corrupter of wishes. Anyway I think you should get to beating up this Misdreavus and catching me now."
"With pleasure, well for the first part at least." Hot Air took Wish's place. A mysterious psywave weaved it's way around to Hot Air. She began by blowing a gust of wind at Misdreavus. Another psywave hit Hot Air. Hot Air readied herself for more attacks as both foe pokemon let out a loud growl for two turns in a row. More wind blew around Misdreavus. Hot Air stockpiled while Chansey continued to be a pokemon shield. Misdreavus was blown away by gust. Hot Air was quite pleased of herself. Dirachi took some spite to losing the pokemon she was fighting with. A growl echoed through the woods as Hot Air maxed out stockpile. A smile crept up Hot Air's face as she finally got to blast Dirachi with a gust. After a turn she returned to attacking Dirachi.
"Grr... Can you just throw a ball already?"
"Now let me use just one more gu-"
Shiny:"Buguitar you're up!"
"What! No! I am so close to beating that Misdreavus."
"But you already beat Misdreavus, I'm a Dirachi."
"There it lies: the future we seek." Buguitar sung loudly over the argument. She then ducked down, embarrassed. Shiny threw a Premier ball at Dirachi. Dirachi willingly went in.
"Yay, I have now joined your team. Also have fun because I'm horribly underleveled and I can only use Psywave and growl."
Shiny:"At least we have Cheryl to heal you after every battle." Cheryl waved.
"Welcome to the team Dirachi! It's very nice to have you!"
"Thanks, I even have a muffin basket for all of you; it's in Veilstone city."
Shinys encountered:29
Shinys caught:15
Dirachi, lv 11, Brave nature, Sturdy body. Growl, Psywave, Spite, Astonish
Shiny began to train Dirachi. They encountered a wild Buneary and Misdreavus. Buguitar was switched in to deal with things, "Start from there, and then we'll forge, a world where all can be free." they didn't do much, but it took forever to defeat the two wild pokemon. Buguitar did level up from the battle however. She had a chance to learn focus energy, but chose not to. This was enough for Shiny.
Shiny:"Cheryl?"
Cheryl:"What is it?"
Shiny:"I think I'm going to train for a while to get stronger. I'll be back though, alright?"
Cheryl:"Okay, I'll wait here you you."
"Goodbye Cheryl! See you soon!"
Shiny's team walked out of Eterna forest. Dirachi was trained on route 205. Dirachi mostly just alternated between Psywave and growl, her only two usable moves. Shiny became half distracted during the training when Jacob showed her some interesting pokemon videos on his phone. She beat a Buizel, Bidoof, Buizel, Buizel, Pachirisu, Bidoof, Bidoof, Shellos, Bidoof, Bidoof, Shellos, Buizel, Shellos and Buizel. After all of this Dirachi went from level 12 to 14. "Alright let's head back in!" said Shiny.
The Quintet headed back to Eterna forest. "Oh there you are!" Said Cheryl, "Let's go through this forest together." They traversed the tall grass, encountering two budew that allowed Dirachi to level up. They encountered a Wurmple and Cascoon. Two trainers surrounded them.
jack:"What's cool, you might ask? No? I'll tell you anyway: bug pokemon!"
Briana:"We're just out on a power walk!"
"Free to dream, and free to smile." Buguitar sang. Buguitar, Wish and Dirachi took out their pokemon, and Dirachi leveled up.
Jack:"It bugs me when people ignore the awesome coolness of bug pokemon"
Briana:"Hey you!"
Shiny picked up a Paralyze heal. Fought a wild Budew and Buneary with Dirachi that dragged on for a long time. Shiny grew annoyed of Dirachi only being able to attack every other turn. "Dirachi I think you need to learn another move," she said.
"What marvelous move do you want me to learn? Splash? Celebrate? Memento?"
Shiny searched through her bag's various TMs. She pulled out a silver disc. Hidden power. "I was thinking maybe this move, but what if I need it latter?"
"Let me remind you there is another, much better ghost type who is also suffering from a lack of attacking options thanks to someone's, insistence." Hot Air rolled her eyes at Wish.
Shiny stared intensely at TM 10. Two pokemon could benefit from it, and on top of that someone could need it later, or even more laterer? Hot Air didn't learn another constant damaging move until level 30 but Dirachi didn't learn another damaging move until 23. Shiny needed to test her two pokemon. "Alright I'll test the two of you in battle, I guess I'll give it to whoever needs it more I guess." She mumbled something about needing it later even more under her breath.
"Wait are you going to give it to one of us out of pity? Ew I don't want your pity. But at the same time it would make me stronger. Still I will never fall behind this other ghost type.
"I can't wait to alternate Growl and Hidden power!"
Shiny walked into the grass. Against Dirachi was a Buneary and Cascoon. Dirachi 2HKOed the Cascoon and defeated the Buneary was defeated by Chansey. Dirachi leveled up at the end of the battle. Against Hot Air was a Misdreavus and Budew. Hot Air OHKOed the Budew and 2HKOed the Misdreavus. Was Dirachi catching up with the rest of the team and her previous terribleness was because she was under leveled?
"I just can't decide!" Shiny yelled.
"Give it to me. I'm obviously the better one here."
"Remeber whoever you chose will love you for life, while the one you don't will put you on their mortal enemy list and forever hate you. No pressure!"
Pressure sank in. Shiny thought about the potential final move sets. "Um... I'm still making up my mind but I'll give it to one of you soon."
The team walked along. Dirachi battled a Budew, Cascoon, Misdreavus, Buneary. "When a Trainer and Pokemon bond as one, a wondrous power is born." a psychic named Eiljah said.
"I see it... I see you going down in defeat." his sister Lindsey added in. They both sent out Abra. Dirachi was briefly in and leveled up as Chansey scored a crit and OHKOed an Abra. Dirachi leveled up. Abra taunted Shiny by using exclusively hidden power. Hot Air was switched in. "What my prediction was wrong, impossible!"
"Well you see your vision was of a future defeat. Not you beating Shiny, but another trainer down the line."
They ventured onward. A wild Cascoon, 5 wurmples, 2 Misdrevus, Dustox, 2 Buneary, 5 budew were defeated, caught Violet the Budew, Wormy the Wurmple, caught happy the Cascoon, Pokemon123! and Blitz the Buizel, brithday the Pachirisu, and picked up a great ball. During this Dirachi grew to level 20 and learned mean look. Hot Air grew to level 23 and Wish grew to level 22.
And in the process of encountering a shiny Wurmple and Budew the game crashed. Shiny proceeded to catch Wormy 2 to replace the original. She also encountered 2 shiny budew, 2 shiny Wurmple, 6 shiny Shellos and who all were not caught.
Shinys encountered:45
Shinys caught:21
Philip:"Here comes the swarm!"
Donald:"My senses tingle. I've spotting a rare pokemon! Are those shinies?"
Shiny:"Yes they are, but I wouldn't really call them rare."
Donald:"Are you kidding? A shiny pokemon has about a one in 8000 chance to appear. And I see a Kricketune there, good choice." Buguitar blushed.
:"Well I'm not so sure about Buguitar and Misdrevus here."
"I'm a Dirachi actually."
:"I was speaking! Anyway I'm one of a kind. I am the most..." Shiny barged in.
Shiny:"I've seen about 45 shiny pokemon so far so it's not that rare."
Donald seemed to be amazed by the number of shiny pokemon Shiny had seen. "Um, Donald." Philip said, "You remember we are bug catchers right? 90% of what we say has to be related to bugs right?" Donald was distracted, "Let's just get this battle over with." They sent out Wurmple and Burmy. Dirachi, Hot Air and Buguitar took care of their Dustox, Cascoon and Kricketune. "Free to be who we will be." Buguitar sang. The two bug catchers were shocked at their defeat.
Going onward Shiny found a potion guarded by a Wurmple and Buneary. Shiny also found some honey.
Kody:"A strange presence has been felt... It is emanating from...you!"
Rachael:"This forest is strange, you know... It seems to fill me with energy..."
Dirachi and Buguitar took out their Meditite and Psyduck. "Let's make sure we create..." Buguitar sang. Dirachi grew to level 21.
Kody:"Oh, be one with me Meditite."
Rachael:"Your victory, there is nothing strange about it."
There were some trees up ahead. "I think I see something." Shiny said squinting.
"What a lovey mansion, such a shame it looks like it's been abandoned."
Shiny gasped. She got out a marker and climbed over the knee high trees.
"Shiny? what are you doing? You could have tripped on those trees and gotten hurt from the thorns. Also I don't like where that marker is going. Why don't you come back here and we can all peacefully stroll through the forest together."
Shiny scribbled the words Team Skull Rulez onto the wall of the mansion. Satisfied Shiny went back to everyone else.
"Shiny what did you just do. That's vandalism!"
Shiny:"I'm just spreading some team skull awareness. Besides it's not like they've done a good job of keeping up the rest of this place."
Cheryl looked worried, "Shiny what did you just do. That was the Old chateau. Legends say that those who disrupt the spirits there will be haunted forever!"
Shiny:"What are the chances a few Ghost types track me down and want to spend the next 100 years haunting me."
"Shiny is right, not many ghost types would be able to track her down." Dirachi took the marker and under team skull rulez wrote -shiny, heading to Eterna City, phone number... "There, know they will be able to track you down for sure."
Shiny:"Wow Dirachi you are really helping things."
"I'm happy to help!"
Everyone took two steps to the right.
Cheryl:"Oh! There's the exit. I'm so relieved... We finally got here, and before any ghosts starting haunting you to. I would've never been able to get through this by myself. Thank you so much Shiny!"
Shiny:"Your welcome. Thanks for healing my pokemon after every battle."
"Goodbye Cheryl! It's been fun traveling through the forest with you!"
"Bye, and remember I have no association with that trap up head.
Cheryl:"Farewell!" Cheryl left.
Shiny:"Anyway let's go to Enterna city! Wait did you say trap?"
"It's okay I baked you some cookies as confert food."
Shiny:"Thanks. Ooo it's chocolate." Shiny took a bite then spat it out, "Pleth! What is in this cookie?"
"Mud of course."
Shiny:"Why."
"You never said you weren't okay with mud being in cookies."
"Hey that wasn't very nice. It's not nice to trick people like that."
"Oh contrary. I offered her cookies which was very kind of me. I never said what kind it was and it's not my fault that she doesn't like the flavor." The Misdreavus ate one of the cookies.
"You are disgusting."
"Um, um." On one hand they were right they did never specify the favor and shiny didn't ask. On the other hand most don't like mud flavored cookies, or did they seeing as they ate one.
Misdreavus turned to shiny, "Alright new trainer just knock out that Misdreavus there, weaken me and let's go together."
Shiny:"Wait, what?"
"Havn't you ever wished that you could start a pokemon journey? Well I'm here to grant it by joining your team as your 4th pokemon."
"No, we are not letting another ghost type on the team. There is only room for one ghost type, and that is me."
"I'm not a ghost type. I'm a psychic and dark type obviously. In fact I'm a little offended that you thought I was a ghost type."
"Why you, Misdreavus are for sure a-"
"Come on guys get along. We'll be gland to let you join our team! What is your name."
"I just go by my species name, Dirachi, the corrupter of wishes. Anyway I think you should get to beating up this Misdreavus and catching me now."
"With pleasure, well for the first part at least." Hot Air took Wish's place. A mysterious psywave weaved it's way around to Hot Air. She began by blowing a gust of wind at Misdreavus. Another psywave hit Hot Air. Hot Air readied herself for more attacks as both foe pokemon let out a loud growl for two turns in a row. More wind blew around Misdreavus. Hot Air stockpiled while Chansey continued to be a pokemon shield. Misdreavus was blown away by gust. Hot Air was quite pleased of herself. Dirachi took some spite to losing the pokemon she was fighting with. A growl echoed through the woods as Hot Air maxed out stockpile. A smile crept up Hot Air's face as she finally got to blast Dirachi with a gust. After a turn she returned to attacking Dirachi.
"Grr... Can you just throw a ball already?"
"Now let me use just one more gu-"
Shiny:"Buguitar you're up!"
"What! No! I am so close to beating that Misdreavus."
"But you already beat Misdreavus, I'm a Dirachi."
"There it lies: the future we seek." Buguitar sung loudly over the argument. She then ducked down, embarrassed. Shiny threw a Premier ball at Dirachi. Dirachi willingly went in.
"Yay, I have now joined your team. Also have fun because I'm horribly underleveled and I can only use Psywave and growl."
Shiny:"At least we have Cheryl to heal you after every battle." Cheryl waved.
"Welcome to the team Dirachi! It's very nice to have you!"
"Thanks, I even have a muffin basket for all of you; it's in Veilstone city."
Shinys encountered:29
Shinys caught:15
Dirachi, lv 11, Brave nature, Sturdy body. Growl, Psywave, Spite, Astonish
Shiny began to train Dirachi. They encountered a wild Buneary and Misdreavus. Buguitar was switched in to deal with things, "Start from there, and then we'll forge, a world where all can be free." they didn't do much, but it took forever to defeat the two wild pokemon. Buguitar did level up from the battle however. She had a chance to learn focus energy, but chose not to. This was enough for Shiny.
Shiny:"Cheryl?"
Cheryl:"What is it?"
Shiny:"I think I'm going to train for a while to get stronger. I'll be back though, alright?"
Cheryl:"Okay, I'll wait here you you."
"Goodbye Cheryl! See you soon!"
Shiny's team walked out of Eterna forest. Dirachi was trained on route 205. Dirachi mostly just alternated between Psywave and growl, her only two usable moves. Shiny became half distracted during the training when Jacob showed her some interesting pokemon videos on his phone. She beat a Buizel, Bidoof, Buizel, Buizel, Pachirisu, Bidoof, Bidoof, Shellos, Bidoof, Bidoof, Shellos, Buizel, Shellos and Buizel. After all of this Dirachi went from level 12 to 14. "Alright let's head back in!" said Shiny.
The Quintet headed back to Eterna forest. "Oh there you are!" Said Cheryl, "Let's go through this forest together." They traversed the tall grass, encountering two budew that allowed Dirachi to level up. They encountered a Wurmple and Cascoon. Two trainers surrounded them.
jack:"What's cool, you might ask? No? I'll tell you anyway: bug pokemon!"
Briana:"We're just out on a power walk!"
"Free to dream, and free to smile." Buguitar sang. Buguitar, Wish and Dirachi took out their pokemon, and Dirachi leveled up.
Jack:"It bugs me when people ignore the awesome coolness of bug pokemon"
Briana:"Hey you!"
Shiny picked up a Paralyze heal. Fought a wild Budew and Buneary with Dirachi that dragged on for a long time. Shiny grew annoyed of Dirachi only being able to attack every other turn. "Dirachi I think you need to learn another move," she said.
"What marvelous move do you want me to learn? Splash? Celebrate? Memento?"
Shiny searched through her bag's various TMs. She pulled out a silver disc. Hidden power. "I was thinking maybe this move, but what if I need it latter?"
"Let me remind you there is another, much better ghost type who is also suffering from a lack of attacking options thanks to someone's, insistence." Hot Air rolled her eyes at Wish.
Shiny stared intensely at TM 10. Two pokemon could benefit from it, and on top of that someone could need it later, or even more laterer? Hot Air didn't learn another constant damaging move until level 30 but Dirachi didn't learn another damaging move until 23. Shiny needed to test her two pokemon. "Alright I'll test the two of you in battle, I guess I'll give it to whoever needs it more I guess." She mumbled something about needing it later even more under her breath.
"Wait are you going to give it to one of us out of pity? Ew I don't want your pity. But at the same time it would make me stronger. Still I will never fall behind this other ghost type.
"I can't wait to alternate Growl and Hidden power!"
Shiny walked into the grass. Against Dirachi was a Buneary and Cascoon. Dirachi 2HKOed the Cascoon and defeated the Buneary was defeated by Chansey. Dirachi leveled up at the end of the battle. Against Hot Air was a Misdreavus and Budew. Hot Air OHKOed the Budew and 2HKOed the Misdreavus. Was Dirachi catching up with the rest of the team and her previous terribleness was because she was under leveled?
"I just can't decide!" Shiny yelled.
"Give it to me. I'm obviously the better one here."
"Remeber whoever you chose will love you for life, while the one you don't will put you on their mortal enemy list and forever hate you. No pressure!"
Pressure sank in. Shiny thought about the potential final move sets. "Um... I'm still making up my mind but I'll give it to one of you soon."
The team walked along. Dirachi battled a Budew, Cascoon, Misdreavus, Buneary. "When a Trainer and Pokemon bond as one, a wondrous power is born." a psychic named Eiljah said.
"I see it... I see you going down in defeat." his sister Lindsey added in. They both sent out Abra. Dirachi was briefly in and leveled up as Chansey scored a crit and OHKOed an Abra. Dirachi leveled up. Abra taunted Shiny by using exclusively hidden power. Hot Air was switched in. "What my prediction was wrong, impossible!"
"Well you see your vision was of a future defeat. Not you beating Shiny, but another trainer down the line."
They ventured onward. A wild Cascoon, 5 wurmples, 2 Misdrevus, Dustox, 2 Buneary, 5 budew were defeated, caught Violet the Budew, Wormy the Wurmple, caught happy the Cascoon, Pokemon123! and Blitz the Buizel, brithday the Pachirisu, and picked up a great ball. During this Dirachi grew to level 20 and learned mean look. Hot Air grew to level 23 and Wish grew to level 22.
And in the process of encountering a shiny Wurmple and Budew the game crashed. Shiny proceeded to catch Wormy 2 to replace the original. She also encountered 2 shiny budew, 2 shiny Wurmple, 6 shiny Shellos and who all were not caught.
Shinys encountered:45
Shinys caught:21
Philip:"Here comes the swarm!"
Donald:"My senses tingle. I've spotting a rare pokemon! Are those shinies?"
Shiny:"Yes they are, but I wouldn't really call them rare."
Donald:"Are you kidding? A shiny pokemon has about a one in 8000 chance to appear. And I see a Kricketune there, good choice." Buguitar blushed.
:"Well I'm not so sure about Buguitar and Misdrevus here."
"I'm a Dirachi actually."
:"I was speaking! Anyway I'm one of a kind. I am the most..." Shiny barged in.
Shiny:"I've seen about 45 shiny pokemon so far so it's not that rare."
Donald seemed to be amazed by the number of shiny pokemon Shiny had seen. "Um, Donald." Philip said, "You remember we are bug catchers right? 90% of what we say has to be related to bugs right?" Donald was distracted, "Let's just get this battle over with." They sent out Wurmple and Burmy. Dirachi, Hot Air and Buguitar took care of their Dustox, Cascoon and Kricketune. "Free to be who we will be." Buguitar sang. The two bug catchers were shocked at their defeat.
Going onward Shiny found a potion guarded by a Wurmple and Buneary. Shiny also found some honey.
Kody:"A strange presence has been felt... It is emanating from...you!"
Rachael:"This forest is strange, you know... It seems to fill me with energy..."
Dirachi and Buguitar took out their Meditite and Psyduck. "Let's make sure we create..." Buguitar sang. Dirachi grew to level 21.
Kody:"Oh, be one with me Meditite."
Rachael:"Your victory, there is nothing strange about it."
There were some trees up ahead. "I think I see something." Shiny said squinting.
"What a lovey mansion, such a shame it looks like it's been abandoned."
Shiny gasped. She got out a marker and climbed over the knee high trees.
"Shiny? what are you doing? You could have tripped on those trees and gotten hurt from the thorns. Also I don't like where that marker is going. Why don't you come back here and we can all peacefully stroll through the forest together."
Shiny scribbled the words Team Skull Rulez onto the wall of the mansion. Satisfied Shiny went back to everyone else.
"Shiny what did you just do. That's vandalism!"
Shiny:"I'm just spreading some team skull awareness. Besides it's not like they've done a good job of keeping up the rest of this place."
Cheryl looked worried, "Shiny what did you just do. That was the Old chateau. Legends say that those who disrupt the spirits there will be haunted forever!"
Shiny:"What are the chances a few Ghost types track me down and want to spend the next 100 years haunting me."
"Shiny is right, not many ghost types would be able to track her down." Dirachi took the marker and under team skull rulez wrote -shiny, heading to Eterna City, phone number... "There, know they will be able to track you down for sure."
Shiny:"Wow Dirachi you are really helping things."
"I'm happy to help!"
Everyone took two steps to the right.
Cheryl:"Oh! There's the exit. I'm so relieved... We finally got here, and before any ghosts starting haunting you to. I would've never been able to get through this by myself. Thank you so much Shiny!"
Shiny:"Your welcome. Thanks for healing my pokemon after every battle."
"Goodbye Cheryl! It's been fun traveling through the forest with you!"
"Bye, and remember I have no association with that trap up head.
Cheryl:"Farewell!" Cheryl left.
Shiny:"Anyway let's go to Enterna city! Wait did you say trap?"
"It's another great day! And with our new friend mistress Air it'll be even better!" Buguitar pretended to smile around Hot Air. Hot Air on the other hand didn't even try to hide her death glare. "Mistress Air, why are you looking at Buguitar like that?"
"No reason, everything is all sunshine and rainbows here." Wish was unconvinced. He took out a clipboard and wrote something down.
Jacob:"How about a quick battle before I leave for Eterna forest?" He sent out a Ponyta. Wish was out but was sent to 12 health before he could do anything. Hot Air switched in and alternated Gust and Stockpile. In the end the burn she got ended up doing the most damage to her.
Jacob:"That really dampened my spirits."
In the grass they beat a level 8 Shellos Wish failed to OHKO with magical leaf and a Pachirisu that allowed Wish to level up.
Daniel:"There's no mountain here, but I'm dressed to hike! Gahaha! Here goes!" On a elevated rocky platform he sent out a Geodude. "Our dreams are meant to be shared. Let it grow. Let it live." Buguitar defeated it with some struggle and missed sings. Wish, Hot Air and Buguitar were able to OHKO Daniel's Geodue, Machop and Bidoof respectively.
Daniel:"Oh yeah. What a refreshing battle that was." The quartet continued onwards. Shiny picked up a X-Attack.
Elizabeth:"I love Pokemon that smell sweet. Like this one--get whiff of this!"
"Let us see what it will bring." Buguitar finished off Budew with more health than she started with.
Elizabeth:"Don't you understand what I meant. Don't my pokemon smell nice?" Shiny found a hidden antidote.
Zackary:"It's a long way between Floroma and Eterna City. So, Let's battle!"
"When we share in our love," Geodude was down to yellow and Buguitar was down to red. Wish switched in and finished Geodude with magical leaf on the first turn out. Buguitar leveled up.
Zackary:"Wawwah! I'm out of pokemon that can go!"
Shiny rushed to the pokemon center and came back. Wish OHKOed a wild Shellos, 3HKOed a Bidoof without any disobedience. Shiny picked up a pokeball, Oran berry and Pecha berry.
They healed then headed back out. "Of all places possible, I've lost my way here..." Nicholas said as he sent out an Onix.
"Search it out, and find the way:" Buguitar 2HKOed Onix thanks to a crit.
Nicholas:"Having lost his way, the trainer lost his battle too..."
Shiny caught a shiny Shellos after Buguitar went to 21 health mostly due to confusion. The Shellos was named Augie, after the person who gave Dirachi's challenge. They healed then fought a Pachirisu that allowed Wish to level up, he started to glow faintly but quickly stopped. He was happy, but he wasn't happy enough to evolve yet. Buguitar was the only evolved pokemon right now and Wish wanted Hot Air and Buguitar to succeed before he did.
Shinys encountered:28
Shinys caught:14
Kelsey:"Osu! I'm not trained to hold back! She sent out a Machop. Even with Wish leading no damage was done after Hot Air switched in and OHKOed with a crit gust. Shiny picked up a "How long have we been traveling. I'm famished."
"It's only noon," Said Shiny, "Though maybe we should take a pit-stop at that house in the middle of nowhere over there." Shiny pointed to a house up ahead.
"Are you sure. Who knows who could live there?"
"Probly someone kind!" They all walked inside, "Hello Madam!"
Woman:"Hello! You seem to be tired, want to rest awhile?"
Shiny:"Sure, thanks." The team was healed and Shiny watched some TV while eating lunch. There was a help wanted ad for Sinnoh news net for a show. Shiny quickly grew annoyed at how many ads TV allows to air as shows.
Woman:"So are you going through Eterna forest?"
Shiny:"Yeah."
Woman:"Be careful. It's deep and there are many ways to get poisoned."
"Oh no poisonous bugs? I'm so afraid. I'm sure I can handle a few bugs with gust."
"Thank you kind madam! We are going to the forest now. Goodbye!"
Woman:"Goodbye young trainer, Cleffa and other pokemon. Stay safe."
The quartet entered Eterna forest. A young woman approached them. "Hello, my name's Cheryl. And you are...?"
Shiny:"I'm Shiny. This is Wish, Buguitar and Ho-, her majesty mistress Air."
"I'm capable of introducing myself. But I won't now, now that it'll be redundant."
"Then what was the point of that sentence?"
"Then what was the point of your face?"
"Be nice guys! Hello Cheryl. It's very nice to meet you."
Cheryl:"So those are your names. I'm sincerely glad to meet you. Shiny may I ask a big favor of you?"
Shiny:"What is it?"
"What ever it is we'll be glad to help!"
Cheryl:"I want to get through this forest, but I'm afraid of doing it alone. I've heard there is a sinister group of people called team galactic about."
Shiny:"Yeah, they're a bunch of idiots who have chronic problem of threatening to hurt kids that can handle themselves. They're not much of a threat if you can beat them in battles."
Cheryl:"I think there'd be safety in numbers. Please, may I go through with you?"
Shiny:"If you heal my pokemon after every battle then you have yourself a deal!"
Cheryl:"That sounds like a good deal. I'll take it."
"Yay! It'll be nice to travel with you Cheryl!"
The forest was overwhelming for Shiny. There were two paths that just seemed to go very far. She took the left path. She saw a pokeball behind a Casoon. When Shiny was in front of the ball a Misdreavus jumped out from behind. "Don't worry, I've got your back," Cheryl said as she sent out a Chansey. Buguitar sang "the point where we can all meet. The point where we're all the same." they were easily able to take care of the wild pokemon despite none of Buguitar's moves being not very effective. In the end Shiny was rewarded with an antidote.
A kid ran by and punched Shiny in the face yelling, "Pikachu all the way!"
Shiny fell backwards. She opened her eyes and saw two Misdreavus looking down at her. The blue one licked her and muttered something along the lines "Tastes like chicken," while the other one nuzzled her.
"It's okay I baked you some cookies as confert food."
Shiny:"Thanks. Ooo it's chocolate." Shiny took a bite then spat it out, "Pleth! What is in this cookie?"
"Mud of course."
Shiny:"Why."
"You never said you weren't okay with mud being in cookies."
"Hey that wasn't very nice. It's not nice to trick people like that."
"Oh contrary. I offered her cookies which was very kind of me. I never said what kind it was and it's not my fault that she doesn't like the flavor." The Misdreavus ate one of the cookies.
"You are disgusting."
"Um, um." On one hand they were right they did never specify the favor and shiny didn't ask. On the other hand most don't like mud flavored cookies, or did they seeing as they ate one.
Misdreavus turned to shiny, "Alright new trainer just knock out that Misdreavus there, weaken me and let's go together."
Shiny:"Wait, what?"
"Havn't you ever wished that you could start a pokemon journey? Well I'm here to grant it by joining your team as your 4th pokemon."
"No, we are not letting another ghost type on the team. There is only room for one ghost type, and that is me."
"I'm not a ghost type. I'm a psychic and dark type obviously. In fact I'm a little offended that you thought I was a ghost type."
"Why you, Misdreavus are for sure a-"
"Come on guys get along. We'll be gland to let you join our team! What is your name."
"I just go by my species name, Dirachi, the corrupter of wishes. Anyway I think you should get to beating up this Misdreavus and catching me now."
"With pleasure, well for the first part at least." Hot Air took Wish's place. A mysterious psywave weaved it's way around to Hot Air. She began by blowing a gust of wind at Misdreavus. Another psywave hit Hot Air. Hot Air readied herself for more attacks as both foe pokemon let out a loud growl for two turns in a row. More wind blew around Misdreavus. Hot Air stockpiled while Chansey continued to be a pokemon shield. Misdreavus was blown away by gust. Hot Air was quite pleased of herself. Dirachi took some spite to losing the pokemon she was fighting with. A growl echoed through the woods as Hot Air maxed out stockpile. A smile crept up Hot Air's face as she finally got to blast Dirachi with a gust. After a turn she returned to attacking Dirachi.
"Grr... Can you just throw a ball already?"
"Now let me use just one more gu-"
Shiny:"Buguitar you're up!"
"What! No! I am so close to beating that Misdreavus."
"But you already beat Misdreavus, I'm a Dirachi."
"There it lies: the future we seek." Buguitar sung loudly over the argument. She then ducked down, embarrassed. Shiny threw a Premier ball at Dirachi. Dirachi willingly went in.
"Yay, I have now joined your team. Also have fun because I'm horribly underleveled and I can only use Psywave and growl."
Shiny:"At least we have Cheryl to heal you after every battle." Cheryl waved.
"Welcome to the team Dirachi! It's very nice to have you!"
"Thanks, I even have a muffin basket for all of you; it's in Veilstone city."
Shinys encountered:29
Shinys caught:15
Dirachi, lv 11, Brave nature, Sturdy body. Growl, Psywave, Spite, Astonish
Shiny began to train Dirachi. They encountered a wild Buneary and Misdreavus. Buguitar was switched in to deal with things, "Start from there, and then we'll forge, a world where all can be free." they didn't do much, but it took forever to defeat the two wild pokemon. Buguitar did level up from the battle however. She had a chance to learn focus energy, but chose not to. This was enough for Shiny.
Shiny:"Cheryl?"
Cheryl:"What is it?"
Shiny:"I think I'm going to train for a while to get stronger. I'll be back though, alright?"
Cheryl:"Okay, I'll wait here you you."
"Goodbye Cheryl! See you soon!"
Shiny's team walked out of Eterna forest. Dirachi was trained on route 205. Dirachi mostly just alternated between Psywave and growl, her only two usable moves. Shiny became half distracted during the training when Jacob showed her some interesting pokemon videos on his phone. She beat a Buizel, Bidoof, Buizel, Buizel, Pachirisu, Bidoof, Bidoof, Shellos, Bidoof, Bidoof, Shellos, Buizel, Shellos and Buizel. After all of this Dirachi went from level 12 to 14. "Alright let's head back in!" said Shiny.
The Quintet headed back to Eterna forest. "Oh there you are!" Said Cheryl, "Let's go through this forest together." They traversed the tall grass, encountering two budew that allowed Dirachi to level up. They encountered a Wurmple and Cascoon. Two trainers surrounded them.
jack:"What's cool, you might ask? No? I'll tell you anyway: bug pokemon!"
Briana:"We're just out on a power walk!"
"Free to dream, and free to smile." Buguitar sang. Buguitar, Wish and Dirachi took out their pokemon, and Dirachi leveled up.
Jack:"It bugs me when people ignore the awesome coolness of bug pokemon"
Briana:"Hey you!"
Shiny picked up a Paralyze heal. Fought a wild Budew and Buneary with Dirachi that dragged on for a long time. Shiny grew annoyed of Dirachi only being able to attack every other turn. "Dirachi I think you need to learn another move," she said.
"What marvelous move do you want me to learn? Splash? Celebrate? Memento?"
Shiny searched through her bag's various TMs. She pulled out a silver disc. Hidden power. "I was thinking maybe this move, but what if I need it latter?"
"Let me remind you there is another, much better ghost type who is also suffering from a lack of attacking options thanks to someone's, insistence." Hot Air rolled her eyes at Wish.
Shiny stared intensely at TM 10. Two pokemon could benefit from it, and on top of that someone could need it later, or even more laterer? Hot Air didn't learn another constant damaging move until level 30 but Dirachi didn't learn another damaging move until 23. Shiny needed to test her two pokemon. "Alright I'll test the two of you in battle, I guess I'll give it to whoever needs it more I guess." She mumbled something about needing it later even more under her breath.
"Wait are you going to give it to one of us out of pity? Ew I don't want your pity. But at the same time it would make me stronger. Still I will never fall behind this other ghost type.
"I can't wait to alternate Growl and Hidden power!"
Shiny walked into the grass. Against Dirachi was a Buneary and Cascoon. Dirachi 2HKOed the Cascoon and defeated the Buneary was defeated by Chansey. Dirachi leveled up at the end of the battle. Against Hot Air was a Misdreavus and Budew. Hot Air OHKOed the Budew and 2HKOed the Misdreavus. Was Dirachi catching up with the rest of the team and her previous terribleness was because she was under leveled?
"I just can't decide!" Shiny yelled.
"Give it to me. I'm obviously the better one here."
"Remeber whoever you chose will love you for life, while the one you don't will put you on their mortal enemy list and forever hate you. No pressure!"
Pressure sank in. Shiny thought about the potential final move sets. "Um... I'm still making up my mind but I'll give it to one of you soon."
The team walked along. Dirachi battled a Budew, Cascoon, Misdreavus, Buneary. "When a Trainer and Pokemon bond as one, a wondrous power is born." a psychic named Eiljah said.
"I see it... I see you going down in defeat." his sister Lindsey added in. They both sent out Abra. Dirachi was briefly in and leveled up as Chansey scored a crit and OHKOed an Abra. Dirachi leveled up. Abra taunted Shiny by using exclusively hidden power. Hot Air was switched in. "What my prediction was wrong, impossible!"
"Well you see your vision was of a future defeat. Not you beating Shiny, but another trainer down the line."
They ventured onward. A wild Cascoon, 5 wurmples, 2 Misdrevus, Dustox, 2 Buneary, 5 budew were defeated, caught Violet the Budew, Wormy the Wurmple, caught happy the Cascoon, Pokemon123! and Blitz the Buizel, brithday the Pachirisu, and picked up a great ball. During this Dirachi grew to level 20 and learned mean look. Hot Air grew to level 23 and Wish grew to level 22.
And in the process of encountering a shiny Wurmple and Budew the game crashed. Shiny proceeded to catch Wormy 2 to replace the original. She also encountered 2 shiny budew, 2 shiny Wurmple, 6 shiny Shellos and who all were not caught.
Shinys encountered:45
Shinys caught:21
Philip:"Here comes the swarm!"
Donald:"My senses tingle. I've spotting a rare pokemon! Are those shinies?"
Shiny:"Yes they are, but I wouldn't really call them rare."
Donald:"Are you kidding? A shiny pokemon has about a one in 8000 chance to appear. And I see a Kricketune there, good choice." Buguitar blushed.
:"Well I'm not so sure about Buguitar and Misdrevus here."
"I'm a Dirachi actually."
:"I was speaking! Anyway I'm one of a kind. I am the most..." Shiny barged in.
Shiny:"I've seen about 45 shiny pokemon so far so it's not that rare."
Donald seemed to be amazed by the number of shiny pokemon Shiny had seen. "Um, Donald." Philip said, "You remember we are bug catchers right? 90% of what we say has to be related to bugs right?" Donald was distracted, "Let's just get this battle over with." They sent out Wurmple and Burmy. Dirachi, Hot Air and Buguitar took care of their Dustox, Cascoon and Kricketune. "Free to be who we will be." Buguitar sang. The two bug catchers were shocked at their defeat.
Going onward Shiny found a potion guarded by a Wurmple and Buneary. Shiny also found some honey.
Kody:"A strange presence has been felt... It is emanating from...you!"
Rachael:"This forest is strange, you know... It seems to fill me with energy..."
Dirachi and Buguitar took out their Meditite and Psyduck. "Let's make sure we create..." Buguitar sang. Dirachi grew to level 21.
Kody:"Oh, be one with me Meditite."
Rachael:"Your victory, there is nothing strange about it."
There were some trees up ahead. "I think I see something." Shiny said squinting.
"What a lovey mansion, such a shame it looks like it's been abandoned."
Shiny gasped. She got out a marker and climbed over the knee high trees.
"Shiny? what are you doing? You could have tripped on those trees and gotten hurt from the thorns. Also I don't like where that marker is going. Why don't you come back here and we can all peacefully stroll through the forest together."
Shiny scribbled the words Team Skull Rulez onto the wall of the mansion. Satisfied Shiny went back to everyone else.
"Shiny what did you just do. That's vandalism!"
Shiny:"I'm just spreading some team skull awareness. Besides it's not like they've done a good job of keeping up the rest of this place."
Cheryl looked worried, "Shiny what did you just do. That was the Old chateau. Legends say that those who disrupt the spirits there will be haunted forever!"
Shiny:"What are the chances a few Ghost types track me down and want to spend the next 100 years haunting me."
"Shiny is right, not many ghost types would be able to track her down." Dirachi took the marker and under team skull rulez wrote -shiny, heading to Eterna City, phone number... "There, know they will be able to track you down for sure."
Shiny:"Wow Dirachi you are really helping things."
"I'm happy to help!"
Everyone took two steps to the right.
Cheryl:"Oh! There's the exit. I'm so relieved... We finally got here, and before any ghosts starting haunting you to. I would've never been able to get through this by myself. Thank you so much Shiny!"
Shiny:"Your welcome. Thanks for healing my pokemon after every battle."
"Goodbye Cheryl! It's been fun traveling through the forest with you!"
"Bye, and remember I have no association with that trap up head.
Cheryl:"Farewell!" Cheryl left.
Shiny:"Anyway let's go to Enterna city! Wait did you say trap?"
Team so far
So I put off posting this for a while, for like about a year... Luckily I wrote down a bit on how everyone did so there's that. I mostly have forgotten the difficulty of what happened by now.
Poke $: 12023
Time: 42:18
Pokedex: 38
 Buguitar the Kricketune - level 22
Sing
Bide
Rock Smash
Leech Life
68 49 33 31 28 35
29/38 lines sung
Buguitar is my MVP. She can attack every turn even with Wish's temperance virtue. She even has sing to buy some time or make catching pokemon easier.
Buguitar the Kricketune - level 22
Sing
Bide
Rock Smash
Leech Life
68 49 33 31 28 35
29/38 lines sung
Buguitar is my MVP. She can attack every turn even with Wish's temperance virtue. She even has sing to buy some time or make catching pokemon easier.
 Hot Air the Drifloon - level 23
Gust
Stockpile
Hot Air the Drifloon - level 23
Gust
Stockpile
Payback - Unuseable
Focus Engery - Unuseable
80 30 23 37 28 42
Hot Air only has one attacking move. This means that due to Wish's temperance she has to switch between Gust and Stockpile. Having to wait every other turn to attack is a pain but Hot Air is still a good pokemon.
 Wish the Cleffa - Level 22
Pound
Magical Leaf
Wish
Copycat
55 20 23 26 32 19
Virtues: Kindness, Humility, Temperance
Too easy and too hard options
Long story short, disobedience is the bane of Wish's existence. Though getting Dirachi did highlight his plus sides. He has wish to heal, he has 2 attacking moves and copycat to copy a foe's move. To bad so far most foe's moves have been stab in which they resist. Still Wish can survive some turns in battle which is good.
Wish the Cleffa - Level 22
Pound
Magical Leaf
Wish
Copycat
55 20 23 26 32 19
Virtues: Kindness, Humility, Temperance
Too easy and too hard options
Long story short, disobedience is the bane of Wish's existence. Though getting Dirachi did highlight his plus sides. He has wish to heal, he has 2 attacking moves and copycat to copy a foe's move. To bad so far most foe's moves have been stab in which they resist. Still Wish can survive some turns in battle which is good.
 Dirachi the Misdreavus - Level 21
Growl
Psywave
Mean Look
Dirachi the Misdreavus - Level 21
Growl
Psywave
Mean Look
Astonish - Unusable
61 37 36 44 45 39
Dirachi somehow manages to be worse that Wish. I did not think it was possible, but it was. She came 10 levels under everyone else, she only has one attacking move and can only attack every other turn, her only attacking move has a noticeable 80 accuracy, she can only attack 15 times before having to be healed. At least she has normal immunity.
Though she did get a lot better latter in the chapter. At around level 17 she was usable.
Buguitar the Kricketune
Buguitar the Kricketune - level 22
Sing
Bide
Rock Smash
Leech Life
68 49 33 31 28 35
29/38 lines sung
Buguitar is my MVP. She can attack every turn even with Wish's temperance virtue. She even has sing to buy some time or make catching pokemon easier.Hot Air the Drifloon
Hot Air the Drifloon - level 23
Gust
Stockpile
Wish the Cleffa
Wish the Cleffa - Level 22
Pound
Magical Leaf
Wish
Copycat
55 20 23 26 32 19
Virtues: Kindness, Humility, Temperance
Too easy and too hard options
Long story short, disobedience is the bane of Wish's existence. Though getting Dirachi did highlight his plus sides. He has wish to heal, he has 2 attacking moves and copycat to copy a foe's move. To bad so far most foe's moves have been stab in which they resist. Still Wish can survive some turns in battle which is good.Dirachi the Misdreavus
Dirachi the Misdreavus - Level 21
Growl
Psywave
Mean Look
Retelling of the Hellfire gym. Not exact words, but a lot of it is what Yinyun Giranite said
ACottontail walked through the desolate streets with her trusty partner Kaybre by her side. ACottontail was here for one reason. She had heard of a mythically hard gym called the Hellfire gym, which she knew would strech the limits of her battling skills. ACottontail knew she was skilled, but she had heard tales of the gym leader's legendary strength. ACottontail and Kaybre stayed close together, trying to calm each other's fears. They entered the building. ACottontail was abruptly sat down for a cup a tea. After listening the the gym leader she spoke, "I'm sorry about what happened to your town. But still, I've heard about your gym, and I've heard that your actually really strong. While I am a strong battler myself, I feared that you could actually beat me. I'm a quite a bit nervous right now, but, I would like to challenge the Hellfire gym." ACottontail held a pokeball to the air in her battle stance, her hand was shaking. The leader stared at her raised Pokéball, but simply remain where he was and sipped some more at his tea, which he obviously hadn't finished yet. "How brave." he finally spoke after the radio silence on his part. "Yes. To come here despite your fear of losing. Truly the prime definition of bravery." He drank the last remaining drops of his tea and sat the cup back on the table. He stood up and walked away from it, reaching for a ball inside his pocket. "And to reward such bravery... I must do my part by honoring you with a gym battle of the ages." He held out his arm with the Pokéball in his hand's grasp. "I will show you just how "strong" I am. I will show you just how "strong" my Pokémon are. I will show you..." he paused momentarily, looking right in to the trainer's eyes. "... the definitive future of my beloved town." And he threw out his first Pokémon. ACottontail saw that the gym leader's pokemon mostly consisted of fire and dark types. ACottontail nervously send out Korferno, a fire and fighting type pokemon that could hit dark types super effectively and resist fire type attacks. The gym leader send out Hugh Mungus. Korferno let out a flame thrower. Quickly Hugh Mungus slammed Korferno in the chest with a venomous claw. Korferno lit himself ablaze to fend off the attacker but the poison seeped in deeper and deeper. Korferno let out a scream as the two pokemon were engulfed in flames. A moment latter the flames died down. Hugh Mungus stood victorious. Round 1 xx VS  ACottontail's heart sank a little. ACottontail knew the gym would be tough but she was really wishing Korferno would have done more. ACottontail panicked and shifted through her pokeballs. She really needed a good ground type or something. Her hand passed over the pokeball of a Sandile. ACottontail didn't finish training her up yet, but it could still work. ACottontail sent out a small Sandile. "Here, want some Gummis?" Sandile looked confused at first, but happily accepted the treats. "Okay, it's the time you've been waiting for. Evolve Sandile!" Sandile was shocked. Her time had come so suddenly. Sandile was covered in a brilliant glow and emerged a Krookodile.
Hugh Mungus remained out. It was Krookodile's time to shine. She used the first ground type move she could think of, earthquake. Hugh Mungus lunged forward with a poisonous claw but Krookodile batted him off. Krookodile made another earthquake with even more force than last time.
Round 2
ACottontail's heart sank a little. ACottontail knew the gym would be tough but she was really wishing Korferno would have done more. ACottontail panicked and shifted through her pokeballs. She really needed a good ground type or something. Her hand passed over the pokeball of a Sandile. ACottontail didn't finish training her up yet, but it could still work. ACottontail sent out a small Sandile. "Here, want some Gummis?" Sandile looked confused at first, but happily accepted the treats. "Okay, it's the time you've been waiting for. Evolve Sandile!" Sandile was shocked. Her time had come so suddenly. Sandile was covered in a brilliant glow and emerged a Krookodile.
Hugh Mungus remained out. It was Krookodile's time to shine. She used the first ground type move she could think of, earthquake. Hugh Mungus lunged forward with a poisonous claw but Krookodile batted him off. Krookodile made another earthquake with even more force than last time.
Round 2  VS xx
"Good job Krookodile!" said ACottontail. Krookodile looked quite pleased that she won her first battle. ACottontail was glad that she won a battle but the pressure was still on. ACottontail saw how the gym leader reused the pokemon he just used. ACottontail assumed he would think she was about to do the same. ACottontail knew the gym leader had a fighting type that could take out Krookodile. ACottontail decided to send in Pateryx as his flying typing could take out fighting types and his rock typing could beat fire types if the gym leader decided to use one.
To ACottontail's surprise Coqui stood on the other side of the battle field. Pateryx soared into the air. Coqui shot a flamethrower into the sky. Pateryx swept down raking Coqui with rock hard claws.
Round 3 VS x
VS xx
"Good job Krookodile!" said ACottontail. Krookodile looked quite pleased that she won her first battle. ACottontail was glad that she won a battle but the pressure was still on. ACottontail saw how the gym leader reused the pokemon he just used. ACottontail assumed he would think she was about to do the same. ACottontail knew the gym leader had a fighting type that could take out Krookodile. ACottontail decided to send in Pateryx as his flying typing could take out fighting types and his rock typing could beat fire types if the gym leader decided to use one.
To ACottontail's surprise Coqui stood on the other side of the battle field. Pateryx soared into the air. Coqui shot a flamethrower into the sky. Pateryx swept down raking Coqui with rock hard claws.
Round 3 VS x x
ACottontail was surprised. She expected this gym to be much harder. She looked at the leader's potential megas, and she knew who to use. Maxie, who was super effective against two of the gym leader's mega's and resisted fairy type attacks. Blazin' Jane was on the other side of the battle field. Blazin' Jane lit up the battle field with inferno but Maxie just shook it off. Maxie raised his front hooves then slammed them into the ground. A powerful earthquake shook the gym.
Round 4
x
ACottontail was surprised. She expected this gym to be much harder. She looked at the leader's potential megas, and she knew who to use. Maxie, who was super effective against two of the gym leader's mega's and resisted fairy type attacks. Blazin' Jane was on the other side of the battle field. Blazin' Jane lit up the battle field with inferno but Maxie just shook it off. Maxie raised his front hooves then slammed them into the ground. A powerful earthquake shook the gym.
Round 4  VS x
VS x x
The shock the gym leader felt caused him to fall silent as he watched the Pokemon he sent out faint, at least more than the person who fought him. "Huh..." he said to himself. "Not bad at all... Maybe you can..." As you returned your Pokemon back, the leader began walking towards ACottontail. "I have to say, I wasn't expecting that. But, you proved me wrong in secretly doubting your power prowess. Well done to you, trainer." Putting his hand in to his robes, he pulled out the tea kettle. ACottontail didn't see him put the kettle in there, but to be fair, she weren't exactly focused on it. He opens the top, and drops the badge from the kettle in to your hands. Despite the drops of tea that are covering it, you can still see your reflection in the shine.
ACottontail was in equal shock. The gym she had been looking at for a while, the gym she felt like she had a serious chance of losing at, went down so easily. ACottontail thought she would have had to try a lot harder than that. She finally realized the badge in her hand. She smiled, but then she realized it was covered in tea. She dried off the badge and her hand on her pant's leg.
"I remember the first trainer I gave that badge to. It was this bright, young lady who expertly "swept" me with her Hydrinifor. Despite her superior skill, she remained kind to me even afterwards. She even gave me a Pokemon to raise if I ever wished to use Electric type Pokemon... I wish I remembered what her name was." He stared down again, just like he had earlier. But instead of the aura of depression you had felt coming off of him, he began giggling with quickly evolved in to laughter. "It's fine though. I'll see her again some day. I can feel it deep within me." He nodded in confirmation; not to ACottontail, but to himself. ACottontail could tell he didn't get many challengers here anymore. Why wouldn't he though? The gym was set up in loving detail, and the pokemon there looked pretty strong. Then she realized the latter probably scared off a lot of potential challengers, like herself for a while... But despite the loneliness, he still had much to tell. He went on and on about his life up to this point, and all the different challengers he faced. It was almost like he was talking to ACottontail like she was an old friend he was catching up with. ACottontail tried to listen closely but had trouble keeping her mind from wandering from time to time.
After he finished with his stories, he let out one final laugh. "Oh, I needed that." he sighed, raising his hands inside his robe and wiping at the tears you believed formed in his eyelids from the laughter. "Don't get me wrong. Tenkanstar is an amazing person, and battler. But, that doesn't change the fact that I also like to meet new people, you know? But I simply can't just leave this place, putting Tenkanstar in charge of everything. They couldn't take care of all this by themself, not that I do a very good job of that already." He took a look around the gym as he said that. "But, that's our problem, not yours. You should probably get going, as it's getting quite late." After he finished the sentences, the floor began slowly dropping down to the larger arena as the staircase folded up on it's own.
"Thanks for the battle. This place is pretty nice despite the fact it is a bit run down." ACottontail started to make her way down the stairs.
"Do please come back again! I'd love to have a rematch some time!" he called out to you as you passed the waving Tenkanstar and neared the curtains. "But if you don't, then please... don't forget about us..."
ACottontail smiled and started crying a bit. Don't forget, a motto she lived by. To let others fall to such an awful fate a being forgotten disgusted her. ACottontail didn't think she could forget the gym, after all the research and self prep she did before taking it on. ACottontail hoped that she would one back one day before the gym closed, and have a rematch.
x
The shock the gym leader felt caused him to fall silent as he watched the Pokemon he sent out faint, at least more than the person who fought him. "Huh..." he said to himself. "Not bad at all... Maybe you can..." As you returned your Pokemon back, the leader began walking towards ACottontail. "I have to say, I wasn't expecting that. But, you proved me wrong in secretly doubting your power prowess. Well done to you, trainer." Putting his hand in to his robes, he pulled out the tea kettle. ACottontail didn't see him put the kettle in there, but to be fair, she weren't exactly focused on it. He opens the top, and drops the badge from the kettle in to your hands. Despite the drops of tea that are covering it, you can still see your reflection in the shine.
ACottontail was in equal shock. The gym she had been looking at for a while, the gym she felt like she had a serious chance of losing at, went down so easily. ACottontail thought she would have had to try a lot harder than that. She finally realized the badge in her hand. She smiled, but then she realized it was covered in tea. She dried off the badge and her hand on her pant's leg.
"I remember the first trainer I gave that badge to. It was this bright, young lady who expertly "swept" me with her Hydrinifor. Despite her superior skill, she remained kind to me even afterwards. She even gave me a Pokemon to raise if I ever wished to use Electric type Pokemon... I wish I remembered what her name was." He stared down again, just like he had earlier. But instead of the aura of depression you had felt coming off of him, he began giggling with quickly evolved in to laughter. "It's fine though. I'll see her again some day. I can feel it deep within me." He nodded in confirmation; not to ACottontail, but to himself. ACottontail could tell he didn't get many challengers here anymore. Why wouldn't he though? The gym was set up in loving detail, and the pokemon there looked pretty strong. Then she realized the latter probably scared off a lot of potential challengers, like herself for a while... But despite the loneliness, he still had much to tell. He went on and on about his life up to this point, and all the different challengers he faced. It was almost like he was talking to ACottontail like she was an old friend he was catching up with. ACottontail tried to listen closely but had trouble keeping her mind from wandering from time to time.
After he finished with his stories, he let out one final laugh. "Oh, I needed that." he sighed, raising his hands inside his robe and wiping at the tears you believed formed in his eyelids from the laughter. "Don't get me wrong. Tenkanstar is an amazing person, and battler. But, that doesn't change the fact that I also like to meet new people, you know? But I simply can't just leave this place, putting Tenkanstar in charge of everything. They couldn't take care of all this by themself, not that I do a very good job of that already." He took a look around the gym as he said that. "But, that's our problem, not yours. You should probably get going, as it's getting quite late." After he finished the sentences, the floor began slowly dropping down to the larger arena as the staircase folded up on it's own.
"Thanks for the battle. This place is pretty nice despite the fact it is a bit run down." ACottontail started to make her way down the stairs.
"Do please come back again! I'd love to have a rematch some time!" he called out to you as you passed the waving Tenkanstar and neared the curtains. "But if you don't, then please... don't forget about us..."
ACottontail smiled and started crying a bit. Don't forget, a motto she lived by. To let others fall to such an awful fate a being forgotten disgusted her. ACottontail didn't think she could forget the gym, after all the research and self prep she did before taking it on. ACottontail hoped that she would one back one day before the gym closed, and have a rematch.
 So that was the Hellfire gym.
ACottontail walked through the desolate streets with her trusty partner Kaybre by her side. ACottontail was here for one reason. She had heard of a mythically hard gym called the Hellfire gym, which she knew would strech the limits of her battling skills. ACottontail knew she was skilled, but she had heard tales of the gym leader's legendary strength. ACottontail and Kaybre stayed close together, trying to calm each other's fears. They entered the building. ACottontail was abruptly sat down for a cup a tea. After listening the the gym leader she spoke, "I'm sorry about what happened to your town. But still, I've heard about your gym, and I've heard that your actually really strong. While I am a strong battler myself, I feared that you could actually beat me. I'm a quite a bit nervous right now, but, I would like to challenge the Hellfire gym." ACottontail held a pokeball to the air in her battle stance, her hand was shaking. The leader stared at her raised Pokéball, but simply remain where he was and sipped some more at his tea, which he obviously hadn't finished yet. "How brave." he finally spoke after the radio silence on his part. "Yes. To come here despite your fear of losing. Truly the prime definition of bravery." He drank the last remaining drops of his tea and sat the cup back on the table. He stood up and walked away from it, reaching for a ball inside his pocket. "And to reward such bravery... I must do my part by honoring you with a gym battle of the ages." He held out his arm with the Pokéball in his hand's grasp. "I will show you just how "strong" I am. I will show you just how "strong" my Pokémon are. I will show you..." he paused momentarily, looking right in to the trainer's eyes. "... the definitive future of my beloved town." And he threw out his first Pokémon. ACottontail saw that the gym leader's pokemon mostly consisted of fire and dark types. ACottontail nervously send out Korferno, a fire and fighting type pokemon that could hit dark types super effectively and resist fire type attacks. The gym leader send out Hugh Mungus. Korferno let out a flame thrower. Quickly Hugh Mungus slammed Korferno in the chest with a venomous claw. Korferno lit himself ablaze to fend off the attacker but the poison seeped in deeper and deeper. Korferno let out a scream as the two pokemon were engulfed in flames. A moment latter the flames died down. Hugh Mungus stood victorious. Round 1 x
x VS
ACottontail's heart sank a little. ACottontail knew the gym would be tough but she was really wishing Korferno would have done more. ACottontail panicked and shifted through her pokeballs. She really needed a good ground type or something. Her hand passed over the pokeball of a Sandile. ACottontail didn't finish training her up yet, but it could still work. ACottontail sent out a small Sandile. "Here, want some Gummis?" Sandile looked confused at first, but happily accepted the treats. "Okay, it's the time you've been waiting for. Evolve Sandile!" Sandile was shocked. Her time had come so suddenly. Sandile was covered in a brilliant glow and emerged a Krookodile.
Hugh Mungus remained out. It was Krookodile's time to shine. She used the first ground type move she could think of, earthquake. Hugh Mungus lunged forward with a poisonous claw but Krookodile batted him off. Krookodile made another earthquake with even more force than last time.
Round 2 VS xx
"Good job Krookodile!" said ACottontail. Krookodile looked quite pleased that she won her first battle. ACottontail was glad that she won a battle but the pressure was still on. ACottontail saw how the gym leader reused the pokemon he just used. ACottontail assumed he would think she was about to do the same. ACottontail knew the gym leader had a fighting type that could take out Krookodile. ACottontail decided to send in Pateryx as his flying typing could take out fighting types and his rock typing could beat fire types if the gym leader decided to use one.
To ACottontail's surprise Coqui stood on the other side of the battle field. Pateryx soared into the air. Coqui shot a flamethrower into the sky. Pateryx swept down raking Coqui with rock hard claws.
Round 3 VS xx
ACottontail was surprised. She expected this gym to be much harder. She looked at the leader's potential megas, and she knew who to use. Maxie, who was super effective against two of the gym leader's mega's and resisted fairy type attacks. Blazin' Jane was on the other side of the battle field. Blazin' Jane lit up the battle field with inferno but Maxie just shook it off. Maxie raised his front hooves then slammed them into the ground. A powerful earthquake shook the gym.
Round 4 VS xx
The shock the gym leader felt caused him to fall silent as he watched the Pokemon he sent out faint, at least more than the person who fought him. "Huh..." he said to himself. "Not bad at all... Maybe you can..." As you returned your Pokemon back, the leader began walking towards ACottontail. "I have to say, I wasn't expecting that. But, you proved me wrong in secretly doubting your power prowess. Well done to you, trainer." Putting his hand in to his robes, he pulled out the tea kettle. ACottontail didn't see him put the kettle in there, but to be fair, she weren't exactly focused on it. He opens the top, and drops the badge from the kettle in to your hands. Despite the drops of tea that are covering it, you can still see your reflection in the shine.
ACottontail was in equal shock. The gym she had been looking at for a while, the gym she felt like she had a serious chance of losing at, went down so easily. ACottontail thought she would have had to try a lot harder than that. She finally realized the badge in her hand. She smiled, but then she realized it was covered in tea. She dried off the badge and her hand on her pant's leg.
"I remember the first trainer I gave that badge to. It was this bright, young lady who expertly "swept" me with her Hydrinifor. Despite her superior skill, she remained kind to me even afterwards. She even gave me a Pokemon to raise if I ever wished to use Electric type Pokemon... I wish I remembered what her name was." He stared down again, just like he had earlier. But instead of the aura of depression you had felt coming off of him, he began giggling with quickly evolved in to laughter. "It's fine though. I'll see her again some day. I can feel it deep within me." He nodded in confirmation; not to ACottontail, but to himself. ACottontail could tell he didn't get many challengers here anymore. Why wouldn't he though? The gym was set up in loving detail, and the pokemon there looked pretty strong. Then she realized the latter probably scared off a lot of potential challengers, like herself for a while... But despite the loneliness, he still had much to tell. He went on and on about his life up to this point, and all the different challengers he faced. It was almost like he was talking to ACottontail like she was an old friend he was catching up with. ACottontail tried to listen closely but had trouble keeping her mind from wandering from time to time.
After he finished with his stories, he let out one final laugh. "Oh, I needed that." he sighed, raising his hands inside his robe and wiping at the tears you believed formed in his eyelids from the laughter. "Don't get me wrong. Tenkanstar is an amazing person, and battler. But, that doesn't change the fact that I also like to meet new people, you know? But I simply can't just leave this place, putting Tenkanstar in charge of everything. They couldn't take care of all this by themself, not that I do a very good job of that already." He took a look around the gym as he said that. "But, that's our problem, not yours. You should probably get going, as it's getting quite late." After he finished the sentences, the floor began slowly dropping down to the larger arena as the staircase folded up on it's own.
"Thanks for the battle. This place is pretty nice despite the fact it is a bit run down." ACottontail started to make her way down the stairs.
"Do please come back again! I'd love to have a rematch some time!" he called out to you as you passed the waving Tenkanstar and neared the curtains. "But if you don't, then please... don't forget about us..."
ACottontail smiled and started crying a bit. Don't forget, a motto she lived by. To let others fall to such an awful fate a being forgotten disgusted her. ACottontail didn't think she could forget the gym, after all the research and self prep she did before taking it on. ACottontail hoped that she would one back one day before the gym closed, and have a rematch.

- Info

- Guides

Welcome to spriteapedia, a sprite school dedicated to detailed guides and giving critique on sprites. Under the guides section you will find some detailed lessons with assignments specifically made to do along with them. You will also find some guides and advice for sprite types that aren't enough for a full class. Feel free to ask questions about how to make sprites at this school, even if you aren't in a class.
Rules
Q&A
Critique
Rules
- Art theft will not be tolerated. Using a fanmade gen 6+ sprite without proper credit is considered art theft. Everywhere you post a sprite that uses a sprite someone else made give credit to them for the sprite, even if you've already told me where you get your sprites from in a previous post. Only use a sprite if it clearly states that it is free to use. The only exception is if you made the gen 6+ sprite yourself or only used official pokemon sprites to make it.
- Please yell at ACottontail if she hasn't responded to you in a week. She is a procrastinator, and needs a push sometimes to make her stop putting things off.
- If you want to join a class just ask.
Q&A
Q: What art program do you use?
A: I mainly use the glorious top tier program of MS Paint. I do 95% of my sprite work in Paint. It's a good program if you want to make sprites in it. For transparency I put my sprites into Krita. For custom animations I use Scratch 2.0.
Q: What's the best way to get better?
A: I feel like the best way to get better is to strive to get better. If you push yourself to make sprites the way you want them to, eventually you will acquire the skills needed to make said sprites. Don't just keep making sprites so everything falls into your comfort zone for your skills. I feel like mastery over the skills of recoloring, fusion and scratch can make the majority of sprites out there. I also recommend getting critique on your sprites. At this school I offer to give feedback anyone's sprites to help them grow as a spriter. I can point out problems in your sprites, and teach you how to fix them, giving you knowledge you can use to improve your future sprites. But most importantly never give up. I believe anyone, regardless of skill level, can become an amazing spriter if they try hard enough.
Q: What if I'm not very proud of my sprite work. Will I ever get better?
A: Please never give up because you think your sprite work isn't good enough. You will get better if you try. When I started spriting, I made almost every mistake in the book. I used the fill bucket tool to recolor with default MS paint colors, I didn't know the difference between a JPG and a PNG and had to redo several sprites, I used sprites where the black lines were destroyed, I've used resized parts without editing them, I've made my scratched sprites way to big, I've scratched on parts without shading them or editing out the excess pixels, and the worst probably has to be in a sprite where I made the inside of Bellossom's skirt completely white and just put it on top of Togekiss's wing. But today I'm very proud of my sprite work, and consider myself a rather skilled spriter. So surely if I can can improve after making all those mistakes, so can you.
Q: I passed a class. Now what?
A: The classes here focus on teaching skills to students. Just because you passed a class doesn't mean you are a master in that area of spriting. It means you know how to use the skills in the class correctly. I don't believe in giving out a ton of assignments after you've shown that you can correctly use the skills for practice. I leave it up to the student how much practice they want to do, and what sprites they want to make.
Q: How did you learn how to sprite?
A: I think I taught myself with some help from my parents. To be honest I started spiriting so long ago I don't really remember. I remember starting with fusions, and it took me 61 sprites before I started to actually recolor instead of just use the fill bucket. Though for the most part I taught myself, and read the occasional tutorial.
Q: Where does the art used in this school come from?
A: Everything is either offical pokemon art, taken from ms paint, edited by me or created by me.
Q: How long have you been spriting?
A: I know at least since sometime in 2015, as I still have old stuff I made uploaded to Roblox around that time. Though I have made bad sprites even before then. I remember gen 4 being the newest generation, and getting sprites from pokemon elite 2000.com. Not sure when that was though. However I stopped for a while after making 61 sprites, and started making sprites again sometime after gen 5 was out.
Q: Why did you start this sprite school?
A: I want to help people get better at spriting. I've seen people make spriting mistakes over and over again where I feel like they could make their sprites better if they were just given a bit of advice. I've also seen people with good spriting skills make somewhat basic designs when it comes to stuff such as fusions, which is why I have some guides on design advice in hopes of diversifying the designs of sprites.
I looked around and I couldn't really find any sprite schools that lined up with what I would want out of a sprite school. I would want critique on the sprites I made, as a lack of it can cause the same mistakes to be made over and over again as they are never pointed out. I would also want the class to give me assignments based on my proven skill level as there is no need to do 20 of the same type of sprite if you get the hang of it after 3. So I decided to start my own that does what I would want from and a spriting school, and create overly detailed guides to share all of my spriting knowledge to you.
Critique
I will give critique on any sprite that you want, regardless of if you have ever taken a class here or not. I can point out general problems in your sprites, and teach you how to fix them, giving you knowledge you can use to improve your future sprites. If you want me to give you spriting advice for a type of sprite I recommend giving me multiple sprites to give critique on as not every spriting error you make will show up on every sprite. If you want critique on how you made a specific sprite I recommend telling me so.
If you want critique on your sprites just post the sprites and ask.
Core Classes
These classes will teach you skills that come up often when making sprites. Here is a flowchart that shows the recommended order to take the classes in.
 Recolor lessons
An intro to recoloring
 Recolors are pretty much using the color replace tool to replace one set of colors with another set. Using something like a fill bucket tool is harder, and makes it more likely for you to forget a part. However I do sometimes use it and the single pixel tool when recoloring small parts in a fusion. When recoloring make sure all of the colors line up, don't forget the shading or the outlines.
 Very rarely can you remove a shade without causing damage to the sprite. For example take Flareon's gen 5 sprite. In the blue recolor the shading on Flareon was ignored. This makes the sprite look flat.
 However there are exceptions such as the shade between Flareon's normal tail color and shadow tail color. It is safe to take that out without causing to much harm to the sprite. However I don't recommend taking out shades unless you have to due to your pallet, or you know what you're doing. The Flareon to above is a devamp. Devamps have strict color pallets so this could be necessary to do for them.
 There will be times where your pallet doesn't have enough colors or you are making a pallet. In those cases select the color of the closest shade, edit the color and make it darker/lighter. When making your own pallet try to avoid neon colors by decreasing the saturation, as neon colors rarely look good. If colors in the original sprite contrast each other, make sure the recolor's colors also contrast. After your done recoloring zoom out. If you can't tell colors apart or can't tell there is shading where there should be adjust the colors.
 A useful trick for recoloring is to put all of the shades of a color into a line of pixels going from lightest to darkest. Then next to it put the colors your going to change the pixels to. This helps you keep track of all of the shades in a recolor.
Lesson 1 - Color replacement tool
In this first assignment you will get used to the recoloring tool in your art program. Before starting any sprite I recommend copy and pasting an extra version of the unedited original sprite into your art program. This way you can refer to it if you mess something up. Also feel free to make the canvas size huge while working on the sprite, just remember to shrink it down in the end.
I want you to take Frostlass and the color scheme to the right of it. Recolor the colors on the left side of the color pallet to the colors on the right. I recommend to do the colors in order, from top to bottom.
You will notice that when you get to white the color replace tool will also change the background. You have to be careful of this in recolors. If you go about this like how you did for the rest of the colors orange will be everywhere. Very carefully with the color replacement tool, replace the white in Frostlass.
 The are two areas you have to be careful in. They are highlighted in orange above. On the arm to the right, right above the bow, there is an opening in the outline. Carefully recolor the inside while avoiding to recolor the outside. If you used the fill bucket here the color will spill out all over your canvas. Though you could use the single pixel tool to plug it up then use the fill bucket.
Another area you have to be careful of is the area under Frostlass's head where it's arm is. There are a few pixels that aren't Frostlass between it's arm and it's body. Do not recolor those 6 pixels. They are a bit easier to see on the original sprite, which is why I said you should keep the unedited sprite next to what your working on for reference. Also when making the sprite transparent don't forget to make those pixels transparent too.
You may be wondering what is the point of making this hideous abomination. It is to get you to see all of the different shades that go into the sprite, and the outlines. I want to ensure you don't gloss over them in future recolors, where colors look more similar to each other. I also wanted to teach you how to deal with pure white in pokemon sprites, and to avoid filling in the inner pixels that aren't the pokemon.
The are two areas you have to be careful in. They are highlighted in orange above. On the arm to the right, right above the bow, there is an opening in the outline. Carefully recolor the inside while avoiding to recolor the outside. If you used the fill bucket here the color will spill out all over your canvas. Though you could use the single pixel tool to plug it up then use the fill bucket.
Another area you have to be careful of is the area under Frostlass's head where it's arm is. There are a few pixels that aren't Frostlass between it's arm and it's body. Do not recolor those 6 pixels. They are a bit easier to see on the original sprite, which is why I said you should keep the unedited sprite next to what your working on for reference. Also when making the sprite transparent don't forget to make those pixels transparent too.
You may be wondering what is the point of making this hideous abomination. It is to get you to see all of the different shades that go into the sprite, and the outlines. I want to ensure you don't gloss over them in future recolors, where colors look more similar to each other. I also wanted to teach you how to deal with pure white in pokemon sprites, and to avoid filling in the inner pixels that aren't the pokemon.
You will notice that when you get to white the color replace tool will also change the background. You have to be careful of this in recolors. If you go about this like how you did for the rest of the colors orange will be everywhere. Very carefully with the color replacement tool, replace the white in Frostlass.
The are two areas you have to be careful in. They are highlighted in orange above. On the arm to the right, right above the bow, there is an opening in the outline. Carefully recolor the inside while avoiding to recolor the outside. If you used the fill bucket here the color will spill out all over your canvas. Though you could use the single pixel tool to plug it up then use the fill bucket.
Another area you have to be careful of is the area under Frostlass's head where it's arm is. There are a few pixels that aren't Frostlass between it's arm and it's body. Do not recolor those 6 pixels. They are a bit easier to see on the original sprite, which is why I said you should keep the unedited sprite next to what your working on for reference. Also when making the sprite transparent don't forget to make those pixels transparent too.
You may be wondering what is the point of making this hideous abomination. It is to get you to see all of the different shades that go into the sprite, and the outlines. I want to ensure you don't gloss over them in future recolors, where colors look more similar to each other. I also wanted to teach you how to deal with pure white in pokemon sprites, and to avoid filling in the inner pixels that aren't the pokemon.Lesson 2 - Pallet swap
In this assignment you will recolor Sandshrew with Flygon's colors. I want you to make the white parts light green, the yellow parts dark green, and the blue red.
I slightly modified the Sandshrew sprite for the difficulty of this lesson. For the light green don't forget to also color in the claws and insides of Sandshrew's ears. Also don't recolor the pupils in Sandshrew's eyes.
I slightly modified the Sandshrew sprite for the difficulty of this lesson. For the light green don't forget to also color in the claws and insides of Sandshrew's ears. Also don't recolor the pupils in Sandshrew's eyes.
Lesson 3 - Adding onto pallets
Sometimes when recoloring a pokemon you will notice that the pokemon you are recoloring has more shades than your pallet. In these cases you will have to edit the colors and make your own. For this lesson I want you to recolor Flygon with Infernape's colors. I want Flygon's light green to be orange, dark green to yellow and red to blue.
Color pallets don't always line up with each other. The will be times where you are recoloring a pokemon with highlights with a pallet from a pokemon that doesn't have highlights. Don't recolor the pokemon's highlights color with the main body color. Everything will become much darker than it should be. Keep in mind the opposite for this is also true for recoloring a main body with a highlight color.
 Infernape's orange has a main body color, however doesn't have highlights. Flygon has highlights. In cases like these you will need to create a highlight color for Infernape's pallet.
 To get more colors into the pallet first get the color that is the closest to the color you want. Then change it's lum value to make it higher for lighter colors or lower for darker colors. Sometimes when making a color darker it will look neon or brighter than it should be. In these cases lower the saturation until the color looks right.
While recoloring the dark green to the yellow outline color you will notice there is still one non-outline shade left on Flygon.
To get more colors into the pallet first get the color that is the closest to the color you want. Then change it's lum value to make it higher for lighter colors or lower for darker colors. Sometimes when making a color darker it will look neon or brighter than it should be. In these cases lower the saturation until the color looks right.
While recoloring the dark green to the yellow outline color you will notice there is still one non-outline shade left on Flygon.
 Recoloring the shades with colors that were meant for outlines usually makes it too dark, and the opposite is true for recoloring the outline with colors that were meant for shades.
In this case take Infernape's yellow shade color and make it darker, but not darker than the outline color. Of course the exception is when the pokemon your recoloring uses it's own shades as outline colors and vise versa. In that case follow the shading pattern of the pokemon your recoloring.
In this recolor all of the colors you are changing require you to make at least one shade of it on your own.
Note: While recoloring shades the wrong shade is a spriting mistake, there are times where it can work out.
Recoloring the shades with colors that were meant for outlines usually makes it too dark, and the opposite is true for recoloring the outline with colors that were meant for shades.
In this case take Infernape's yellow shade color and make it darker, but not darker than the outline color. Of course the exception is when the pokemon your recoloring uses it's own shades as outline colors and vise versa. In that case follow the shading pattern of the pokemon your recoloring.
In this recolor all of the colors you are changing require you to make at least one shade of it on your own.
Note: While recoloring shades the wrong shade is a spriting mistake, there are times where it can work out.
 Take this Tyranitar recolor for example. It's main body color is the shade color of Jellicent. With an edit to the highlight, the recolor actually looks good. If you recolor a pokemon with a incorrect shade make sure your doing it purposefully, and that it looks good.
Color pallets don't always line up with each other. The will be times where you are recoloring a pokemon with highlights with a pallet from a pokemon that doesn't have highlights. Don't recolor the pokemon's highlights color with the main body color. Everything will become much darker than it should be. Keep in mind the opposite for this is also true for recoloring a main body with a highlight color.
Infernape's orange has a main body color, however doesn't have highlights. Flygon has highlights. In cases like these you will need to create a highlight color for Infernape's pallet.
To get more colors into the pallet first get the color that is the closest to the color you want. Then change it's lum value to make it higher for lighter colors or lower for darker colors. Sometimes when making a color darker it will look neon or brighter than it should be. In these cases lower the saturation until the color looks right.
While recoloring the dark green to the yellow outline color you will notice there is still one non-outline shade left on Flygon.
Recoloring the shades with colors that were meant for outlines usually makes it too dark, and the opposite is true for recoloring the outline with colors that were meant for shades.
In this case take Infernape's yellow shade color and make it darker, but not darker than the outline color. Of course the exception is when the pokemon your recoloring uses it's own shades as outline colors and vise versa. In that case follow the shading pattern of the pokemon your recoloring.
In this recolor all of the colors you are changing require you to make at least one shade of it on your own.
Note: While recoloring shades the wrong shade is a spriting mistake, there are times where it can work out.
Take this Tyranitar recolor for example. It's main body color is the shade color of Jellicent. With an edit to the highlight, the recolor actually looks good. If you recolor a pokemon with a incorrect shade make sure your doing it purposefully, and that it looks good.Lesson 4 - Creating your own pallets
The final lesson is to learn how to create your own pallet for a recolor. For this assignment I want you to pick any pokemon you want, and completely change it's color pallet aside from black outlines and the white in their eyes. Leave no extra color unedited. But don't make everything the same color. Also don't get any colors from other pokemon sprites.
Getting a pallet that looks good can be hard. Try to avoid neon colors, as they rarely look good. Once you got the base color use what you learned in lesson 3 to make shades for them. Also try to make all the different colors on the pokemon go together. Make sure that you can tell apart the different colors on the sprite. The shading should be visible but not a jarring change. If colors were distinct on the original sprite they should be distinct on the recolor to.
 Sometimes on pokemon sprites with patterns there will be pixels to transition from the main body color to the patterns. This is called anti-aliasing, and it is used to make sprites look smoother. Keep in mind these pixels while recoloring. The image above shows gives an example of recolors that ignore it and pay attention to it.
 In some official sprites the colors on them flow together, such as the white and blue on Jellicent. When this happens shades from one color of a sprite can be used as shades for others, or in Jellicent's shades of one color is used as an outline color for another. If the new pallet doesn't flow together like the old one, you will have to be careful and make sure the shades match up with the new colors of the sprite.
While recoloring pokemon to other colors, it is okay to get colors from other pokemon if you are having trouble getting the color look right. However for please don't do that the sake of this assignment. I want to see how you deal with picking colors on your own.
In some official sprites the colors on them flow together, such as the white and blue on Jellicent. When this happens shades from one color of a sprite can be used as shades for others, or in Jellicent's shades of one color is used as an outline color for another. If the new pallet doesn't flow together like the old one, you will have to be careful and make sure the shades match up with the new colors of the sprite.
While recoloring pokemon to other colors, it is okay to get colors from other pokemon if you are having trouble getting the color look right. However for please don't do that the sake of this assignment. I want to see how you deal with picking colors on your own.
Sometimes on pokemon sprites with patterns there will be pixels to transition from the main body color to the patterns. This is called anti-aliasing, and it is used to make sprites look smoother. Keep in mind these pixels while recoloring. The image above shows gives an example of recolors that ignore it and pay attention to it.
In some official sprites the colors on them flow together, such as the white and blue on Jellicent. When this happens shades from one color of a sprite can be used as shades for others, or in Jellicent's shades of one color is used as an outline color for another. If the new pallet doesn't flow together like the old one, you will have to be careful and make sure the shades match up with the new colors of the sprite.
While recoloring pokemon to other colors, it is okay to get colors from other pokemon if you are having trouble getting the color look right. However for please don't do that the sake of this assignment. I want to see how you deal with picking colors on your own. Fusion lessons
An intro to Fusion

 Fusion, the art of combining two pokemon sprites together to create something new. Fusion mainly consists of being able to separate parts, and being able to put them onto a base smoothly.
The skills used to make a fusion are used in a surprisingly large amount of sprites. Anytime you take a part from another sprite, these skills apply. I paid close attention while doing some fusions, and these lessons are based on the skills I used often in them.
Fusion, the art of combining two pokemon sprites together to create something new. Fusion mainly consists of being able to separate parts, and being able to put them onto a base smoothly.
The skills used to make a fusion are used in a surprisingly large amount of sprites. Anytime you take a part from another sprite, these skills apply. I paid close attention while doing some fusions, and these lessons are based on the skills I used often in them.Fusion design advice
To get the best results for the designs of fusions I suggest sketching them out first. A pitfall I see in sprites where the spriting starts immediately is that it often looks like parts are just pasted onto the pokemon because it's easy to make. To make better designs for my sprites I plan out the sprite first by sketching it. You don't even have to draw the entire pokemon or draw it well. Just draw the designs of body parts until you can get an image of how the sprite looks like in your head.
When making fusions don't just put parts of one pokemon onto another. Try to fuse the very essence of the pokemon themselves. Look at body parts of both pokemon and think 'how can I fuse these elements together' or 'how can I create something new from these parts'.
 Take these Lapras and Ludicolo fusions for example. The first one I just put Ludicolo's hat on Lapras. On the second fusion I tried to fuse Ludicolo onto Lapras, combining parts like the shell and the horn with elements of both pokemon. While the 2nd fusion has many elements from the advanced recolor classes on it, I thought it was a good example to illustrate my point.
You are free to put body parts onto the fusion where neither had those parts to begin with. You can also use parts for stuff they were never meant to be in the first place.
Take this Manelectric Abomasnow fusion. See how Abomasnow's arms are used for floof? By using parts in unusual ways I created one of my favorite fusions.
Take these Lapras and Ludicolo fusions for example. The first one I just put Ludicolo's hat on Lapras. On the second fusion I tried to fuse Ludicolo onto Lapras, combining parts like the shell and the horn with elements of both pokemon. While the 2nd fusion has many elements from the advanced recolor classes on it, I thought it was a good example to illustrate my point.
You are free to put body parts onto the fusion where neither had those parts to begin with. You can also use parts for stuff they were never meant to be in the first place.
Take this Manelectric Abomasnow fusion. See how Abomasnow's arms are used for floof? By using parts in unusual ways I created one of my favorite fusions.
 You may be wondering what colors to make a fusion. My answer is whatever looks nice. Don't be afraid to make the fusion the colors of the "base" if it looks good For exsample take the fusion above. The base is Glaceon, and it's design was based mostly on Glaceon's color scheme. Trying to force Virizion's color pallet on it made it worse.
Don't forget shiny pallets are also available. If you really want to you can even use colors neither of the pokemon have if they look nice and add to the design your looking for.
Often when I start making a sprite I get overwhelmed. I know I have to do all these thing for the design, and it just feels like to much. What I do is take a breath and focus on one small part at a time. Once I finish one step I move onto another. I keep going until I'm happy with the sprite, or I added everything I want to add onto it.
You may be wondering what colors to make a fusion. My answer is whatever looks nice. Don't be afraid to make the fusion the colors of the "base" if it looks good For exsample take the fusion above. The base is Glaceon, and it's design was based mostly on Glaceon's color scheme. Trying to force Virizion's color pallet on it made it worse.
Don't forget shiny pallets are also available. If you really want to you can even use colors neither of the pokemon have if they look nice and add to the design your looking for.
Often when I start making a sprite I get overwhelmed. I know I have to do all these thing for the design, and it just feels like to much. What I do is take a breath and focus on one small part at a time. Once I finish one step I move onto another. I keep going until I'm happy with the sprite, or I added everything I want to add onto it.
Take these Lapras and Ludicolo fusions for example. The first one I just put Ludicolo's hat on Lapras. On the second fusion I tried to fuse Ludicolo onto Lapras, combining parts like the shell and the horn with elements of both pokemon. While the 2nd fusion has many elements from the advanced recolor classes on it, I thought it was a good example to illustrate my point.
You are free to put body parts onto the fusion where neither had those parts to begin with. You can also use parts for stuff they were never meant to be in the first place.
Take this Manelectric Abomasnow fusion. See how Abomasnow's arms are used for floof? By using parts in unusual ways I created one of my favorite fusions.
You may be wondering what colors to make a fusion. My answer is whatever looks nice. Don't be afraid to make the fusion the colors of the "base" if it looks good For exsample take the fusion above. The base is Glaceon, and it's design was based mostly on Glaceon's color scheme. Trying to force Virizion's color pallet on it made it worse.
Don't forget shiny pallets are also available. If you really want to you can even use colors neither of the pokemon have if they look nice and add to the design your looking for.
Often when I start making a sprite I get overwhelmed. I know I have to do all these thing for the design, and it just feels like to much. What I do is take a breath and focus on one small part at a time. Once I finish one step I move onto another. I keep going until I'm happy with the sprite, or I added everything I want to add onto it.Lesson 1 - Erasing
When making a fusion you will often have to erase parts of a pokemon. This can come in the form of erasing the area around a part you want to use, or erasing the part on the base so you can place another part there. For this lesson I want you separate Mime.Jr's hat from the rest of it's body by erasing it's body.
First of all when making a fusion always have a copy of the pokemon your using available somewhere on your canvas. This way if you make a mistake to one of the pokemon, and need the original it'll save you from having to copy and paste the sprite into the program again.
When trying to separate a part from the rest of it's body first you should take the area around it with the selection tool, then copy and paste away from the rest of the sprite. Then go around the part with your eraser tool to remove the pixels that aren't part of the hat.
 After that you may notice there are some pixels that are too small to erase with your eraser tool without damaging the hat. For pixels such as those two above the right curve use the single pixel tool to erase them.
In some situations you may find it suitable to use the fill bucket to erase pixels around the part your trying to get. All of this also applies to removing parts of a base pokemon such as a tail to make way for a different one.
After that you may notice there are some pixels that are too small to erase with your eraser tool without damaging the hat. For pixels such as those two above the right curve use the single pixel tool to erase them.
In some situations you may find it suitable to use the fill bucket to erase pixels around the part your trying to get. All of this also applies to removing parts of a base pokemon such as a tail to make way for a different one.
First of all when making a fusion always have a copy of the pokemon your using available somewhere on your canvas. This way if you make a mistake to one of the pokemon, and need the original it'll save you from having to copy and paste the sprite into the program again.
When trying to separate a part from the rest of it's body first you should take the area around it with the selection tool, then copy and paste away from the rest of the sprite. Then go around the part with your eraser tool to remove the pixels that aren't part of the hat.
After that you may notice there are some pixels that are too small to erase with your eraser tool without damaging the hat. For pixels such as those two above the right curve use the single pixel tool to erase them.
In some situations you may find it suitable to use the fill bucket to erase pixels around the part your trying to get. All of this also applies to removing parts of a base pokemon such as a tail to make way for a different one.Lesson 2 - Mending parts
When making a fusion you will sometimes have parts you want to use that are behind different parts of the pokemon. In those cases you will want to fix up the part before putting it into the fusion. For this lesson I want you to to take Articuno's tail, erase the parts around it and fix the parts that were blocked by other parts of Articuno.
The first step is to erase the parts around Articuno's tail. It's okay to leave pixels if you think they will become part of the tail's outline. The next step is to draw the outline with the single pixel tool. Use the two outlines next to the area blocked by other parts as a reference to how you should draw the outline. Try to make it smoothly transition from one part of the outline to the next. The next step is to replace all the pixels that aren't Articuno's tail inside the tail with the base color of the tail with the single pixel tool.
After that fix up the shading and details in the areas that were obscured by other parts. While those areas of Articuno's tail didn't have any shading, they did have changes in the outline color. Use the outline colors of the lines that weren't blocked by other parts as a reference to what the colors should be. Articuno's tail also has two lines as details. Use where the lines already there as a reference for where the missing lines should go.
The first step is to erase the parts around Articuno's tail. It's okay to leave pixels if you think they will become part of the tail's outline. The next step is to draw the outline with the single pixel tool. Use the two outlines next to the area blocked by other parts as a reference to how you should draw the outline. Try to make it smoothly transition from one part of the outline to the next. The next step is to replace all the pixels that aren't Articuno's tail inside the tail with the base color of the tail with the single pixel tool.
After that fix up the shading and details in the areas that were obscured by other parts. While those areas of Articuno's tail didn't have any shading, they did have changes in the outline color. Use the outline colors of the lines that weren't blocked by other parts as a reference to what the colors should be. Articuno's tail also has two lines as details. Use where the lines already there as a reference for where the missing lines should go.Lesson 3 - Adding & Blending together parts
When making a fusion you will add parts onto a pokemon. After getting the part you want via erasing the rest of the sprite around it drag it onto the place you want it to go on the pokemon. If there is something in the way you don't want, such as there being another tail, you should erase it first before dragging the new part onto it. For this lesson I want you to replace the end of Lucario's arm with Octillery's mouth to create a sort of arm cannon.
You will quickly run into the problem of just placing the mouth doesn't look good. This is because Octillery's mouth is way to big for Lucario's arm. In order to fix this draw a line starting from the outline of the top of Lucario's arm to Octillery's mouth a few pixels at a time. Every few pixels move the line up by one. When going up stop drawing and move up and left one before drawing again.
 Avoid pixels in outlines that connect pixels in a sharp L like way unless you are trying to make something like a sharp point.
You don't have to connect the very top of Octillery's outline with Lucario's arm, stop once the outline of Octillery's mouth connects with the line you are drawing naturally. After that do the same to connect the outline of the bottom part of Lucario's arm with Octillery's mouth. Then erase the pixels outside the outline you just created. Finally fix up the shading making the end of the shading on Octillery's mouth meet up with the shading on Lucario's arm.
Avoid pixels in outlines that connect pixels in a sharp L like way unless you are trying to make something like a sharp point.
You don't have to connect the very top of Octillery's outline with Lucario's arm, stop once the outline of Octillery's mouth connects with the line you are drawing naturally. After that do the same to connect the outline of the bottom part of Lucario's arm with Octillery's mouth. Then erase the pixels outside the outline you just created. Finally fix up the shading making the end of the shading on Octillery's mouth meet up with the shading on Lucario's arm.
 While it didn't occur here sometimes when placing parts in programs like MS paint, the white parts will show the pixels behind them. In order to fix this change the color of the part to a random color nowhere else in the sprite, move the part over, then make the part white again. This can also be fixed by working on a background that isn't the color of any other part on the sprite, or by just fixing it up once you moved the part, though the latter is prone to more mistakes.
Another thing to look out for is where things logically are on a sprite. A common spriting mistake I see is placing a part behind a pokemon when it makes no logical sense.
While it didn't occur here sometimes when placing parts in programs like MS paint, the white parts will show the pixels behind them. In order to fix this change the color of the part to a random color nowhere else in the sprite, move the part over, then make the part white again. This can also be fixed by working on a background that isn't the color of any other part on the sprite, or by just fixing it up once you moved the part, though the latter is prone to more mistakes.
Another thing to look out for is where things logically are on a sprite. A common spriting mistake I see is placing a part behind a pokemon when it makes no logical sense.
 Take the image above for example. Due to the way Accelgor is angled the wings are coming out of his back and his left shoulder. The sprites on the right fix this by placing Accelgor's other wing where it logically should be, so both wings are coming out of the shoulders.
Depending on the angle the pokemon is facing wings won't always be facing towards the back. Sometimes it is more logical to place the wings to match the direction they are facing. However putting both wings on one side of a pokemon can look weird. Do what feels the most right. In the example image I did both, and it changes the angle Accelgor looks like its facing a little bit.
Take the image above for example. Due to the way Accelgor is angled the wings are coming out of his back and his left shoulder. The sprites on the right fix this by placing Accelgor's other wing where it logically should be, so both wings are coming out of the shoulders.
Depending on the angle the pokemon is facing wings won't always be facing towards the back. Sometimes it is more logical to place the wings to match the direction they are facing. However putting both wings on one side of a pokemon can look weird. Do what feels the most right. In the example image I did both, and it changes the angle Accelgor looks like its facing a little bit.
You will quickly run into the problem of just placing the mouth doesn't look good. This is because Octillery's mouth is way to big for Lucario's arm. In order to fix this draw a line starting from the outline of the top of Lucario's arm to Octillery's mouth a few pixels at a time. Every few pixels move the line up by one. When going up stop drawing and move up and left one before drawing again.
Avoid pixels in outlines that connect pixels in a sharp L like way unless you are trying to make something like a sharp point.
You don't have to connect the very top of Octillery's outline with Lucario's arm, stop once the outline of Octillery's mouth connects with the line you are drawing naturally. After that do the same to connect the outline of the bottom part of Lucario's arm with Octillery's mouth. Then erase the pixels outside the outline you just created. Finally fix up the shading making the end of the shading on Octillery's mouth meet up with the shading on Lucario's arm.
While it didn't occur here sometimes when placing parts in programs like MS paint, the white parts will show the pixels behind them. In order to fix this change the color of the part to a random color nowhere else in the sprite, move the part over, then make the part white again. This can also be fixed by working on a background that isn't the color of any other part on the sprite, or by just fixing it up once you moved the part, though the latter is prone to more mistakes.
Another thing to look out for is where things logically are on a sprite. A common spriting mistake I see is placing a part behind a pokemon when it makes no logical sense.
Take the image above for example. Due to the way Accelgor is angled the wings are coming out of his back and his left shoulder. The sprites on the right fix this by placing Accelgor's other wing where it logically should be, so both wings are coming out of the shoulders.
Depending on the angle the pokemon is facing wings won't always be facing towards the back. Sometimes it is more logical to place the wings to match the direction they are facing. However putting both wings on one side of a pokemon can look weird. Do what feels the most right. In the example image I did both, and it changes the angle Accelgor looks like its facing a little bit.Lesson 4 - Sandwich placement
Sometimes when making a sprite you will want to place something in front of some parts, and behind other parts. In order to do this first copy the part on the sprite that you want to go in front of the other part. After that put the middle part onto the sprite. Finally drag the part you copied earlier back onto the sprite.
For this lesson I want you to take the Mime Jr. hat you separated earlier and put it on top of Thundurus, but have the front Thundurus's spiky part be in front of the hat. I want you to place the hat to show that you understand this skill as opposed to a logical placement.
Don't forget to fix up the white part on Mime Jr.'s hat if the pixels show through it.
Don't forget to fix up the white part on Mime Jr.'s hat if the pixels show through it.
Lesson 5 - resizing parts
Sometimes you will want something to be bigger or smaller. Never use a part you only resized, it will never look good.
Sometimes you just need to change the size by a only few pixels. In cases where you need it smaller select part of the part with the rectangular selection tool and shift the part closer to the rest of it by one. Try going for areas where the outline has more than one pixel first, and most of the time you should try going for the longest outline segments first. Afterwards adjust the outline and shading around the area you compressed to make it look natural. Repeat this until satisfied. To make it slightly bigger move the part away from the rest of the part and then fix it up.
 For smaller parts use the gen 7 minisprites. Those sprites were made with the intention of being tiny so if they aren't small enough for you, nothing will be. Be sure to recolor them to the part to the colors of the front sprite, as minisprites often have different pallets than front sprites.
For this lesson I want you to make Espeon's tail two pixel's taller and two pixels thinner. If you are having trouble resizing the tail on Espeon, take it away from Espeon then edit it. Move it back onto Espeon afterwards.
For smaller parts use the gen 7 minisprites. Those sprites were made with the intention of being tiny so if they aren't small enough for you, nothing will be. Be sure to recolor them to the part to the colors of the front sprite, as minisprites often have different pallets than front sprites.
For this lesson I want you to make Espeon's tail two pixel's taller and two pixels thinner. If you are having trouble resizing the tail on Espeon, take it away from Espeon then edit it. Move it back onto Espeon afterwards.
Lesson 6 - Making a fusion
Now for the moment you have been waiting for. Making the fusion. For this lesson I want you to fuse any pokemon together that you would like.
When making a big change to a sprite you should make a backup by copy and pasting the sprite somewhere on your canvas. That way if you don't like the change you made you can go back to a previous version without much hassle. Erase the backups once you are finished with the sprite.
All of the lessons beforehand were teaching you skills for this moment. I want you to go all out on this fusion. Show me everything you learned(unless it harms the design of the fusion). Before starting please read fusion design advice. I want you to try to make a fusion with a design you think looks nice instead of one that is easy to make. It's okay if you something mess up, it will only show you what you need to work on to get better.
Fusion Creation process
Here I will walk you through the process I go through for fusions. For this fusion I will be fusing Vaporeon and Cofagrigus. Now when you first think of this fusion you might think of something like this.
 My problem with this sprite is that it is too simple. There is so much potential when fusing these two pokemon together, yet this fusion takes the easy way out. While the hands going out of the fins and tail is cool, this sprite fails to really go anywhere with the idea of the fusion, and is just Cofagrigus arms on a recolored Vaporeon.
 My first step when making a fusion is to plan it out with a sketch. When making a fusion I try to fuse the very essence of the pokemon together or make something new. For example take where Vaporeon's fins were. On Vaporeon's head fins come out. Ghostly arms come out of Cofagrigus's body. I decided to fuse these two concepts together by making ghostly arms come out where Vaporeon's fins should be. There are stripes along the tail with it ending with the face on Cofagrigus's head to try to create something new out of Vaporeon's tail using elements from Cofagrigus.
After the first sketch I sketch out and refine ideas for the sprite. In this case it is the stripes along the front paws and having the fin along Vaporeon's back be ghostly like Cofagrigus's arms. Then I draw a second sketch where I put all of the elements together, and try to make the pokemon look like the pokemon if I mess up the first sketch horribly.
Now you will notice in the second sketch I forgot the ghostly back fin. This is because I forgot to draw it. I tried to draw it in the pose I wanted it in, the fusion creeping about. Notice the simplicity of the sketch. These are meant to help you plan your ideas out. Details such as hands(Seriously who can draw them?) are simplified to get the general point across without making the sketch take 3000 years.
I will be using Vaporeon's HeartGold sprite as it is closer to the pose I am aiming for.
My first step when making a fusion is to plan it out with a sketch. When making a fusion I try to fuse the very essence of the pokemon together or make something new. For example take where Vaporeon's fins were. On Vaporeon's head fins come out. Ghostly arms come out of Cofagrigus's body. I decided to fuse these two concepts together by making ghostly arms come out where Vaporeon's fins should be. There are stripes along the tail with it ending with the face on Cofagrigus's head to try to create something new out of Vaporeon's tail using elements from Cofagrigus.
After the first sketch I sketch out and refine ideas for the sprite. In this case it is the stripes along the front paws and having the fin along Vaporeon's back be ghostly like Cofagrigus's arms. Then I draw a second sketch where I put all of the elements together, and try to make the pokemon look like the pokemon if I mess up the first sketch horribly.
Now you will notice in the second sketch I forgot the ghostly back fin. This is because I forgot to draw it. I tried to draw it in the pose I wanted it in, the fusion creeping about. Notice the simplicity of the sketch. These are meant to help you plan your ideas out. Details such as hands(Seriously who can draw them?) are simplified to get the general point across without making the sketch take 3000 years.
I will be using Vaporeon's HeartGold sprite as it is closer to the pose I am aiming for.
 For this sprite the first thing I do is get the sprite ready for the pose. This gets the sprite ready to work on Cofagrius parts latter. I move and mend body parts into the pose I want. I also remove part of the fin as it was in the way and I won't need it for the final design. For the paw off the ground I made a copy of the sprite as it was a part of the sprite I was likely to mess up. I did a few versions that didn't look so good until I got a final version I was happy with.
 Next I decided to focus on the head. First I remove the fins as I won't need them. Then I move the head closer to the body as the frills took up a lot of space. Then I worked on the mouth and eyes. When making the mouth I had a feeling like I would have to reshape the eye, so I made a copy of it. After that I made another copy in case I messed up the head while adding the hands, and I should have started with a copy of the full body, as I realized only after I placed the hands. I also adjusted the smile a bit as in sprites adjustments are key. Just a few pixels can drastically change the feel of the sprite.
 I realized the hands are to big as they will cover up a significant portion of the sprite if I left them as they were. I shrank the size of the hands, and then placed them. I originally was going to have the leftmost hand behind the other hands, however it would get to covered up, so I considered moving it off to the side and just using the central hand again. I decided to have the hand hover over the other two as to not get in the way. I then drew in the ghostly arms to connect the hands to the head.
 Next I add on the face on Cofagrius's head onto the tail of the fusion. Then I recolor it. I fix up the back fins and recolor them into a ghost-like substance. I also fix up the neck. I tried to make the face yellow, but that wasn't really working out. I changed it to black, and also changed the direction of the face to match the direction of the mouth and eyes.
 I was having trouble with getting the smile to look right. While I don't usually do this in fusions, I decided to grab the mouth off of Gengar's minisprite to make the mouth look better. The mouth on Cofagrius's minisprite is to small to look good. I tried edit the mouth to make it more pointed like Cofafrius's teeth, but that made it look worse. So instead I fused it with the current mouth and lightened the color a bit, and that mouth looked good. To get the mouth on the fusion I filled it with a near white color, then changed it back.
 Next I add the stripes. I grab the color pallet and add them along the arms, legs and tail. I thought the fusion was looking a bit plain in the area, so I added a stripe to it's stomach. However it looked worse so I kept it the way it was.
 Finally I worked on the headdress. I was going to make it mimic Cofagrius's. However I realized that while I changed the direction the fusion's head was in, I didn't change the direction the headdress was facing. After fixing that I focused on the headdress.
 And now, the fusion is finished. While making this sprite I used techniques from all 5 core classes. I recolored Cofagrius to Vaporeon's colors. I obviously fused parts of Cofagrius onto Vaporeon. I scratched part of the smile, the ghostly arms and the sides of the headdress. I put the fusion in a pose, and for advanced recolor I put on a stripe pattern onto Vaporeon. As shown here these skills come up everywhere in spriting, which is why they are core classes.
 This sprite is actually a remake of an older fusion sprite. I wasn't as into giving my sprites poses then. Here you can clearly see the difference it makes. The old sprite uses Vaporeon's gen 5 sprite and pose. The result looks like it's making the surprised Pikachu face while sitting down. The next sprite has the fusion lurking around with a big slasher smile. This pose is much more fitting for the fusion, and tells you a bit about it's personality.
And here is what my workspace looked like once I was done with the fusion (Though shrunken a bit):
This sprite is actually a remake of an older fusion sprite. I wasn't as into giving my sprites poses then. Here you can clearly see the difference it makes. The old sprite uses Vaporeon's gen 5 sprite and pose. The result looks like it's making the surprised Pikachu face while sitting down. The next sprite has the fusion lurking around with a big slasher smile. This pose is much more fitting for the fusion, and tells you a bit about it's personality.
And here is what my workspace looked like once I was done with the fusion (Though shrunken a bit):
 That showed just one way to fuse the two pokemon together. There are still infinitely more ways the fusion can go. This time instead of completely fusing the pokemon together I am going to fuse the concepts of Cofagrius onto Vaporeon.
 For this fusion I am aiming for a rich, and bit ghostly fusion. As you can see the first sketch doesn't remotely look like the pokemon. After thinking through some of the parts, the 2nd second sketch is a lot better, and actually looks like a pokemon.
 For this fusion I will use Vaporeon's platinum sprite as it is the closest to the pose I am aiming for.
 The first thing I do is get the pose right. I move the tail behind Vaporeon, lift up Vaporeon's front arm and add in the back legs. This was tricky as the tail was covering most of it. My first attempt looked wrong as it made the belly looked large and fat. My second attempt's legs looked worse. I edited the pixels between the first and second pair of legs, and went with the first attempt's back legs as they looked better. I also adjusted the front arm going up a bit to make it look better.
 Next I work on the bow tie. I tried placing the hands in front of Vaporeon, but that did not work out. For the bow tie I looked at the barrettes from the diamond and pearl games as inspiration. Finally I got something I was happy with, and put the hands behind the back.
 Next I add in the head piece. As you can see, putting it on Vaporeon's head as it is, is way to big. I tried shrinking it, but those also flopped. I ended up editing the one on the minisprite a bit.
 Then I made the gold bands, I also edited the lines and shading of the head piece a bit.
 After that I added the golden thing to the tail. I also closed up the lines on the back fin.
 While I put in everything I wanted to, the fusion still looked a bit plain. I added a neck band that has the symbol of Cofagrius's head on it. I also tried giving it the eye of Horus as Cofagrius is based on an Egyptian Coffin. I tried to tone it down a bit, but it looked like it was crying... Clearly not my intention, so I removed it entirely. I edited the shading a bit, and with that the fusion is finished.
Here is what my workspace looked like in the end:
While I put in everything I wanted to, the fusion still looked a bit plain. I added a neck band that has the symbol of Cofagrius's head on it. I also tried giving it the eye of Horus as Cofagrius is based on an Egyptian Coffin. I tried to tone it down a bit, but it looked like it was crying... Clearly not my intention, so I removed it entirely. I edited the shading a bit, and with that the fusion is finished.
Here is what my workspace looked like in the end:

 You can make many different versions of a fusion using the same two pokemon. Here are four fusions using the same two pokemon, and that's just as Vaporeon as the base. So the next time your making a fusion, instead of just dragging a part onto a pokemon and recoloring it, remember there's a whole world of possibilities you can make. Let your creativity shine!
My problem with this sprite is that it is too simple. There is so much potential when fusing these two pokemon together, yet this fusion takes the easy way out. While the hands going out of the fins and tail is cool, this sprite fails to really go anywhere with the idea of the fusion, and is just Cofagrigus arms on a recolored Vaporeon.
My first step when making a fusion is to plan it out with a sketch. When making a fusion I try to fuse the very essence of the pokemon together or make something new. For example take where Vaporeon's fins were. On Vaporeon's head fins come out. Ghostly arms come out of Cofagrigus's body. I decided to fuse these two concepts together by making ghostly arms come out where Vaporeon's fins should be. There are stripes along the tail with it ending with the face on Cofagrigus's head to try to create something new out of Vaporeon's tail using elements from Cofagrigus.
After the first sketch I sketch out and refine ideas for the sprite. In this case it is the stripes along the front paws and having the fin along Vaporeon's back be ghostly like Cofagrigus's arms. Then I draw a second sketch where I put all of the elements together, and try to make the pokemon look like the pokemon if I mess up the first sketch horribly.
Now you will notice in the second sketch I forgot the ghostly back fin. This is because I forgot to draw it. I tried to draw it in the pose I wanted it in, the fusion creeping about. Notice the simplicity of the sketch. These are meant to help you plan your ideas out. Details such as hands(Seriously who can draw them?) are simplified to get the general point across without making the sketch take 3000 years.
I will be using Vaporeon's HeartGold sprite as it is closer to the pose I am aiming for.
For this sprite the first thing I do is get the sprite ready for the pose. This gets the sprite ready to work on Cofagrius parts latter. I move and mend body parts into the pose I want. I also remove part of the fin as it was in the way and I won't need it for the final design. For the paw off the ground I made a copy of the sprite as it was a part of the sprite I was likely to mess up. I did a few versions that didn't look so good until I got a final version I was happy with.
Next I decided to focus on the head. First I remove the fins as I won't need them. Then I move the head closer to the body as the frills took up a lot of space. Then I worked on the mouth and eyes. When making the mouth I had a feeling like I would have to reshape the eye, so I made a copy of it. After that I made another copy in case I messed up the head while adding the hands, and I should have started with a copy of the full body, as I realized only after I placed the hands. I also adjusted the smile a bit as in sprites adjustments are key. Just a few pixels can drastically change the feel of the sprite.
I realized the hands are to big as they will cover up a significant portion of the sprite if I left them as they were. I shrank the size of the hands, and then placed them. I originally was going to have the leftmost hand behind the other hands, however it would get to covered up, so I considered moving it off to the side and just using the central hand again. I decided to have the hand hover over the other two as to not get in the way. I then drew in the ghostly arms to connect the hands to the head.
Next I add on the face on Cofagrius's head onto the tail of the fusion. Then I recolor it. I fix up the back fins and recolor them into a ghost-like substance. I also fix up the neck. I tried to make the face yellow, but that wasn't really working out. I changed it to black, and also changed the direction of the face to match the direction of the mouth and eyes.
I was having trouble with getting the smile to look right. While I don't usually do this in fusions, I decided to grab the mouth off of Gengar's minisprite to make the mouth look better. The mouth on Cofagrius's minisprite is to small to look good. I tried edit the mouth to make it more pointed like Cofafrius's teeth, but that made it look worse. So instead I fused it with the current mouth and lightened the color a bit, and that mouth looked good. To get the mouth on the fusion I filled it with a near white color, then changed it back.
Next I add the stripes. I grab the color pallet and add them along the arms, legs and tail. I thought the fusion was looking a bit plain in the area, so I added a stripe to it's stomach. However it looked worse so I kept it the way it was.
Finally I worked on the headdress. I was going to make it mimic Cofagrius's. However I realized that while I changed the direction the fusion's head was in, I didn't change the direction the headdress was facing. After fixing that I focused on the headdress.
And now, the fusion is finished. While making this sprite I used techniques from all 5 core classes. I recolored Cofagrius to Vaporeon's colors. I obviously fused parts of Cofagrius onto Vaporeon. I scratched part of the smile, the ghostly arms and the sides of the headdress. I put the fusion in a pose, and for advanced recolor I put on a stripe pattern onto Vaporeon. As shown here these skills come up everywhere in spriting, which is why they are core classes.
This sprite is actually a remake of an older fusion sprite. I wasn't as into giving my sprites poses then. Here you can clearly see the difference it makes. The old sprite uses Vaporeon's gen 5 sprite and pose. The result looks like it's making the surprised Pikachu face while sitting down. The next sprite has the fusion lurking around with a big slasher smile. This pose is much more fitting for the fusion, and tells you a bit about it's personality.
And here is what my workspace looked like once I was done with the fusion (Though shrunken a bit):
That showed just one way to fuse the two pokemon together. There are still infinitely more ways the fusion can go. This time instead of completely fusing the pokemon together I am going to fuse the concepts of Cofagrius onto Vaporeon.
For this fusion I am aiming for a rich, and bit ghostly fusion. As you can see the first sketch doesn't remotely look like the pokemon. After thinking through some of the parts, the 2nd second sketch is a lot better, and actually looks like a pokemon.
For this fusion I will use Vaporeon's platinum sprite as it is the closest to the pose I am aiming for.
The first thing I do is get the pose right. I move the tail behind Vaporeon, lift up Vaporeon's front arm and add in the back legs. This was tricky as the tail was covering most of it. My first attempt looked wrong as it made the belly looked large and fat. My second attempt's legs looked worse. I edited the pixels between the first and second pair of legs, and went with the first attempt's back legs as they looked better. I also adjusted the front arm going up a bit to make it look better.
Next I work on the bow tie. I tried placing the hands in front of Vaporeon, but that did not work out. For the bow tie I looked at the barrettes from the diamond and pearl games as inspiration. Finally I got something I was happy with, and put the hands behind the back.
Next I add in the head piece. As you can see, putting it on Vaporeon's head as it is, is way to big. I tried shrinking it, but those also flopped. I ended up editing the one on the minisprite a bit.
Then I made the gold bands, I also edited the lines and shading of the head piece a bit.
After that I added the golden thing to the tail. I also closed up the lines on the back fin.
While I put in everything I wanted to, the fusion still looked a bit plain. I added a neck band that has the symbol of Cofagrius's head on it. I also tried giving it the eye of Horus as Cofagrius is based on an Egyptian Coffin. I tried to tone it down a bit, but it looked like it was crying... Clearly not my intention, so I removed it entirely. I edited the shading a bit, and with that the fusion is finished.
Here is what my workspace looked like in the end:
You can make many different versions of a fusion using the same two pokemon. Here are four fusions using the same two pokemon, and that's just as Vaporeon as the base. So the next time your making a fusion, instead of just dragging a part onto a pokemon and recoloring it, remember there's a whole world of possibilities you can make. Let your creativity shine!
 Scratch lessons
An intro to scratch
 Scratch, creating things by yourself by hand. Scratch is basically pixel art. While it can look overwhelming at first it really isn't that bad most of the time. Scratching shows up everywhere. In retypes and even fusions sometimes you will have to scratch new parts or modify parts in order to get the result you want.
There are three key things to scratch, keeping good proportion sizes, having a solid outline and shading the sprite.
Scratch, creating things by yourself by hand. Scratch is basically pixel art. While it can look overwhelming at first it really isn't that bad most of the time. Scratching shows up everywhere. In retypes and even fusions sometimes you will have to scratch new parts or modify parts in order to get the result you want.
There are three key things to scratch, keeping good proportion sizes, having a solid outline and shading the sprite.Lesson 1 - Scratching a sprite
While this is one lesson it's a long one, as I wasn't really sure show to break it up. For this lesson I want you to try to create a sprite of a gen 6+ pokemon. I suggest trying do make a simpler pokemon.
Part 1: Proportion
 The first step when making a sprite is to get the portions down. If you don't the sprite could end up being too big compared to other pokemon sprites or have something much bigger or smaller compared to the rest of the sprite.
 First find a pokemon of a similar size to the pokemon you will sprite. Then draw a neon colored box around it, make sure the sides of the box are just outside the outer most pixels of the sprite, and is right next to it. The easiest way to do that is to start using the rectangle tool until your cursor is in the corner of the sprite. Then without moving your cursor stop the current rectangle and create a new one going all the way to the other corner of the sprite. After that remove the pokemon from the middle of the box. That box serves as a reference for the size should make your pokemon. If a pokemon has something large hanging off of it like a tail you might want to make two boxes, one for the main body, and one for the tail.
 Then you want to draw a sketch. Using Neon colors draw the general size + place of what things would be. Make sure to use different colors for different parts or it becomes hard to tell what's what. Usually I do two sketches, one to get the location and size of things on the sprite, and another to form more details. Pokemon sprites tend to face left so keep that in mind while sketching the sprite.
After that go into more detail with a second sketch. Once that is done it is time to move onto the outline.
Though there is one trick that you can use if you are having trouble. Take a 3D sprite or artwork of what you are trying to scratch and scale it down to the size of the rectangle. Quickly get the general shape and then erase what isn't part of your sketch.
Let me get one thing clear. DO NOT TRACE IT EXACTLY. The point of this is to get the portions for the sprite. If you carefully trace it, it is no longer a scratched sprite but instead a pixel over. It is painfully obvious when someone does a pixel over from the 3D sprite or artwork. Just draw circles and lines to get the general shape of the pokemon. After erasing what isn't the sketch, move the parts of the sketch to the pose you want the sprite to have. After that make the 2nd sketch where you go into more careful detail.
This image is an example of what I mean. The one on the left is lose and gets the general idea of the portions down without being exact enough to trace. It leaves enough room for your second sketch to make the sprite your own. On the right it is literally traced. It is very tempting to make that your outline with some adjustments. This is a pixel over, and it doesn't really teach you how to make a scratched sprite.
Part 2: Outline
The next step is to create an outline for your sprite. Carefully go around where the sketch is and make the outline, one line at a time. When making a circular shape, if there is a part that looks rather long and flat add a line segment on top of part of it. Then erase the inner part of it. Alternatively you can lengthen the line segments leading up to it.
When making the outline avoid making sharp L shaped groups of pixels unless you are making something like a spike. This will make your outline look a lot cleaner.
Then you want to draw a sketch. Using Neon colors draw the general size + place of what things would be. Make sure to use different colors for different parts or it becomes hard to tell what's what. Usually I do two sketches, one to get the location and size of things on the sprite, and another to form more details. Pokemon sprites tend to face left so keep that in mind while sketching the sprite.
After that go into more detail with a second sketch. Once that is done it is time to move onto the outline.
Though there is one trick that you can use if you are having trouble. Take a 3D sprite or artwork of what you are trying to scratch and scale it down to the size of the rectangle. Quickly get the general shape and then erase what isn't part of your sketch.
Let me get one thing clear. DO NOT TRACE IT EXACTLY. The point of this is to get the portions for the sprite. If you carefully trace it, it is no longer a scratched sprite but instead a pixel over. It is painfully obvious when someone does a pixel over from the 3D sprite or artwork. Just draw circles and lines to get the general shape of the pokemon. After erasing what isn't the sketch, move the parts of the sketch to the pose you want the sprite to have. After that make the 2nd sketch where you go into more careful detail.
This image is an example of what I mean. The one on the left is lose and gets the general idea of the portions down without being exact enough to trace. It leaves enough room for your second sketch to make the sprite your own. On the right it is literally traced. It is very tempting to make that your outline with some adjustments. This is a pixel over, and it doesn't really teach you how to make a scratched sprite.
Part 2: Outline
The next step is to create an outline for your sprite. Carefully go around where the sketch is and make the outline, one line at a time. When making a circular shape, if there is a part that looks rather long and flat add a line segment on top of part of it. Then erase the inner part of it. Alternatively you can lengthen the line segments leading up to it.
When making the outline avoid making sharp L shaped groups of pixels unless you are making something like a spike. This will make your outline look a lot cleaner.
 A useful trick I remember hearing for curves is when a line segment of one pixel is next to one of 3 or more pixels, make a line segment of 2 pixels in between them to try to transition them. I find that this usually makes my line art look better, though there are exceptions. In the image above the lines on the right use this trick while the ones on the left don't.
Be sure to zoom out and see how your outline looks from time to time as that is how people will view your sprite most of the time. Another trick I found if you are having trouble with making the shape of something is to draw the line quickly in about one mouse press. After that fix up the line by removing L shaped clutters of excess pixels and adjusting the line segments that look off.
Adjustments are key. If something looks off you might have to adjust the shape or size of something. When making narrowish parts with the top/bottom left/right halves next to each other try to make both of the line's line segments move in sync with each other. This will help you keep the width of the object consistent.
A useful trick I remember hearing for curves is when a line segment of one pixel is next to one of 3 or more pixels, make a line segment of 2 pixels in between them to try to transition them. I find that this usually makes my line art look better, though there are exceptions. In the image above the lines on the right use this trick while the ones on the left don't.
Be sure to zoom out and see how your outline looks from time to time as that is how people will view your sprite most of the time. Another trick I found if you are having trouble with making the shape of something is to draw the line quickly in about one mouse press. After that fix up the line by removing L shaped clutters of excess pixels and adjusting the line segments that look off.
Adjustments are key. If something looks off you might have to adjust the shape or size of something. When making narrowish parts with the top/bottom left/right halves next to each other try to make both of the line's line segments move in sync with each other. This will help you keep the width of the object consistent.
 Sometimes you will sprite something small, and the pixels won't seem to fit. In these cases you will have to play around with the pixels. You might have to redo it a few times. Keep altering them until you have something you are happy with. For things such as Mimikyu's cloth I keep trying to get one pointing out of it section right, and then I base the rest of it off of that.
For details that will be colored such as eyes you might want to draw them in using a different color than the rest of the outline. Just make sure not to confuse it for your sketch.
It's okay to find yourself jumping back and forth between the outline and coloring. Sometimes when scratching sprites I complete one body part at a time instead of doing the outline all at once. Once you are finished with the outline erase your sketch. I do this by replacing the sketch color with white/transparent.
Part three: Color
Sometimes you will sprite something small, and the pixels won't seem to fit. In these cases you will have to play around with the pixels. You might have to redo it a few times. Keep altering them until you have something you are happy with. For things such as Mimikyu's cloth I keep trying to get one pointing out of it section right, and then I base the rest of it off of that.
For details that will be colored such as eyes you might want to draw them in using a different color than the rest of the outline. Just make sure not to confuse it for your sketch.
It's okay to find yourself jumping back and forth between the outline and coloring. Sometimes when scratching sprites I complete one body part at a time instead of doing the outline all at once. Once you are finished with the outline erase your sketch. I do this by replacing the sketch color with white/transparent.
Part three: Color
 Finally it is time to color in the sprite. First get a pallet. Colors often have a base color, a shade color, an outline color and sometimes a highlight. Official gen 5 pokemon sprites have 15 colors on them, 13 counting black and white. If you are aiming for accuracy try to stay within this 13 color limit, which includes different shades of a color.
 Place shading on the sprite like you would normally when drawing. If you don't really know how shading works that's okay, I don't either. Since the lighting of sprites come from the top left, place the shade by the bottom right parts of sprites. Also place shading where something on top of/in front of something would block the right. Despite my inexperience I can usually make the shading look descent through that.
When adding the shade draw the outline of where the shade would start, then color in the inside. Also keep in mind other light sources such as flames, as that could affect how you shade the sprite.
Place shading on the sprite like you would normally when drawing. If you don't really know how shading works that's okay, I don't either. Since the lighting of sprites come from the top left, place the shade by the bottom right parts of sprites. Also place shading where something on top of/in front of something would block the right. Despite my inexperience I can usually make the shading look descent through that.
When adding the shade draw the outline of where the shade would start, then color in the inside. Also keep in mind other light sources such as flames, as that could affect how you shade the sprite.
 There is a technique known as dithering that you might want to use if you want a shade in between two colors. It can be seen on the neck of this Bayleef. To dither make everything of the same color connect diagonally. Dithering is usually used sparingly on sprites. If you are ever unsure on how to shade or make something try to find an official pokemon sprite to use as a reference on how to make/shade it.
 Color the outline based on the color around it, based on what it would be if the sprite were to continue on. If the outline is by the base color, color it the outline color. If the outline is by a shade color, leave it black. You might also want to change the color of the outline so it doesn't blend in with objects surrounding the outline. Sometimes when a highlight color is by an outline the outline is colored with the shade color, however this is used sparingly.
 Here is an image showing the progression of me making a Mimikyu sprite, so you can get a rough idea of how the sprite looks like at each stage.
The first step when making a sprite is to get the portions down. If you don't the sprite could end up being too big compared to other pokemon sprites or have something much bigger or smaller compared to the rest of the sprite.
First find a pokemon of a similar size to the pokemon you will sprite. Then draw a neon colored box around it, make sure the sides of the box are just outside the outer most pixels of the sprite, and is right next to it. The easiest way to do that is to start using the rectangle tool until your cursor is in the corner of the sprite. Then without moving your cursor stop the current rectangle and create a new one going all the way to the other corner of the sprite. After that remove the pokemon from the middle of the box. That box serves as a reference for the size should make your pokemon. If a pokemon has something large hanging off of it like a tail you might want to make two boxes, one for the main body, and one for the tail.
Then you want to draw a sketch. Using Neon colors draw the general size + place of what things would be. Make sure to use different colors for different parts or it becomes hard to tell what's what. Usually I do two sketches, one to get the location and size of things on the sprite, and another to form more details. Pokemon sprites tend to face left so keep that in mind while sketching the sprite.
After that go into more detail with a second sketch. Once that is done it is time to move onto the outline.
Though there is one trick that you can use if you are having trouble. Take a 3D sprite or artwork of what you are trying to scratch and scale it down to the size of the rectangle. Quickly get the general shape and then erase what isn't part of your sketch.
Let me get one thing clear. DO NOT TRACE IT EXACTLY. The point of this is to get the portions for the sprite. If you carefully trace it, it is no longer a scratched sprite but instead a pixel over. It is painfully obvious when someone does a pixel over from the 3D sprite or artwork. Just draw circles and lines to get the general shape of the pokemon. After erasing what isn't the sketch, move the parts of the sketch to the pose you want the sprite to have. After that make the 2nd sketch where you go into more careful detail.
This image is an example of what I mean. The one on the left is lose and gets the general idea of the portions down without being exact enough to trace. It leaves enough room for your second sketch to make the sprite your own. On the right it is literally traced. It is very tempting to make that your outline with some adjustments. This is a pixel over, and it doesn't really teach you how to make a scratched sprite.
Part 2: Outline
The next step is to create an outline for your sprite. Carefully go around where the sketch is and make the outline, one line at a time. When making a circular shape, if there is a part that looks rather long and flat add a line segment on top of part of it. Then erase the inner part of it. Alternatively you can lengthen the line segments leading up to it.
When making the outline avoid making sharp L shaped groups of pixels unless you are making something like a spike. This will make your outline look a lot cleaner.
A useful trick I remember hearing for curves is when a line segment of one pixel is next to one of 3 or more pixels, make a line segment of 2 pixels in between them to try to transition them. I find that this usually makes my line art look better, though there are exceptions. In the image above the lines on the right use this trick while the ones on the left don't.
Be sure to zoom out and see how your outline looks from time to time as that is how people will view your sprite most of the time. Another trick I found if you are having trouble with making the shape of something is to draw the line quickly in about one mouse press. After that fix up the line by removing L shaped clutters of excess pixels and adjusting the line segments that look off.
Adjustments are key. If something looks off you might have to adjust the shape or size of something. When making narrowish parts with the top/bottom left/right halves next to each other try to make both of the line's line segments move in sync with each other. This will help you keep the width of the object consistent.
Sometimes you will sprite something small, and the pixels won't seem to fit. In these cases you will have to play around with the pixels. You might have to redo it a few times. Keep altering them until you have something you are happy with. For things such as Mimikyu's cloth I keep trying to get one pointing out of it section right, and then I base the rest of it off of that.
For details that will be colored such as eyes you might want to draw them in using a different color than the rest of the outline. Just make sure not to confuse it for your sketch.
It's okay to find yourself jumping back and forth between the outline and coloring. Sometimes when scratching sprites I complete one body part at a time instead of doing the outline all at once. Once you are finished with the outline erase your sketch. I do this by replacing the sketch color with white/transparent.
Part three: Color
Finally it is time to color in the sprite. First get a pallet. Colors often have a base color, a shade color, an outline color and sometimes a highlight. Official gen 5 pokemon sprites have 15 colors on them, 13 counting black and white. If you are aiming for accuracy try to stay within this 13 color limit, which includes different shades of a color.
Place shading on the sprite like you would normally when drawing. If you don't really know how shading works that's okay, I don't either. Since the lighting of sprites come from the top left, place the shade by the bottom right parts of sprites. Also place shading where something on top of/in front of something would block the right. Despite my inexperience I can usually make the shading look descent through that.
When adding the shade draw the outline of where the shade would start, then color in the inside. Also keep in mind other light sources such as flames, as that could affect how you shade the sprite.
There is a technique known as dithering that you might want to use if you want a shade in between two colors. It can be seen on the neck of this Bayleef. To dither make everything of the same color connect diagonally. Dithering is usually used sparingly on sprites. If you are ever unsure on how to shade or make something try to find an official pokemon sprite to use as a reference on how to make/shade it.
Color the outline based on the color around it, based on what it would be if the sprite were to continue on. If the outline is by the base color, color it the outline color. If the outline is by a shade color, leave it black. You might also want to change the color of the outline so it doesn't blend in with objects surrounding the outline. Sometimes when a highlight color is by an outline the outline is colored with the shade color, however this is used sparingly.
Here is an image showing the progression of me making a Mimikyu sprite, so you can get a rough idea of how the sprite looks like at each stage.
Lesson 2 - Editing/Adding scratched parts
When making sprites there will be times where you will want parts you can't quite get from other sprites. In these instances you will have to make the part yourself. For this lesson I want you to give Shinx emo bangs(Think Staraptor) that go over one of the eyes.
A lot of what you learned in the previous lesson still applies. However this time you have to be aware of the pixels around the area you are creating the scratched sprite. Base the size of what you are making on the pixels around it.
Carefully make the new outline with the existing pixels. If you damage the surrounding pixels erase a bit of the area around the newly scratched part, not the entire sprite. Then copy and paste a backup. Move the sprite with the new scratched part over the backup. After that erase the parts that become irrelevant, in this case the remaining parts of the top head fluff. Finally shade it.
A lot of what you learned in the previous lesson still applies. However this time you have to be aware of the pixels around the area you are creating the scratched sprite. Base the size of what you are making on the pixels around it.
Carefully make the new outline with the existing pixels. If you damage the surrounding pixels erase a bit of the area around the newly scratched part, not the entire sprite. Then copy and paste a backup. Move the sprite with the new scratched part over the backup. After that erase the parts that become irrelevant, in this case the remaining parts of the top head fluff. Finally shade it. Pose lessons
An intro to poses
 Poses can bring life into any kind of sprite you make. There is a difference between a Growithe that is just standing there, and one that looks excited to see you. Finding the right pose can give your sprite more of an emotional impact, and help with the theme you are going for.
Lesson 1 - Facial expressions
Giving your sprite the right facial expression can help sell the emotion the sprite is going for.
Eyes: Try to keep the shape and color of the eyes in mind while making changes. Also don't forget to color in the outline for newly added parts. When making the eye close, make the line in the center of the eye as pokemon tend to have a top and bottom eyelid.
Example expressions: For this lesson I want you to take any pokemon or sprite you've made that doesn't have Chikorita's face that you want and give it the same expressions as the image above. Make sure the pokemon has a visible mouth and eyes to make expressions of. While these are a bit much, it should let you practice most of the expressions you would give a sprite.
Anger - Make the pokemon's eyes slant towards the center of their face. Give the pokemon a frown. Add an anger symbol by having three red curves face inward from a center. Use the example for reference if you are having trouble making it. While you wouldn't put it in all of the sprites you are trying to make look angry, it can really help sell the emotion.
Saddness - Give the pokemon a frown. Make them look down. Start by blanking out the eye. Then add the pupil. After that draw the rest of the inside of the eye around the pupil. Be careful to preserve the shape and color of the inside of the eye while making changes to it. Also Make the top part of the eye curve inwards. After that add tears under the eye. You don't want to have the tears make a jarring contrast between the pokmon and the tears themselves.
Calm - Make the pokemon's eyes close and curve down. Give the sprite a slight smile.
Awkward Laughter - Make the pokemon's eyes close and curve up. Give the pokemon an open mouth smile. Add a drop of sweat to the pokemon's face about where the upper part of the eyes are. To sprite the sweat drop make a vertical line of two pixels. Then give it an outline everywhere but the top and corners.
Are you serious - Make the top of the pokemon's eyelids a flat line. Give the pokemon a flat line for the face.
Shock - Make the pokemon's eyes completely white. You make have to make the eyes a bit more circular. Give the pokemon an o shaped open mouth.
Shy Crush - Make the pokemon look towards it's bottom right. Add in some blush. If you are having trouble adding blush that isn't to hard or soft looking have a hard pink color surrounded by some light pink color like the example image.
Sad Anger - Find the center point for the eye. Make a pixel to the side closest to the center of the face. Make a diagonal line that keeps going up until you reach the outline of the eye. Then below + diagonal to the center pixel add a line that goes to the outline of the eye. Make the pokemon frown. Add in some tears.
Awe - Give the pokemon star shaped pupils. Give them a huge smile.
For this lesson I want you to take any pokemon or sprite you've made that doesn't have Chikorita's face that you want and give it the same expressions as the image above. Make sure the pokemon has a visible mouth and eyes to make expressions of. While these are a bit much, it should let you practice most of the expressions you would give a sprite.
Anger - Make the pokemon's eyes slant towards the center of their face. Give the pokemon a frown. Add an anger symbol by having three red curves face inward from a center. Use the example for reference if you are having trouble making it. While you wouldn't put it in all of the sprites you are trying to make look angry, it can really help sell the emotion.
Saddness - Give the pokemon a frown. Make them look down. Start by blanking out the eye. Then add the pupil. After that draw the rest of the inside of the eye around the pupil. Be careful to preserve the shape and color of the inside of the eye while making changes to it. Also Make the top part of the eye curve inwards. After that add tears under the eye. You don't want to have the tears make a jarring contrast between the pokmon and the tears themselves.
Calm - Make the pokemon's eyes close and curve down. Give the sprite a slight smile.
Awkward Laughter - Make the pokemon's eyes close and curve up. Give the pokemon an open mouth smile. Add a drop of sweat to the pokemon's face about where the upper part of the eyes are. To sprite the sweat drop make a vertical line of two pixels. Then give it an outline everywhere but the top and corners.
Are you serious - Make the top of the pokemon's eyelids a flat line. Give the pokemon a flat line for the face.
Shock - Make the pokemon's eyes completely white. You make have to make the eyes a bit more circular. Give the pokemon an o shaped open mouth.
Shy Crush - Make the pokemon look towards it's bottom right. Add in some blush. If you are having trouble adding blush that isn't to hard or soft looking have a hard pink color surrounded by some light pink color like the example image.
Sad Anger - Find the center point for the eye. Make a pixel to the side closest to the center of the face. Make a diagonal line that keeps going up until you reach the outline of the eye. Then below + diagonal to the center pixel add a line that goes to the outline of the eye. Make the pokemon frown. Add in some tears.
Awe - Give the pokemon star shaped pupils. Give them a huge smile.
- Eyes closed with a curve going up - Happy
- Eyes closed with a curve going down - Calm/sleeping
- Top part of eye curves down - Worry/upset
- Bottom part of eye curves up - Annoyed/going crazy
- Eyes slant towards center of face - Anger/Hostility
- Pure white - Shocked
- Stars as pupils - Amazed
- Looking down - sadness
- Looking away - Timidity
- Eyes closed with a curve going up - Happy
- Curve going down - Happy
- Curve going up - Upset
- Straight - neutral, a slight smile or frown is also used sometimes
- O shaped - Shock
- Drooling - Hunger
For this lesson I want you to take any pokemon or sprite you've made that doesn't have Chikorita's face that you want and give it the same expressions as the image above. Make sure the pokemon has a visible mouth and eyes to make expressions of. While these are a bit much, it should let you practice most of the expressions you would give a sprite.
Anger - Make the pokemon's eyes slant towards the center of their face. Give the pokemon a frown. Add an anger symbol by having three red curves face inward from a center. Use the example for reference if you are having trouble making it. While you wouldn't put it in all of the sprites you are trying to make look angry, it can really help sell the emotion.
Saddness - Give the pokemon a frown. Make them look down. Start by blanking out the eye. Then add the pupil. After that draw the rest of the inside of the eye around the pupil. Be careful to preserve the shape and color of the inside of the eye while making changes to it. Also Make the top part of the eye curve inwards. After that add tears under the eye. You don't want to have the tears make a jarring contrast between the pokmon and the tears themselves.
Calm - Make the pokemon's eyes close and curve down. Give the sprite a slight smile.
Awkward Laughter - Make the pokemon's eyes close and curve up. Give the pokemon an open mouth smile. Add a drop of sweat to the pokemon's face about where the upper part of the eyes are. To sprite the sweat drop make a vertical line of two pixels. Then give it an outline everywhere but the top and corners.
Are you serious - Make the top of the pokemon's eyelids a flat line. Give the pokemon a flat line for the face.
Shock - Make the pokemon's eyes completely white. You make have to make the eyes a bit more circular. Give the pokemon an o shaped open mouth.
Shy Crush - Make the pokemon look towards it's bottom right. Add in some blush. If you are having trouble adding blush that isn't to hard or soft looking have a hard pink color surrounded by some light pink color like the example image.
Sad Anger - Find the center point for the eye. Make a pixel to the side closest to the center of the face. Make a diagonal line that keeps going up until you reach the outline of the eye. Then below + diagonal to the center pixel add a line that goes to the outline of the eye. Make the pokemon frown. Add in some tears.
Awe - Give the pokemon star shaped pupils. Give them a huge smile.Lesson 2 - Posing the body
For this lesson I want you to put Kirlia's gen 5 sprite into a pose of having one hand on it's hip and the other out. I also want you to separate it's feet.
In order to put a pokemon into a pose you should take the end of it's limb and place it where you want it to be. Then scratch the remaining portion in order to reconnect it with it's body. Also clean up the area where the limb was if it was blocking something. Keep in mind the size of the pokemon. Try to keep the width of body parts consistent and try not to stretch or shrink parts too much.
First apply this to making Kirlia's left hand stick out. Next move Kirlia's right hand to it's hips as while it is on the skirt it's not quite on the hips. It will be a bit harder to connect to the body. If you are having trouble making it look right take Kirlia's elbow and attach it to the end of Kirlia's hand.
For the legs start by separating the foot, then placing it where Kirlia's two feet will be. After that make the legs so they connect from the feet to Kirlia's bottom. Keep in mind Kirlia's legs are about 1 pixel thick.
In order to put a pokemon into a pose you should take the end of it's limb and place it where you want it to be. Then scratch the remaining portion in order to reconnect it with it's body. Also clean up the area where the limb was if it was blocking something. Keep in mind the size of the pokemon. Try to keep the width of body parts consistent and try not to stretch or shrink parts too much.
First apply this to making Kirlia's left hand stick out. Next move Kirlia's right hand to it's hips as while it is on the skirt it's not quite on the hips. It will be a bit harder to connect to the body. If you are having trouble making it look right take Kirlia's elbow and attach it to the end of Kirlia's hand.
For the legs start by separating the foot, then placing it where Kirlia's two feet will be. After that make the legs so they connect from the feet to Kirlia's bottom. Keep in mind Kirlia's legs are about 1 pixel thick. A note on using past generation sprites
Pokemon has been through 5 generations worth of sprites. Sometimes you may see a sprite from an older generation that has a pose that would be great to use for the sprite your making.
 Generation 3 and 4 sprites are okay to use. However they may have a different color pallet so you have to make sure all of the colors are consistent in the sprite. Gen 3 tends to have a different color pallet from the gen 4 & 5 sprites so you may want to recolor them before using them.
 Generation 1 and 2 sprites however are too different to be used with generation 3, 4 and 5 sprites. If you want to use them you have to revamp them first. I don't mean just a recolor, but a ton of edits to the shading as gen 1 and 2 had color pallets that servely limited their shading.
 As for using the generation 6+ 3D sprites in sprites, don't. They are very hard to recolor as they have 30 million colors on them that prevent the color replacement tool from working. It is also very hard to make scratch edits to them without there being a jarring clash between the two styles. This is why people either use fan-made gen 6+ sprites or do a pixel over of the 3D model.
Generation 3 and 4 sprites are okay to use. However they may have a different color pallet so you have to make sure all of the colors are consistent in the sprite. Gen 3 tends to have a different color pallet from the gen 4 & 5 sprites so you may want to recolor them before using them.
Generation 1 and 2 sprites however are too different to be used with generation 3, 4 and 5 sprites. If you want to use them you have to revamp them first. I don't mean just a recolor, but a ton of edits to the shading as gen 1 and 2 had color pallets that servely limited their shading.
As for using the generation 6+ 3D sprites in sprites, don't. They are very hard to recolor as they have 30 million colors on them that prevent the color replacement tool from working. It is also very hard to make scratch edits to them without there being a jarring clash between the two styles. This is why people either use fan-made gen 6+ sprites or do a pixel over of the 3D model. Advanced recolor lessons
An intro to advanced recolor
 Sometimes you want to make parts of the sprite of the same color different colors. When this comes up spamming the color replacement tool doesn't work anymore. The key to complicated recolors is being careful. These lessons will also cover adding patterns to a sprite.
Lesson 1 - Recoloring only parts
When recoloring sprites sometimes you only want to recolor only parts of a certain color to another color. When this happens go in very carefully with a small color replacement tool and recolor the parts you can recolor without changing the other parts. After that go into the smaller areas with the single pixel tool.
For this lesson I want you to recolor Burmy's leaves the alternating colors of the Watmel berry.
Start by making the top most two leaves pink. For the pink color use the 2nd lightest shade for the base color to avoid using highlights as the base color. Use the darkest shade as the shade color so you can tell the base and shade color apart. Create your own outline color.
Next change all of the leaves surrounding Burmy's face to Watmel green. Use the 2nd lightest color for the base, the 2nd darkest color for the shade, and darken the darkest color a bit for the outline.
Here you will have to be a lot more careful. If you aren't you could change the color of the leaves beneath them by mistake. When your color replacement tool gets to small recolor the remaining pixels with the single pixel tool and the fill bucket.
Be careful about the outlines. Some of the outlines blend into the leaves below them. Recolor the outline closest to the inner part of the leaves you are recoloring. Do not recolor if an outline pixel is diagonal to the inner pixel of what you are recoloring as most of the time and in this case it is the outline for something else.
Once that is done recolor the next row of leaves pink, and the large part at the very bottom green.
For this lesson I want you to recolor Burmy's leaves the alternating colors of the Watmel berry.
Start by making the top most two leaves pink. For the pink color use the 2nd lightest shade for the base color to avoid using highlights as the base color. Use the darkest shade as the shade color so you can tell the base and shade color apart. Create your own outline color.
Next change all of the leaves surrounding Burmy's face to Watmel green. Use the 2nd lightest color for the base, the 2nd darkest color for the shade, and darken the darkest color a bit for the outline.
Here you will have to be a lot more careful. If you aren't you could change the color of the leaves beneath them by mistake. When your color replacement tool gets to small recolor the remaining pixels with the single pixel tool and the fill bucket.
Be careful about the outlines. Some of the outlines blend into the leaves below them. Recolor the outline closest to the inner part of the leaves you are recoloring. Do not recolor if an outline pixel is diagonal to the inner pixel of what you are recoloring as most of the time and in this case it is the outline for something else.
Once that is done recolor the next row of leaves pink, and the large part at the very bottom green.Lesson 2 - Patterns
When adding patterns make sure the color of the pattern goes with the pokemon's color scheme. Another thing to look out for is just copy and pasting the pattern all over the pokemon. Make sure the pattern for the pokemon follow's it's outlines and doesn't go on top of them. However it is okay to recolor an outline color to an outline color for a pattern if the pattern was going to continue there.
If there is an outline that indicates a change of shape in the pokemon such as an arm that covers part of the body, chose where the pattern will show and erase the other part. It looks rather unnatural when markings on two places of the body just happen to line up to look like one marking with a line through it. Try to avoid it unless it is intentional in your design.
Also make sure to follow the shading on the pokemon. Another thing is variation. Varying the pattern you put on the pokemon can really make it look nicer. I recommend starting off with a normal sized marking and a smaller one, and making more as you see fit. Of course if you want to make every marking unique go for it.
 Now let me tell you about anti-aliasing. They are pixels put between two colors to make it look smoother. Look at the Clefairy above. The Clefairy on the left has anti-aliasing and the one on the right doesn't. See how much smoother the Clefairy on the left is? To make anti-analising chose a color between the base color of the pokemon, and the base color of the pattern. I find that the best way to get the color is to get a tool that makes semi-transparent strokes, get the color from one of the strokes and then undo the stroke. Then put a pixel in areas that look rough, and could be smoother.
 Do not go overboard with anti-analising. In the games it is only really used to make spots on pokemon look better. Don't surround the entire pattern with anti-analising. Anti-analising is only mainly used in areas of the base color. If there is a part in the shade a new color of anti-analising isn't made for it. Either remove it all together in shade areas or use a color that is already somewhere on the sprite. There is also usually only one anti-analising color.
For this lesson I want you to give Clefairy a star pattern. Start by finding a color that looks good on Clefairy. Then either draw patterns using the base pattern color onto Clefairy which is better for unique patterns or make them off to the side which is better for repeating shape patterns.
For smaller stars you can make them + shaped. For bigger stars you can make a line of 5 pixels, with one of 3 pixels under it. Add a pixel to the top and onto the bottom outer corners. You can make your own star shapes too if you want, these are just for guidance if you get stuck.
Do not go overboard with anti-analising. In the games it is only really used to make spots on pokemon look better. Don't surround the entire pattern with anti-analising. Anti-analising is only mainly used in areas of the base color. If there is a part in the shade a new color of anti-analising isn't made for it. Either remove it all together in shade areas or use a color that is already somewhere on the sprite. There is also usually only one anti-analising color.
For this lesson I want you to give Clefairy a star pattern. Start by finding a color that looks good on Clefairy. Then either draw patterns using the base pattern color onto Clefairy which is better for unique patterns or make them off to the side which is better for repeating shape patterns.
For smaller stars you can make them + shaped. For bigger stars you can make a line of 5 pixels, with one of 3 pixels under it. Add a pixel to the top and onto the bottom outer corners. You can make your own star shapes too if you want, these are just for guidance if you get stuck.
 Now for the anti-analising. For the bigger star on the bottom most pixels add a pixel going towards the center. I find that is what looks the best. You don't want to over do anti-analising in sprites. For instance if you put anti-analising in the corners of the smaller star it will look like a spot.
Now if you didn't draw the shapes directly onto the sprite copy and paste the shapes onto the sprite. Be careful about the placement. You want to find a nice balance of not being to cluttered and varying the shapes you place down. Once that is done fix up any outlines you broke. Then recolor the parts that need to, including outlines.
Now for the anti-analising. For the bigger star on the bottom most pixels add a pixel going towards the center. I find that is what looks the best. You don't want to over do anti-analising in sprites. For instance if you put anti-analising in the corners of the smaller star it will look like a spot.
Now if you didn't draw the shapes directly onto the sprite copy and paste the shapes onto the sprite. Be careful about the placement. You want to find a nice balance of not being to cluttered and varying the shapes you place down. Once that is done fix up any outlines you broke. Then recolor the parts that need to, including outlines.
Now let me tell you about anti-aliasing. They are pixels put between two colors to make it look smoother. Look at the Clefairy above. The Clefairy on the left has anti-aliasing and the one on the right doesn't. See how much smoother the Clefairy on the left is? To make anti-analising chose a color between the base color of the pokemon, and the base color of the pattern. I find that the best way to get the color is to get a tool that makes semi-transparent strokes, get the color from one of the strokes and then undo the stroke. Then put a pixel in areas that look rough, and could be smoother.
Do not go overboard with anti-analising. In the games it is only really used to make spots on pokemon look better. Don't surround the entire pattern with anti-analising. Anti-analising is only mainly used in areas of the base color. If there is a part in the shade a new color of anti-analising isn't made for it. Either remove it all together in shade areas or use a color that is already somewhere on the sprite. There is also usually only one anti-analising color.
For this lesson I want you to give Clefairy a star pattern. Start by finding a color that looks good on Clefairy. Then either draw patterns using the base pattern color onto Clefairy which is better for unique patterns or make them off to the side which is better for repeating shape patterns.
For smaller stars you can make them + shaped. For bigger stars you can make a line of 5 pixels, with one of 3 pixels under it. Add a pixel to the top and onto the bottom outer corners. You can make your own star shapes too if you want, these are just for guidance if you get stuck.
Now for the anti-analising. For the bigger star on the bottom most pixels add a pixel going towards the center. I find that is what looks the best. You don't want to over do anti-analising in sprites. For instance if you put anti-analising in the corners of the smaller star it will look like a spot.
Now if you didn't draw the shapes directly onto the sprite copy and paste the shapes onto the sprite. Be careful about the placement. You want to find a nice balance of not being to cluttered and varying the shapes you place down. Once that is done fix up any outlines you broke. Then recolor the parts that need to, including outlines.
Lesson 3 - Adding advanced multi-color patterns
Sometimes when making a sprite you will want to create a complex pattern in multiple colors. You will then come to the horrible realization that you have to keep track of shading while creating the pattern. However I've come up with a method to make it much easier.
The first thing you want to do is make a copy of the sprite your making. Then draw the pattern directly onto the sprite using flat colors. You can completely ignore shading for now. Make sure not to use colors already on the sprite. You also have to color in areas you want to keep their original color in a different color. Make sure to also color in outlines you want to be that color.
 After that make a copy of the unedited sprite and the sprite covered in patterns. Make one of the colors in the pattern transparent. Then drag it over the unedited sprite. After that recolor everything to the color you want, and this includes shading.
For the rest of the colors make another copy of the unedited sprite. Then on the sprite you just recolored make another color transparent. Drag that over the unedited sprite and then recolor. If you are trying to keep some of the colors the same as the original sprite do it last, as otherwise you might recolor it to a different color.
For this lesson I want you to recolor Walrein with the pattern provided on the right. The pattern was made to be really annoying to recolor onto the sprite without this method. I trust that you will be able to create patterns on your own, recoloring everything correctly is the part I want to focus on for this lesson. The pattern gives you the base color for the body, but you will have to create all of the shades on your own.
Start by making the red transparent and then drag it over the Walrein sprite. Then recolor it. I want you to try to stick to the same red for the entirety of Walrein's sprite. Though you want to make the Red on the white parts of Walrein lighter than the rest of the body. Be careful about mixing up the pure white on Walrein's sprite with the pure white patterns on it. After that do the green. Then the white. For the yellow just leave Walrein's base color there.
Having many different colors together can make it hard to see the shading on the sprite, so be careful when doing this.
After that make a copy of the unedited sprite and the sprite covered in patterns. Make one of the colors in the pattern transparent. Then drag it over the unedited sprite. After that recolor everything to the color you want, and this includes shading.
For the rest of the colors make another copy of the unedited sprite. Then on the sprite you just recolored make another color transparent. Drag that over the unedited sprite and then recolor. If you are trying to keep some of the colors the same as the original sprite do it last, as otherwise you might recolor it to a different color.
For this lesson I want you to recolor Walrein with the pattern provided on the right. The pattern was made to be really annoying to recolor onto the sprite without this method. I trust that you will be able to create patterns on your own, recoloring everything correctly is the part I want to focus on for this lesson. The pattern gives you the base color for the body, but you will have to create all of the shades on your own.
Start by making the red transparent and then drag it over the Walrein sprite. Then recolor it. I want you to try to stick to the same red for the entirety of Walrein's sprite. Though you want to make the Red on the white parts of Walrein lighter than the rest of the body. Be careful about mixing up the pure white on Walrein's sprite with the pure white patterns on it. After that do the green. Then the white. For the yellow just leave Walrein's base color there.
Having many different colors together can make it hard to see the shading on the sprite, so be careful when doing this.Side Classes
These classes are for specific sprite types. Custom Animation
An intro to custom animation
 It's not an animated recolor. It's not putting sprites from multiple generations together. This is making your very own animations for sprites. This is done by converting the sprite into a vector sprite, moving it around, cleaning up the images then converting it to a gif.
For these lessons you will need a program called Scratch 2.0. You can get the program here. The program was designed to be an educational coding program, but we are interested in it's art editor.
These lessons were made with a computer in mind. Scratch 2.0 won't work on most tablets and phones.
It's not an animated recolor. It's not putting sprites from multiple generations together. This is making your very own animations for sprites. This is done by converting the sprite into a vector sprite, moving it around, cleaning up the images then converting it to a gif.
For these lessons you will need a program called Scratch 2.0. You can get the program here. The program was designed to be an educational coding program, but we are interested in it's art editor.
These lessons were made with a computer in mind. Scratch 2.0 won't work on most tablets and phones.Lesson 1 - Rigging a sprite
Before you can animate a sprite, you got to rig the sprite. For this lesson I want you to rig any official pokemon sprite or sprite you made/edited.
 The first thing to do is to open up Scratch. Click costumes which is boxed in red. Then you want to import the sprite into the program which is boxed in orange. You want to right click and duplicate the first image.
 Remember to save what you do in Scratch. The save buttons are boxed in light blue. Scratch has crashed on me before when I was using the magic wand tool. Stay on the safe side and save.
 Then on duplicated image erase everything but a body part which is boxed in yellow. These parts will be the parts that you are able to move in the animation process.
 Instead of operating in pixels like any normal art program, Scratch operates in SUB-pixels. That means many features are able to be done in a 4th of a pixel. This is bad when doing pixel art. All but the smallest 2 eraser sizes automatically erase subpixels, and the smallest two will erase subpixels if you use it willy-nilly.
 The thing to do is carefully with a small eraser erase the boundary between the body part and the rest of the sprite, never doing diagonal strokes. Then erase the rest of the sprite with a bigger eraser without damaging the part. Then erase what you couldn't erase with the bigger eraser without damaging the part with a smaller eraser.
 Depending on the part you may want to extend it a few pixels outwards so it looks better when other parts are moved away from it.
 After that click convert to vector that is boxed in green in the lower right corner. Repeat the process above until you got all of the body parts.
You will want one vector image to put all of the body parts together on. Copy and paste all of the body parts onto one image. Copying and pasting in Scratch is finicky. You will lose what you just copied the second you are off of a vector image. It may also take a few tries.
Once all of the pieces are on one image it's time to reconstruct the sprite. Carefully put the parts back together to form the sprite, you can drag it and use arrow keys. However this also involves subpixels.
After that click convert to vector that is boxed in green in the lower right corner. Repeat the process above until you got all of the body parts.
You will want one vector image to put all of the body parts together on. Copy and paste all of the body parts onto one image. Copying and pasting in Scratch is finicky. You will lose what you just copied the second you are off of a vector image. It may also take a few tries.
Once all of the pieces are on one image it's time to reconstruct the sprite. Carefully put the parts back together to form the sprite, you can drag it and use arrow keys. However this also involves subpixels.
 Try to use segments of single pixels on the sprite to try to line things up. You can also do this as you separate the parts, which is what I do. When you are done go back and forth from the original image to the reconstructed one and check for differences. Ideally they should look the same.
For this lesson I want to to screenshot the end result once you reconstructed the sprite.
Try to use segments of single pixels on the sprite to try to line things up. You can also do this as you separate the parts, which is what I do. When you are done go back and forth from the original image to the reconstructed one and check for differences. Ideally they should look the same.
For this lesson I want to to screenshot the end result once you reconstructed the sprite.
The first thing to do is to open up Scratch. Click costumes which is boxed in red. Then you want to import the sprite into the program which is boxed in orange. You want to right click and duplicate the first image.
Remember to save what you do in Scratch. The save buttons are boxed in light blue. Scratch has crashed on me before when I was using the magic wand tool. Stay on the safe side and save.
Then on duplicated image erase everything but a body part which is boxed in yellow. These parts will be the parts that you are able to move in the animation process.
Instead of operating in pixels like any normal art program, Scratch operates in SUB-pixels. That means many features are able to be done in a 4th of a pixel. This is bad when doing pixel art. All but the smallest 2 eraser sizes automatically erase subpixels, and the smallest two will erase subpixels if you use it willy-nilly.
The thing to do is carefully with a small eraser erase the boundary between the body part and the rest of the sprite, never doing diagonal strokes. Then erase the rest of the sprite with a bigger eraser without damaging the part. Then erase what you couldn't erase with the bigger eraser without damaging the part with a smaller eraser.
Depending on the part you may want to extend it a few pixels outwards so it looks better when other parts are moved away from it.
After that click convert to vector that is boxed in green in the lower right corner. Repeat the process above until you got all of the body parts.
You will want one vector image to put all of the body parts together on. Copy and paste all of the body parts onto one image. Copying and pasting in Scratch is finicky. You will lose what you just copied the second you are off of a vector image. It may also take a few tries.
Once all of the pieces are on one image it's time to reconstruct the sprite. Carefully put the parts back together to form the sprite, you can drag it and use arrow keys. However this also involves subpixels.
Try to use segments of single pixels on the sprite to try to line things up. You can also do this as you separate the parts, which is what I do. When you are done go back and forth from the original image to the reconstructed one and check for differences. Ideally they should look the same.
For this lesson I want to to screenshot the end result once you reconstructed the sprite.Lesson 2 - Animating the sprite
For this lesson I want you to animate the sprite you rigged in lesson 1.
 First you want to get the reconstructed vector image as the only costume in a sprite. I recommend duplicating the sprite you were working on by right clicking the image for it on the bottom left corner of the screen, then clicking duplicate. Then press X on all of the costumes in the sprite until only the vector image is left.
Now it is time to animate the sprite. First you should duplicate the first frame. Now you want to move it a bit. The vector editor also works in sub-pixels, so try to use the pixels around the part to judge how much you moved it.
If you move things by less than a full pixel it will not show up in the final animation. You can also rotate and resize parts. For frames that continue current motion duplicate the frame you just worked on once your finished working on it.
First you want to get the reconstructed vector image as the only costume in a sprite. I recommend duplicating the sprite you were working on by right clicking the image for it on the bottom left corner of the screen, then clicking duplicate. Then press X on all of the costumes in the sprite until only the vector image is left.
Now it is time to animate the sprite. First you should duplicate the first frame. Now you want to move it a bit. The vector editor also works in sub-pixels, so try to use the pixels around the part to judge how much you moved it.
If you move things by less than a full pixel it will not show up in the final animation. You can also rotate and resize parts. For frames that continue current motion duplicate the frame you just worked on once your finished working on it.
 Adding pixels to the animation is a bit tricky. First you want to click the button that looks like a square with circles in the corners. Then on the bottom left corner of the art editor you want to click the solid rectangle.
Then use the eyedropper to get the color you want. Using an existing pixel as a guide, make a rectangle about the size of a pixel. Then place them where you want to put the pixels. You can use the tool that looks like a stamp to copy and paste those pixels(and parts).
The animation should eventually loop back to one of the frames. Focus on making the unique frames for the animation. Don't create extra frames looping back to the first sprite if you want them to look exactly the same as other frames you already have.
Adding pixels to the animation is a bit tricky. First you want to click the button that looks like a square with circles in the corners. Then on the bottom left corner of the art editor you want to click the solid rectangle.
Then use the eyedropper to get the color you want. Using an existing pixel as a guide, make a rectangle about the size of a pixel. Then place them where you want to put the pixels. You can use the tool that looks like a stamp to copy and paste those pixels(and parts).
The animation should eventually loop back to one of the frames. Focus on making the unique frames for the animation. Don't create extra frames looping back to the first sprite if you want them to look exactly the same as other frames you already have.
 You can test out your animation in the editor. Click the scripts button that is next to the costumes button. There are bits of code that let you control the sprite. Under looks there is a block that says "Switch costume to (NAME)". That will allow you to change what frame the sprite is currently on. Use the arrow drop down to select which frame it will become when used.
 Under control there is a block that says "forever". Put one around the rest of your code so the animation keeps looping.
There is also a block called "wait (1) secs". This block will allow you to add pauses to your animation. Typically you want to put waits of 0.1 seconds in between blocks that change the sprite.
Finally there is the "repeat (10)" block. This allows you to loop parts of your animation. This is useful if you want a part of the animation to loop a number of times before doing something else.
Changes can be seen to the left of the screen. You can duplicate blocks by right clicking on them. You can start and stop code by quickly clicking on it. Keep adjusting your frames and animation until you get something you are happy with.
Under control there is a block that says "forever". Put one around the rest of your code so the animation keeps looping.
There is also a block called "wait (1) secs". This block will allow you to add pauses to your animation. Typically you want to put waits of 0.1 seconds in between blocks that change the sprite.
Finally there is the "repeat (10)" block. This allows you to loop parts of your animation. This is useful if you want a part of the animation to loop a number of times before doing something else.
Changes can be seen to the left of the screen. You can duplicate blocks by right clicking on them. You can start and stop code by quickly clicking on it. Keep adjusting your frames and animation until you get something you are happy with.
 For the next step you want to clean up the images. This avoids the grainy and broken outlines problem many gen 5 sprite animations have. First of all go under motion and get the block "go to x:(number)y:(number)". Make both numbers zero, then click it. This will get your sprite to the center of the screen.
 Now open up the program you use to make sprites. Take screen shots of the screen but make the white part transparent. Start by taking screen shots of the farthest reaching frames, and put them over each other. Make sure the screenshots line up. Then draw a 1 pixel wide box around the edges of the sprite. This box tells you how big all of the frames should be, so you wouldn't have trouble latter.
 If you are having trouble getting the images to line up create this image in a separate sprite in the scratch editor. Then move around the screen shots so that the pixel in the middle stays white.
Clear the inside of the box. Now take a screen shot of a frame. Save it. Create a new image that has what was in the last image. Repeat this for all of the frames.
If you are having trouble getting the images to line up create this image in a separate sprite in the scratch editor. Then move around the screen shots so that the pixel in the middle stays white.
Clear the inside of the box. Now take a screen shot of a frame. Save it. Create a new image that has what was in the last image. Repeat this for all of the frames.
 Once you do that crop the images so they look like above. Now it is time to clean up the image. Remove the semi-white pixels or make them a color in the sprite's pallet. Close up any broken outlines. Make sure all pixels are within the pallet's color.

 This is a comparison of the screen shoted image to the cleaned up image. The gen 5 animations can look messed up at times, and Eelektross is a great example of this. Very often during the animation the arms and the top of the head have their outlines broken. Cleaning up the frames can help you avoid this.
Once you've made all of the backgrounds transparent go to ezgif.com or another gif making website. Upload all of the frames that will be in your animation.
This is a comparison of the screen shoted image to the cleaned up image. The gen 5 animations can look messed up at times, and Eelektross is a great example of this. Very often during the animation the arms and the top of the head have their outlines broken. Cleaning up the frames can help you avoid this.
Once you've made all of the backgrounds transparent go to ezgif.com or another gif making website. Upload all of the frames that will be in your animation.
 Scroll down a bit to the options. Click don't stack frames. For the delay time set it to what most of the frames were in the scratch editor. 0.1 in a wait block = 10 delay time.
Now it's time to put the animation together. Each frame is given a number based on their file name alphabetical order. Use that to keep track of what frame it is. Copy and drag frames into the order you want them in. There isn't a way to loop part of an animation, so if you want part of an animation to play after another part loops a number of times, you have to do that manually.
Scroll down a bit to the options. Click don't stack frames. For the delay time set it to what most of the frames were in the scratch editor. 0.1 in a wait block = 10 delay time.
Now it's time to put the animation together. Each frame is given a number based on their file name alphabetical order. Use that to keep track of what frame it is. Copy and drag frames into the order you want them in. There isn't a way to loop part of an animation, so if you want part of an animation to play after another part loops a number of times, you have to do that manually.
 Once you are done count how many frames there are total in your animation. Each row can fit 6 frames in them. Set the right number under toggle range of frames to how many frames there are in the animation.
Then press make a gif. EZgif deletes gifs on their servers after a while, so make sure to save the gif to your computer. Upload the image somewhere else where it won't get deleted.
Once you are done count how many frames there are total in your animation. Each row can fit 6 frames in them. Set the right number under toggle range of frames to how many frames there are in the animation.
Then press make a gif. EZgif deletes gifs on their servers after a while, so make sure to save the gif to your computer. Upload the image somewhere else where it won't get deleted.
First you want to get the reconstructed vector image as the only costume in a sprite. I recommend duplicating the sprite you were working on by right clicking the image for it on the bottom left corner of the screen, then clicking duplicate. Then press X on all of the costumes in the sprite until only the vector image is left.
Now it is time to animate the sprite. First you should duplicate the first frame. Now you want to move it a bit. The vector editor also works in sub-pixels, so try to use the pixels around the part to judge how much you moved it.
If you move things by less than a full pixel it will not show up in the final animation. You can also rotate and resize parts. For frames that continue current motion duplicate the frame you just worked on once your finished working on it.
Adding pixels to the animation is a bit tricky. First you want to click the button that looks like a square with circles in the corners. Then on the bottom left corner of the art editor you want to click the solid rectangle.
Then use the eyedropper to get the color you want. Using an existing pixel as a guide, make a rectangle about the size of a pixel. Then place them where you want to put the pixels. You can use the tool that looks like a stamp to copy and paste those pixels(and parts).
The animation should eventually loop back to one of the frames. Focus on making the unique frames for the animation. Don't create extra frames looping back to the first sprite if you want them to look exactly the same as other frames you already have.
You can test out your animation in the editor. Click the scripts button that is next to the costumes button. There are bits of code that let you control the sprite. Under looks there is a block that says "Switch costume to (NAME)". That will allow you to change what frame the sprite is currently on. Use the arrow drop down to select which frame it will become when used.
Under control there is a block that says "forever". Put one around the rest of your code so the animation keeps looping.
There is also a block called "wait (1) secs". This block will allow you to add pauses to your animation. Typically you want to put waits of 0.1 seconds in between blocks that change the sprite.
Finally there is the "repeat (10)" block. This allows you to loop parts of your animation. This is useful if you want a part of the animation to loop a number of times before doing something else.
Changes can be seen to the left of the screen. You can duplicate blocks by right clicking on them. You can start and stop code by quickly clicking on it. Keep adjusting your frames and animation until you get something you are happy with.
For the next step you want to clean up the images. This avoids the grainy and broken outlines problem many gen 5 sprite animations have. First of all go under motion and get the block "go to x:(number)y:(number)". Make both numbers zero, then click it. This will get your sprite to the center of the screen.
Now open up the program you use to make sprites. Take screen shots of the screen but make the white part transparent. Start by taking screen shots of the farthest reaching frames, and put them over each other. Make sure the screenshots line up. Then draw a 1 pixel wide box around the edges of the sprite. This box tells you how big all of the frames should be, so you wouldn't have trouble latter.
If you are having trouble getting the images to line up create this image in a separate sprite in the scratch editor. Then move around the screen shots so that the pixel in the middle stays white.
Clear the inside of the box. Now take a screen shot of a frame. Save it. Create a new image that has what was in the last image. Repeat this for all of the frames.
Once you do that crop the images so they look like above. Now it is time to clean up the image. Remove the semi-white pixels or make them a color in the sprite's pallet. Close up any broken outlines. Make sure all pixels are within the pallet's color.
This is a comparison of the screen shoted image to the cleaned up image. The gen 5 animations can look messed up at times, and Eelektross is a great example of this. Very often during the animation the arms and the top of the head have their outlines broken. Cleaning up the frames can help you avoid this.
Once you've made all of the backgrounds transparent go to ezgif.com or another gif making website. Upload all of the frames that will be in your animation.
Scroll down a bit to the options. Click don't stack frames. For the delay time set it to what most of the frames were in the scratch editor. 0.1 in a wait block = 10 delay time.
Now it's time to put the animation together. Each frame is given a number based on their file name alphabetical order. Use that to keep track of what frame it is. Copy and drag frames into the order you want them in. There isn't a way to loop part of an animation, so if you want part of an animation to play after another part loops a number of times, you have to do that manually.
Once you are done count how many frames there are total in your animation. Each row can fit 6 frames in them. Set the right number under toggle range of frames to how many frames there are in the animation.
Then press make a gif. EZgif deletes gifs on their servers after a while, so make sure to save the gif to your computer. Upload the image somewhere else where it won't get deleted.
 Silhouettes/Galaxy
These two are so closely related I merged them into one class.
 Grab the fill bucket or color replace tool and make everything the same color. Make sure to make everything the same color.
Sometimes pokemon have colors that are near black on them, that are easy to miss if you are making the silhouette black. A good trick to make sure you don't miss anything is to fill bucket the sprite a neon color once your done then change it back.
For this lesson I want you to make Leafeon completely pure black. Don't forget the almost completely black lines on the sprite.
Grab the fill bucket or color replace tool and make everything the same color. Make sure to make everything the same color.
Sometimes pokemon have colors that are near black on them, that are easy to miss if you are making the silhouette black. A good trick to make sure you don't miss anything is to fill bucket the sprite a neon color once your done then change it back.
For this lesson I want you to make Leafeon completely pure black. Don't forget the almost completely black lines on the sprite.
You can also make Silhouettes using pictures. After completing the first step put a giant square around the silhouette, and make the silhouette transparent. Then drag it over the picture. Then remove everything outside the square, and then the square it's self. You can even do this in paint by making color 2 the color of the silhouette and turn transparent selection on.
For this lesson I want you to change the Leafeon Silhouette you did into a full galaxy. Just follow the steps above but with a galaxy picture. If you are having trouble finding a galaxy background you can use this one by JL Field on needpix.com. It is free to use commercially with modification, so it is okay if you sell sprites in a shop made with it.
If you get your own galaxy background make sure it is free to use with modification, as otherwise it is art theft. If you plan to sell galaxy sprites in a shop make sure the image is free to use commercially with modification.
Partial Galaxy is a lot like full Galaxy except you are only filling in parts of the sprite with a solid color. If there is white in the sprite your using you will want to make the transparent color different from white in the sprite.
 When making a sprite a partial galaxy you don't want to keep all of the lines. In the area your making a galaxy remove all but the most important outlines inside of the pokemon that creates it's shape. Otherwise it will look cluttered.
 Though at the same time don't remove to many outlines. If you do, the pokemon will begin to lose it's shape. Keep the key outlines to keep the shape of the pokemon.
 Remember to recolor the outlines around the parts you made galaxy. The outline should be a deep purple, or whatever the color of the galaxy is.
 Other variants that exist of this are galaxies that are the same color as the original pokemon. However don't take any galaxy color and apply a semi-tranparent brush over it, it will look muddy. I don't have the tools to show you a proper example of this, but don't make it like the image above.
 Another type that no one really talks about are line galaxies. These take all of the lines of a pokemon, and applies the galaxy to them. When making these make the background the darker part of the galaxy image, as having something bright like a star doesn't look as good.
Your assignment is to make a partial galaxy sprite.
Another type that no one really talks about are line galaxies. These take all of the lines of a pokemon, and applies the galaxy to them. When making these make the background the darker part of the galaxy image, as having something bright like a star doesn't look as good.
Your assignment is to make a partial galaxy sprite.
Lesson 1 - Silhouette
Grab the fill bucket or color replace tool and make everything the same color. Make sure to make everything the same color.
Sometimes pokemon have colors that are near black on them, that are easy to miss if you are making the silhouette black. A good trick to make sure you don't miss anything is to fill bucket the sprite a neon color once your done then change it back.
For this lesson I want you to make Leafeon completely pure black. Don't forget the almost completely black lines on the sprite.
Lesson 2 - Full Galaxy
You can also make Silhouettes using pictures. After completing the first step put a giant square around the silhouette, and make the silhouette transparent. Then drag it over the picture. Then remove everything outside the square, and then the square it's self. You can even do this in paint by making color 2 the color of the silhouette and turn transparent selection on.
For this lesson I want you to change the Leafeon Silhouette you did into a full galaxy. Just follow the steps above but with a galaxy picture. If you are having trouble finding a galaxy background you can use this one by JL Field on needpix.com. It is free to use commercially with modification, so it is okay if you sell sprites in a shop made with it.
If you get your own galaxy background make sure it is free to use with modification, as otherwise it is art theft. If you plan to sell galaxy sprites in a shop make sure the image is free to use commercially with modification.Lesson 3 - Partial Galaxy
Partial Galaxy is a lot like full Galaxy except you are only filling in parts of the sprite with a solid color. If there is white in the sprite your using you will want to make the transparent color different from white in the sprite.
When making a sprite a partial galaxy you don't want to keep all of the lines. In the area your making a galaxy remove all but the most important outlines inside of the pokemon that creates it's shape. Otherwise it will look cluttered.
Though at the same time don't remove to many outlines. If you do, the pokemon will begin to lose it's shape. Keep the key outlines to keep the shape of the pokemon.
Remember to recolor the outlines around the parts you made galaxy. The outline should be a deep purple, or whatever the color of the galaxy is.
Other variants that exist of this are galaxies that are the same color as the original pokemon. However don't take any galaxy color and apply a semi-tranparent brush over it, it will look muddy. I don't have the tools to show you a proper example of this, but don't make it like the image above.
Another type that no one really talks about are line galaxies. These take all of the lines of a pokemon, and applies the galaxy to them. When making these make the background the darker part of the galaxy image, as having something bright like a star doesn't look as good.
Your assignment is to make a partial galaxy sprite.
Guides
These are guides on how to make certain sprite types that don't require enough unique skills to get their own class. The best thing to do to learn these is to try it on your own then ask for critique.Miscellaneous beginner info
 Getting sprites
There a few websites you can use to get sprites
 See how much better the sprite on the right looks from the sprite on the left? That is why you shouldn't use sprites in their black outline removed state.
- The cave of dragonflies is useful if you can spell the names of pokemon and can generate random sprites. You can generate up to three gens 1-5 sprites at a time, so it's useful when you don't know what to sprite. It even gives you the frames used when sending out a pokemon for 4, and a gif of the animation for gens 2-3 so you have even more sprites to chose from. However it lacks minisprites.
- The spriter's resource is a useful place to get sprites from the spinoff and main series games. They are useful for getting minisprites and PMD sprites, along with sprites from other obscure spinoffs. It has the most sprites out of all of the sites listed here. The sprites come in a giant sheet filled with sprites. However I won't link it because I'm unsure of the moderation of the comments section.
- Pokemon DB gives you a giant list on one page with every pokemon on it. However it has spoilers for the gen after 7 if you scroll down enough, has alternate forms on the pokemon's pages and has news on the front page. The site lacks send out animation sprites and gen 5&7 minisprites.
- I usually get my sprites by copying and pasting them from Serebii.net, however it's banner at the top of the page has spoilers for the gen after 7 so be careful about that, and it's a news site. You can view sprites by generation pokedex, and then by type. The site lacks back sprites and send out animation sprites, and it has gen 7 minisprites that are inconvenient to recolor.
See how much better the sprite on the right looks from the sprite on the left? That is why you shouldn't use sprites in their black outline removed state. tools
tools
There are many art programs out there. Here is a list of tools I recommend having in an art program.
- A single pixel tool. Being able to change individual pixels is important to have in an art program. This allows you to add patterns, scratch, mend parts, don't use an art program without one. Make sure it is in solid color and doesn't leave semi-transparent pixels everywhere.
- A selecting + moving tool. You will need this for fusions and slightly adjusting the size of things. While you could get away with only having a rectangular one by spacing separate parts away enough from each other I recommend using an art program that also has one where you draw out the shape.
- The ability to zoom in. Sprites are tiny and it will make your life much harder if you try to make them at 100% zoom. 300% zoom is the minimum you could get away with, though I recommend 500% or 600% zoom. While using an art program that shows a version of the sprite at 100% zoom while your working would be nice to have, it is not necessary and you can easily get away with not having that.
- The ability to copy and paste. Being able to copy and paste is key for getting sprites into the program to edit, and for fusions. I recommend using a program that can copy and paste images you copied outside the program as it makes getting the sprites into the program a lot easier, but in that case your program at least needs an import function.
- A color replacement tool. I highly recommend having a tool where you can select parts of the sprite to change one color into another. It also allows you to recolor parts of the sprite of the same color different colors. Having a tool that changes all of the colors into another color at the same time would be nice to have, but isn't necessary as you can just go over the whole sprite with the recolor parts tool. While you could get away without a color replacement tool, that makes it much easier to make mistakes while coloring.
- Color select + editor tool. Being able to select colors is key to recoloring. Being able to edit colors is also important as it allows you to add in shades when your pallet doesn't have enough, and to make your own pallets.
- Transparency. Having a transparent background looks a lot nicer than having a white background around your sprites. While this is useful to have in your main art program, you can also export your sprite to an art program that does have transparency. I personally use Krita to give a transparent background to my MS paint sprites.
- Layers. They are useful for working on parts surrounded by a bunch of other parts you don't want to mess up. Though this isn't required, and even I(most of the time) use an art program that doesn't have them.
- A large square eraser tool. This makes it much easier to get parts for fusion, and remove parts you don't need. While you could do this via the single pixel tool or selection tool, I find using the eraser first time saving. Make sure the eraser doesn't leave transparent pixels around. Also make sure the eraser doesn't erase sub-pixels as a program that works with sub-pixels is harder to make sprites in.
- Fill bucket tool. I find this useful when I'm quickly recoloring small parts of a pokemon. Though this isn't required.
 MS paint tricks
I have been using MS paint for a long time and I'll share some of my knowledge of the program with you.
First of all click the select option and turn on transparent selection. It will make your second color not be moved when you use the select tool. This is key to making sprites, especially in fusions. However I've noticed a bug in it. In saved drawings it suddenly stops working. I've found that control+A, up arrow, down arrow, select any other tool fixes it. However it comes back up if you use the pencil tool. Doing that fix again fixes it. This also fixes the color replacement tool not working.
Another extremely useful thing I found is that if you go to view and click on thumbnail it will show a version of your sprite at 100% zoom while zoomed in. This is really useful and saves you from having to zoom in and out all of the time to see if the sprite looks good. However it only shows up if you are in 200% or more zoom.
To recolor first get the color you want to replace as color 1, and the color you want to change it too to color 2. Then go to the eraser tool and right click and drag over the areas you want to recolor. With the pencil, color picker and fill bucket tool left click for color 1 and right click for color 2.
 Retype design advice
Just like when making fusions I recommend sketching out the design first.
 When making a retype I suggest adding in a theme on top of the retype. It's easy to just set Jirachi on fire to make it a fire type. However think of this. Jirachi is based on Tanabata, a japanse festival based around making wishes. Fireworks is something fire related that are often associated with festivals. Imagine a Jirachi covered in white and red striped fireworks, with a fireworks crown. I feel like adding a theme to retypes make it much more interesting than just adding parts of said type onto a pokemon.
 Retypes can also be multiple types. For example this fire/ice Jirachi. Keeping with the theme of having themes this example was also given a theme. Jirachi is based on stars, a celetial object. Another celetial object are comets, and thus it is based on a comet as comets are made up of mostly ice. While it looks mostly like an ice type with some flames at first, it is based on how when stuff like meteors come into earth's gravitational pull they speed up and catch on fire, and this Jirachi can set it's self on fire if it wanted to and thus it's fire typing.
 While the most types a pokemon can have is 2, you can make a retype with multiple types if you want. Some cannon pokemon already look like they have more than 2 types. For example Delmise looks like it could be a water/steel/grass/ghost type pokemon.


 Also remember that types aren't all just one color. People often go to green when they think grass type. However there are pokemon such as Exeggcute, Tangela, Jumpluff, Seedot, Lileep, Cherrim's sunshine form, Sawsbuck and Foongus that have very little or no green at all on their designs. Don't feel limited by typing when deciding what color to make your retype.
Another thing to be aware of are cliches when it comes to retypes. Other than the color, fire retype tend to be set on fire and grass retypes tend to just have Shaymin's flower added to the pokemon. While there is nothing wrong with liking those designs, there is a lot more you can do. Take the grass type pokemon above for example. None of them are green or have leaves or flowers. There is no one solution to retyping a pokemon. Try to think outside the box for a truly special retype.
If you are stuck on what to change look at the pokemon, and ask yourself what makes the pokemon the type it is. Does if have fins as a water type? Does it have a lightning bolt tail? Try changing those parts to match the type you are trying to retype it to.
Also remember that types aren't all just one color. People often go to green when they think grass type. However there are pokemon such as Exeggcute, Tangela, Jumpluff, Seedot, Lileep, Cherrim's sunshine form, Sawsbuck and Foongus that have very little or no green at all on their designs. Don't feel limited by typing when deciding what color to make your retype.
Another thing to be aware of are cliches when it comes to retypes. Other than the color, fire retype tend to be set on fire and grass retypes tend to just have Shaymin's flower added to the pokemon. While there is nothing wrong with liking those designs, there is a lot more you can do. Take the grass type pokemon above for example. None of them are green or have leaves or flowers. There is no one solution to retyping a pokemon. Try to think outside the box for a truly special retype.
If you are stuck on what to change look at the pokemon, and ask yourself what makes the pokemon the type it is. Does if have fins as a water type? Does it have a lightning bolt tail? Try changing those parts to match the type you are trying to retype it to.
When making a retype I suggest adding in a theme on top of the retype. It's easy to just set Jirachi on fire to make it a fire type. However think of this. Jirachi is based on Tanabata, a japanse festival based around making wishes. Fireworks is something fire related that are often associated with festivals. Imagine a Jirachi covered in white and red striped fireworks, with a fireworks crown. I feel like adding a theme to retypes make it much more interesting than just adding parts of said type onto a pokemon.
Retypes can also be multiple types. For example this fire/ice Jirachi. Keeping with the theme of having themes this example was also given a theme. Jirachi is based on stars, a celetial object. Another celetial object are comets, and thus it is based on a comet as comets are made up of mostly ice. While it looks mostly like an ice type with some flames at first, it is based on how when stuff like meteors come into earth's gravitational pull they speed up and catch on fire, and this Jirachi can set it's self on fire if it wanted to and thus it's fire typing.
Also remember that types aren't all just one color. People often go to green when they think grass type. However there are pokemon such as Exeggcute, Tangela, Jumpluff, Seedot, Lileep, Cherrim's sunshine form, Sawsbuck and Foongus that have very little or no green at all on their designs. Don't feel limited by typing when deciding what color to make your retype.
Another thing to be aware of are cliches when it comes to retypes. Other than the color, fire retype tend to be set on fire and grass retypes tend to just have Shaymin's flower added to the pokemon. While there is nothing wrong with liking those designs, there is a lot more you can do. Take the grass type pokemon above for example. None of them are green or have leaves or flowers. There is no one solution to retyping a pokemon. Try to think outside the box for a truly special retype.
If you are stuck on what to change look at the pokemon, and ask yourself what makes the pokemon the type it is. Does if have fins as a water type? Does it have a lightning bolt tail? Try changing those parts to match the type you are trying to retype it to. Evolution design advice
When making an evolution for a pokemon try to avoid bigger mon syndrome. I notice in a lot of fan evolutions they take the pokemon, make it bigger, and add stuff onto it. Almost no evolution line does this in pokemon.


 Take the Squirtle line. All members of the line have different tails and ears. Instead of being an in-between for Squirtle and Blastoise, Wartortle has it's own identity by having white wavy ears and a tail no other member has, and also has blush. While at the same time Wartortle looks like a middle evolution, and keeps the theme of being blue turtles in it's design, which prevents it from looking like it's from a completely different evolution line.
Almost every pokemon is like this. So when designing an evolution for a pokemon or fakemon instead of making it a bigger or smaller version of the pokemon, try to give it it's own identity while still fitting in with the line.
Take the Squirtle line. All members of the line have different tails and ears. Instead of being an in-between for Squirtle and Blastoise, Wartortle has it's own identity by having white wavy ears and a tail no other member has, and also has blush. While at the same time Wartortle looks like a middle evolution, and keeps the theme of being blue turtles in it's design, which prevents it from looking like it's from a completely different evolution line.
Almost every pokemon is like this. So when designing an evolution for a pokemon or fakemon instead of making it a bigger or smaller version of the pokemon, try to give it it's own identity while still fitting in with the line. Devamping pokemon, gen 1

 The first step to devamping a pokemon is to get a gen 1 sprite with a similar color scheme to the pokemon your devamping. A devamp only has 4 colors, white, lighter color, darker color and black.
 This turns into the pokemon having two colors, white with lighter color shading, and lighter color with darker color shading. You want to decide which colors of the sprite you'll make lighter and which parts you'll make darker. Then recolor them. Make all of the outlines black.
I find this method makes devamps look better than if you made all the colors of a devamp correspond to different shades of colors in a sprite.
This turns into the pokemon having two colors, white with lighter color shading, and lighter color with darker color shading. You want to decide which colors of the sprite you'll make lighter and which parts you'll make darker. Then recolor them. Make all of the outlines black.
I find this method makes devamps look better than if you made all the colors of a devamp correspond to different shades of colors in a sprite.
 But what if a sprite has many colors you may ask. In these cases use a gen 1 sprite with the color most similar to the main color and you have to try your best to place the rest of the colors. Generally make all of the places of one color the same color, and make color right next to each other different colors.
None of this applies to devamps in the gen 2 style, where you use two different colors instead of the lighter color and a darker color. However I am clueless when it comes to doing these so I can't be of much help...
But what if a sprite has many colors you may ask. In these cases use a gen 1 sprite with the color most similar to the main color and you have to try your best to place the rest of the colors. Generally make all of the places of one color the same color, and make color right next to each other different colors.
None of this applies to devamps in the gen 2 style, where you use two different colors instead of the lighter color and a darker color. However I am clueless when it comes to doing these so I can't be of much help... Undertale styled sprites
Undertale styled sprites are sprites that make the pokemon white on a black background. The first thing to do is get the sprite you want to make on a black background. Then decide what parts you want to make black and what parts you want to make white.
If there are not quite pure black outlines on the sprite recolor them to a visible grey to make it easier to see where the outline is on the sprite your working on.
The key thing in Undertale styled sprites is to convey the details of the pokemon in only two colors. For parts you want to make white fill it in white. For parts you want to make black give it a white outline. Be careful around small parts like the eyes and mouth as those are the easiest to mess up. You don't always have to include the outline as part of what you make white, sometimes making part of it black can give the part a better shape, and make it look better.
One thing I noticed in these sprites is that not everything has to be connected. You do not have to make the outline to connect everything like in pokemon sprites. If when zoomed out it looks okay then you are good. This most often comes up when two body parts outline's are very close to each other.
 For example take this Cubone. Notice how there is no lines under the skull. This is what I am talking about. Despite the fact there isn't an outline connecting the arms to the skull it still looks nice.
Another thing I noticed is that there is very little shading. Most of the shading appears to be shine for armor, and even then details come first.
For example take this Cubone. Notice how there is no lines under the skull. This is what I am talking about. Despite the fact there isn't an outline connecting the arms to the skull it still looks nice.
Another thing I noticed is that there is very little shading. Most of the shading appears to be shine for armor, and even then details come first. Lineless
 Lineless is taking a sprite and then replacing as much of the outline you can with color. For the most part you should take the colors around the outline for what color to make the outline. If there is an outline next to two different colors, use the color of the part that looks like is in the front or on top of the other part.
 If you have two parts of the same color on top of each other try to convey their distinct shape with shading. For example let's take the lava dripping from Slugma's head. If you colored it exactly as it is in the original sprite it doesn't look like it's there. So instead of making light outlines or keeping it the way it is, you can alter the shading around the part to convey that it exists.
 Don't be afraid to change the shading if it makes the pokemon's shape more clear. If you are going to change an outline to pure white, and it is on the outside of the sprite make it the next lightest shade of white on the sprite. If all of them are to dark make up your own. Otherwise the white parts will blend in on white backgrounds.
 Some pokemon have natural lines in them, such as Drifblim. In these cases make those lines the next lightest color, or create a new color if it looks to dark. Otherwise you should only really use light outlines to convey details as a last resort when you can't make it look right with shading.
 Tron Design advice
 The main appeal of a tron pokemon are neon colors that pop out due to the rest of the pokemon being dark.
 Don't make to much of the pokemon neon. This will make the neon go from standing out to everywhere, which ruins the appeal of the sprite. If you need more colors make them dark. If the color is to light it will pull the attention away from the neon colors.
Retelling of the mega gym, not exact words, wip
ACottontail walked into the mega gym, her trusty partner Kaybre at her side. "Hello I would like to take on the mega gym. I would like to fight Luxnight first." "Welcome welcome." The gym leader said "I wish you luck." ACottontail sent out Cinder first. The gym leader elegantly tossed a pokeball into the air, Poi~ shined like a rainbow in the sky, then lunged down at Cinder. Cinder held back Poi~ an inch from her face with metal claws. Poi~'s tail slapped at the ground and kicked mud in Cinder's face. A barrage of mud came from all directions. Cinder feebly tried to swat it away from her. A powerful blast of water hit her and she was down. x x VS
x VS  ACottontail stared Poi~ in the eye with shock, and fear in her eyes. One of her pokemon went down. She glanced down at Cinder, then returned her. It was time to send out her ace. "Kaybre let's go." she pointed forward. On the other side was a Skarmory. Kaybre launched a dragon pulse from her mouth. It hit, smoke covered Skarmory. It flew out of the cloud and slammed Kaybre across the gym. Kaybre launched another dragon pulse, but was weakened by the earlier attack. Skarmory continued it's assault. Kaybre slummed to the ground.
x
ACottontail stared Poi~ in the eye with shock, and fear in her eyes. One of her pokemon went down. She glanced down at Cinder, then returned her. It was time to send out her ace. "Kaybre let's go." she pointed forward. On the other side was a Skarmory. Kaybre launched a dragon pulse from her mouth. It hit, smoke covered Skarmory. It flew out of the cloud and slammed Kaybre across the gym. Kaybre launched another dragon pulse, but was weakened by the earlier attack. Skarmory continued it's assault. Kaybre slummed to the ground.
x x VS
x VS  ACottontail ran over to her fainted pokemon. She cradled Kaybre in her arms before returning her. She looked over at Luxnight. Luxnight had just swept through her team. Luxnight was stronger than ACottontail was. ACottontail could barley comprehend this. She lost a gym for the first time. She had serious respect for Luxnight as a battler if Luxnight could take her down like that. She didn't know what to say. She just slowly walked out of the gym.
ACottontail recollected herself. It was time to try again. "Hello, I would like a rematch." ACottontail sent out Cinder. Both pokemon ran towards each other. A furious brawl broke out. Cinder got a suprize attack on Caliburn, who quickly retaliated and got the finishing blow on Cinder.
xx VS
ACottontail ran over to her fainted pokemon. She cradled Kaybre in her arms before returning her. She looked over at Luxnight. Luxnight had just swept through her team. Luxnight was stronger than ACottontail was. ACottontail could barley comprehend this. She lost a gym for the first time. She had serious respect for Luxnight as a battler if Luxnight could take her down like that. She didn't know what to say. She just slowly walked out of the gym.
ACottontail recollected herself. It was time to try again. "Hello, I would like a rematch." ACottontail sent out Cinder. Both pokemon ran towards each other. A furious brawl broke out. Cinder got a suprize attack on Caliburn, who quickly retaliated and got the finishing blow on Cinder.
xx VS  It was time. ACottontail was going to pull out the big guns. "Go Crisis!" Crisis sprawled out majestically in the sky. Poi~ wasted no time and launched a moon blast at Crisis. Poi~ towered over Crisis who was fainted. Luxnight took out a legendary. ACottontail stood in shock. It seemed as if nothing she did was working. She left the gym.
x
It was time. ACottontail was going to pull out the big guns. "Go Crisis!" Crisis sprawled out majestically in the sky. Poi~ wasted no time and launched a moon blast at Crisis. Poi~ towered over Crisis who was fainted. Luxnight took out a legendary. ACottontail stood in shock. It seemed as if nothing she did was working. She left the gym.
x x VS
ACottontail started recording what pokemon Luxnight used. She came up with a plan and then rechallenged the gym.
ACottontail sent out Voltolos first. Alto was on the other side. Voltolos launched out a hurricane, but Alto countered it with a blizzard. Voltolos put his arms up and braced for impact. Freezing cold winds blasted at him while ice shards scraped against his arms. He peeked out once the winds were over, only to get a dragon pulse in the face. Alto swept in for a full out assault. Voltolos desperately made his strongest winds to keep Alto at bay, but fell to the outrage.
x
x VS
ACottontail started recording what pokemon Luxnight used. She came up with a plan and then rechallenged the gym.
ACottontail sent out Voltolos first. Alto was on the other side. Voltolos launched out a hurricane, but Alto countered it with a blizzard. Voltolos put his arms up and braced for impact. Freezing cold winds blasted at him while ice shards scraped against his arms. He peeked out once the winds were over, only to get a dragon pulse in the face. Alto swept in for a full out assault. Voltolos desperately made his strongest winds to keep Alto at bay, but fell to the outrage.
x x VS
x VS  ACottontail's plan was already going to heck. She sent out Cinder. To ACottontail's horror Poi~ slithered onto the battle field, towering majestically above Cinder. Cinder clutched her grass gem, vines covered in thorns covered her body. She charged at Poi~. Poi~ drew strength from her gem and launched a strong blast of mud at Cinder. Even when evenly matched type wise, Poi~ overpowered Cinder. To her horror ACottontail lost again.
xx VS
ACottontail went back into the gym, hoping things would be different this time. She started out with Voltolos, as he seemed like the best choice. Voltolos launched off a series of lighting bolts. Koutsume lunged forward, then quickly punched Voltolos. He punched back, Koutsume tried to step back but was hit. He lunged forward again. Voltolos covered himself in lightning, then launched a bolt at Koutsume. Frustrated at the chance of losing Koutsume threw his gem at the ground, causing an earthquake. Voltolos laughed then send another lightning bolt forward. Koutsume yelled and with all of his remaining strength ran toward and let out a punch, but it was too little. Koutsume fell to the electricity surging through his body.
VS x
ACottontail's plan was already going to heck. She sent out Cinder. To ACottontail's horror Poi~ slithered onto the battle field, towering majestically above Cinder. Cinder clutched her grass gem, vines covered in thorns covered her body. She charged at Poi~. Poi~ drew strength from her gem and launched a strong blast of mud at Cinder. Even when evenly matched type wise, Poi~ overpowered Cinder. To her horror ACottontail lost again.
xx VS
ACottontail went back into the gym, hoping things would be different this time. She started out with Voltolos, as he seemed like the best choice. Voltolos launched off a series of lighting bolts. Koutsume lunged forward, then quickly punched Voltolos. He punched back, Koutsume tried to step back but was hit. He lunged forward again. Voltolos covered himself in lightning, then launched a bolt at Koutsume. Frustrated at the chance of losing Koutsume threw his gem at the ground, causing an earthquake. Voltolos laughed then send another lightning bolt forward. Koutsume yelled and with all of his remaining strength ran toward and let out a punch, but it was too little. Koutsume fell to the electricity surging through his body.
VS x x
ACottontail was surprised, she actually won. She beat one round. The pressure to keep winning was intense. ACottontail sent out Asher. The gym leader tossed a pokeball, and Poi~ was sent out. ACottontail gulped. Poi~ drew power from the moon, then let out overwhelming fairy type power. Asher got in a mudshot or two, but was to overwhelmed, and fainted.
x
x
ACottontail was surprised, she actually won. She beat one round. The pressure to keep winning was intense. ACottontail sent out Asher. The gym leader tossed a pokeball, and Poi~ was sent out. ACottontail gulped. Poi~ drew power from the moon, then let out overwhelming fairy type power. Asher got in a mudshot or two, but was to overwhelmed, and fainted.
x x VS
This match was falling apart. This match determined whether ACottontail won or not. Her hand shaking, she sent out Distone. Distone summoned a blast of mud through his ring. Cress leapt forward in a powerful flame charge. Distone flung his ring at Cress who shot flames from his mouth. Distone, realizing he let go of his ring panicked and used Zen headbutt. Cress slashed with a flaming paw and struck Distone down.
x
x VS
This match was falling apart. This match determined whether ACottontail won or not. Her hand shaking, she sent out Distone. Distone summoned a blast of mud through his ring. Cress leapt forward in a powerful flame charge. Distone flung his ring at Cress who shot flames from his mouth. Distone, realizing he let go of his ring panicked and used Zen headbutt. Cress slashed with a flaming paw and struck Distone down.
x x VS
x VS  ACottontail lost again. She was starting to believe the gym was impossible to beat. She hung her head down, and walked out of the gym.
ACottontail walking into the mega gym. She had out papers with an elaborate plan sprawled on them. The bags under her eyes and crazed smile suggested she hadn't slept for days. "I think I finally figured it out. Luxnight, I would like a rematch." ACottontail quietly laughed, clutching her plan.
She sent out Voltolos first, hoping this plan would work. Right then the dreaded beauty Poi~ appeared. ACottontail broke into a laughing fit. She finally had the upper hand. Voltolos cloaked in lightning charged forward. Poi~ tried to block it with her tail, but Voltolos countered it with Thunder. Poi~ shot a hydro pump in retaliation. A blast of water charged forward, Voltolos electrocuted it, the electricity crept along the stream until it shocked Poi~, who fainted. ACottontail was shocked at what she saw. She finally was able to take out Poi~, after losing so many times. Though it was only the first battle, the pressure was on.
VS xx
ACottontail felt like she needed some extra power. However all of her dragon type legendaries were likely to lose. She sent out Ho-oh. On the other side Kurshia was sent out. ACottontail knew Kurshia was possible, but she hadn't expected it in her plan.
x
ACottontail lost again. She was starting to believe the gym was impossible to beat. She hung her head down, and walked out of the gym.
ACottontail walking into the mega gym. She had out papers with an elaborate plan sprawled on them. The bags under her eyes and crazed smile suggested she hadn't slept for days. "I think I finally figured it out. Luxnight, I would like a rematch." ACottontail quietly laughed, clutching her plan.
She sent out Voltolos first, hoping this plan would work. Right then the dreaded beauty Poi~ appeared. ACottontail broke into a laughing fit. She finally had the upper hand. Voltolos cloaked in lightning charged forward. Poi~ tried to block it with her tail, but Voltolos countered it with Thunder. Poi~ shot a hydro pump in retaliation. A blast of water charged forward, Voltolos electrocuted it, the electricity crept along the stream until it shocked Poi~, who fainted. ACottontail was shocked at what she saw. She finally was able to take out Poi~, after losing so many times. Though it was only the first battle, the pressure was on.
VS xx
ACottontail felt like she needed some extra power. However all of her dragon type legendaries were likely to lose. She sent out Ho-oh. On the other side Kurshia was sent out. ACottontail knew Kurshia was possible, but she hadn't expected it in her plan.
x x VS
x VS  ACottontail was at a loss of what to do. So many possibilities, so many chances to lose, when she was so close to winning. ACottontail, her hand shaking, sent out Reigigias. She hoped that as it had few weaknesses it would be able to deal with what ever pokemon Luxnight sent out next.
Cress charged forward with flames. With the gem ACottontail gave it for dealing with steal types, Regigias scored super effective hit on Cress. ACottontail was standing at the edge of her seat. Her Regigias's health fell, but Cress's health fell more. The entire gym went shaking as Regigias landed the final blow.
ACottontail was at a loss of what to do. So many possibilities, so many chances to lose, when she was so close to winning. ACottontail, her hand shaking, sent out Reigigias. She hoped that as it had few weaknesses it would be able to deal with what ever pokemon Luxnight sent out next.
Cress charged forward with flames. With the gem ACottontail gave it for dealing with steal types, Regigias scored super effective hit on Cress. ACottontail was standing at the edge of her seat. Her Regigias's health fell, but Cress's health fell more. The entire gym went shaking as Regigias landed the final blow.
 VS xx
This was it. ACottontail had beaten the strongest trainer in all of PFQ. She could barley believe it. The badge was so close. She just had to not mess up the second part, and she would beat the hardest gym on pokefarm.
ACottontail was taking no chances now that she had beaten Luxnight. ACottontail sent out Oska Blaster. Oska resisted Bowser's blasts of water, and pulled through after many dragon rages.
VS xx
This was it. ACottontail had beaten the strongest trainer in all of PFQ. She could barley believe it. The badge was so close. She just had to not mess up the second part, and she would beat the hardest gym on pokefarm.
ACottontail was taking no chances now that she had beaten Luxnight. ACottontail sent out Oska Blaster. Oska resisted Bowser's blasts of water, and pulled through after many dragon rages.
 VS x
VS x x
Next ACottontail sent out Yang. Yang swung out his arm and sent out a sonic cut. Luke charged forward, and attacked Yang with the spike on his wrist. A powerful punch brought Luke down.
x
Next ACottontail sent out Yang. Yang swung out his arm and sent out a sonic cut. Luke charged forward, and attacked Yang with the spike on his wrist. A powerful punch brought Luke down.
 VS x
VS x x
This was it, the final battle before the badge. ACottontail sent out Cinder. Speedy began with a discharge, which was countered by earth power. Cinder shurged off the electric attacks, and came through with the power of her ground gem. When Cinder landed the final blow ACottontail smiled as she had won the badge.
VS x
x
This was it, the final battle before the badge. ACottontail sent out Cinder. Speedy began with a discharge, which was countered by earth power. Cinder shurged off the electric attacks, and came through with the power of her ground gem. When Cinder landed the final blow ACottontail smiled as she had won the badge.
VS x x
ACottontail tackle hugged Cinder. She did it. ACottontail after many failed attempts had finally beaten the mega gym. She proudly held her gym badge. All of those failed attempts were worth it for this victory.
Proudly with the badge in hand, Cinder and ACottontail exited the gym, and went onto the next challenge.
x
ACottontail tackle hugged Cinder. She did it. ACottontail after many failed attempts had finally beaten the mega gym. She proudly held her gym badge. All of those failed attempts were worth it for this victory.
Proudly with the badge in hand, Cinder and ACottontail exited the gym, and went onto the next challenge.
Anyway that is how I beat the mega gym. That was definitely the hardest gym I've ever faced.
ACottontail walked into the mega gym, her trusty partner Kaybre at her side. "Hello I would like to take on the mega gym. I would like to fight Luxnight first." "Welcome welcome." The gym leader said "I wish you luck." ACottontail sent out Cinder first. The gym leader elegantly tossed a pokeball into the air, Poi~ shined like a rainbow in the sky, then lunged down at Cinder. Cinder held back Poi~ an inch from her face with metal claws. Poi~'s tail slapped at the ground and kicked mud in Cinder's face. A barrage of mud came from all directions. Cinder feebly tried to swat it away from her. A powerful blast of water hit her and she was down. x
x VS
ACottontail stared Poi~ in the eye with shock, and fear in her eyes. One of her pokemon went down. She glanced down at Cinder, then returned her. It was time to send out her ace. "Kaybre let's go." she pointed forward. On the other side was a Skarmory. Kaybre launched a dragon pulse from her mouth. It hit, smoke covered Skarmory. It flew out of the cloud and slammed Kaybre across the gym. Kaybre launched another dragon pulse, but was weakened by the earlier attack. Skarmory continued it's assault. Kaybre slummed to the ground.
xx VS
ACottontail ran over to her fainted pokemon. She cradled Kaybre in her arms before returning her. She looked over at Luxnight. Luxnight had just swept through her team. Luxnight was stronger than ACottontail was. ACottontail could barley comprehend this. She lost a gym for the first time. She had serious respect for Luxnight as a battler if Luxnight could take her down like that. She didn't know what to say. She just slowly walked out of the gym.
ACottontail recollected herself. It was time to try again. "Hello, I would like a rematch." ACottontail sent out Cinder. Both pokemon ran towards each other. A furious brawl broke out. Cinder got a suprize attack on Caliburn, who quickly retaliated and got the finishing blow on Cinder.
xx VS
It was time. ACottontail was going to pull out the big guns. "Go Crisis!" Crisis sprawled out majestically in the sky. Poi~ wasted no time and launched a moon blast at Crisis. Poi~ towered over Crisis who was fainted. Luxnight took out a legendary. ACottontail stood in shock. It seemed as if nothing she did was working. She left the gym.
xx VS
ACottontail started recording what pokemon Luxnight used. She came up with a plan and then rechallenged the gym.
ACottontail sent out Voltolos first. Alto was on the other side. Voltolos launched out a hurricane, but Alto countered it with a blizzard. Voltolos put his arms up and braced for impact. Freezing cold winds blasted at him while ice shards scraped against his arms. He peeked out once the winds were over, only to get a dragon pulse in the face. Alto swept in for a full out assault. Voltolos desperately made his strongest winds to keep Alto at bay, but fell to the outrage.
xx VS
ACottontail's plan was already going to heck. She sent out Cinder. To ACottontail's horror Poi~ slithered onto the battle field, towering majestically above Cinder. Cinder clutched her grass gem, vines covered in thorns covered her body. She charged at Poi~. Poi~ drew strength from her gem and launched a strong blast of mud at Cinder. Even when evenly matched type wise, Poi~ overpowered Cinder. To her horror ACottontail lost again.
xx VS
ACottontail went back into the gym, hoping things would be different this time. She started out with Voltolos, as he seemed like the best choice. Voltolos launched off a series of lighting bolts. Koutsume lunged forward, then quickly punched Voltolos. He punched back, Koutsume tried to step back but was hit. He lunged forward again. Voltolos covered himself in lightning, then launched a bolt at Koutsume. Frustrated at the chance of losing Koutsume threw his gem at the ground, causing an earthquake. Voltolos laughed then send another lightning bolt forward. Koutsume yelled and with all of his remaining strength ran toward and let out a punch, but it was too little. Koutsume fell to the electricity surging through his body.
VS xx
ACottontail was surprised, she actually won. She beat one round. The pressure to keep winning was intense. ACottontail sent out Asher. The gym leader tossed a pokeball, and Poi~ was sent out. ACottontail gulped. Poi~ drew power from the moon, then let out overwhelming fairy type power. Asher got in a mudshot or two, but was to overwhelmed, and fainted.
xx VS
This match was falling apart. This match determined whether ACottontail won or not. Her hand shaking, she sent out Distone. Distone summoned a blast of mud through his ring. Cress leapt forward in a powerful flame charge. Distone flung his ring at Cress who shot flames from his mouth. Distone, realizing he let go of his ring panicked and used Zen headbutt. Cress slashed with a flaming paw and struck Distone down.
xx VS
ACottontail lost again. She was starting to believe the gym was impossible to beat. She hung her head down, and walked out of the gym.
ACottontail walking into the mega gym. She had out papers with an elaborate plan sprawled on them. The bags under her eyes and crazed smile suggested she hadn't slept for days. "I think I finally figured it out. Luxnight, I would like a rematch." ACottontail quietly laughed, clutching her plan.
She sent out Voltolos first, hoping this plan would work. Right then the dreaded beauty Poi~ appeared. ACottontail broke into a laughing fit. She finally had the upper hand. Voltolos cloaked in lightning charged forward. Poi~ tried to block it with her tail, but Voltolos countered it with Thunder. Poi~ shot a hydro pump in retaliation. A blast of water charged forward, Voltolos electrocuted it, the electricity crept along the stream until it shocked Poi~, who fainted. ACottontail was shocked at what she saw. She finally was able to take out Poi~, after losing so many times. Though it was only the first battle, the pressure was on.
VS xx
ACottontail felt like she needed some extra power. However all of her dragon type legendaries were likely to lose. She sent out Ho-oh. On the other side Kurshia was sent out. ACottontail knew Kurshia was possible, but she hadn't expected it in her plan.
xx VS
ACottontail was at a loss of what to do. So many possibilities, so many chances to lose, when she was so close to winning. ACottontail, her hand shaking, sent out Reigigias. She hoped that as it had few weaknesses it would be able to deal with what ever pokemon Luxnight sent out next.
Cress charged forward with flames. With the gem ACottontail gave it for dealing with steal types, Regigias scored super effective hit on Cress. ACottontail was standing at the edge of her seat. Her Regigias's health fell, but Cress's health fell more. The entire gym went shaking as Regigias landed the final blow.
VS xx
This was it. ACottontail had beaten the strongest trainer in all of PFQ. She could barley believe it. The badge was so close. She just had to not mess up the second part, and she would beat the hardest gym on pokefarm.
ACottontail was taking no chances now that she had beaten Luxnight. ACottontail sent out Oska Blaster. Oska resisted Bowser's blasts of water, and pulled through after many dragon rages.
VS xx
Next ACottontail sent out Yang. Yang swung out his arm and sent out a sonic cut. Luke charged forward, and attacked Yang with the spike on his wrist. A powerful punch brought Luke down.
VS xx
This was it, the final battle before the badge. ACottontail sent out Cinder. Speedy began with a discharge, which was countered by earth power. Cinder shurged off the electric attacks, and came through with the power of her ground gem. When Cinder landed the final blow ACottontail smiled as she had won the badge.
VS xx
ACottontail tackle hugged Cinder. She did it. ACottontail after many failed attempts had finally beaten the mega gym. She proudly held her gym badge. All of those failed attempts were worth it for this victory.
Proudly with the badge in hand, Cinder and ACottontail exited the gym, and went onto the next challenge.
Anyway that is how I beat the mega gym.
Has anyone else seen beta Wooper yet? A GS prototype was leaked and beta Wooper is literally one of the cutest things I've seen. I have to revamp it and animate it ASAP. It's just so cute!
I also really like Rayleep and Bomushka from the earlier prototypes leaked. I really like how Rayleep looks heavenly from one side and devilish on the other. I think it would have been a great dark and fairy type pokemon. Mantine just doesn't have the same charm. As for Bomushka I originally thought that fire seal was a ghost type when I first saw it's sprite in black and white. I thought it was balancing something like a Gastly on it's nose. I've been trying to revamp it into what I originally saw but getting the colors to look right is the end of me.
I finished them!
 They are so cute! The revamp took me 10m 06s while the animation took me 1h 24m 09s. I originally tried to make the animated one go up onto it's hind legs but it did not look right as it was coming down.
Also if you are wondering they are both free to use with credit. I would like it if you told me if you used the sprites somewhere as I love seeing other people use sprites that I've made somewhere.
They are so cute! The revamp took me 10m 06s while the animation took me 1h 24m 09s. I originally tried to make the animated one go up onto it's hind legs but it did not look right as it was coming down.
Also if you are wondering they are both free to use with credit. I would like it if you told me if you used the sprites somewhere as I love seeing other people use sprites that I've made somewhere.Cannot post: Please log in to post